Monday 28 February 2011

Charity shop finds

For this weeks magpie Monday charity shop post I thought I'd start with the replica copper ship lanterns we found in a charity shop for £3.99 last week, my husband loved them instantly. They hold tea light candles at the moment which would look quite atmospheric on the patio for outdoor eating on a summer evening but my husband has been wondering whether he can convert them to run off solar power.


Next as my little ones are important too, I thought I would show you a couple of the things that they have found. This train set cost cost us £1.75 it is a fisher price geotrax set, normally very expensive, we took a bit of a chance because we didn't know it worked but luckily after putting it together everything works. There are more parts than you can see in the photograph but they only built a small track today, hours of fun!


We found this wooden doll's cradle for £3.00, it needs a small repair to the rocker at the bottom and a re paint but the work will be worth it and will keep my husband busy. This is so sturdy that my children can sit in it, perfect for my daughter.


I also bought some circular knitting needles, two pairs for 25p bargain price, not really sure how much these cost in the shops nowadays but they can't be as cheap as that!


 this post will be linked as a magpie monday post on the blog me and my shadow by missielizzie.

Wednesday 23 February 2011

A look at February

Well, we started the month with learning about Imbolc, Chinese new year and Valentines day and the children enjoyed making many related crafts... we were very, very busy! So for the last week or so we have been having a more relaxed time. There has still been many crafts but of a more free style, sort of a raid the craft box and glue it all on paper style.


Since we made the 'bristlebot', a small robot, last year my son has been quite interested in electronics so we got a starter kit for him and he has been learning all about circuits.


The above photograph is of some parts of the starter electronics set that my husband has been helping him with, we will probably buy a more advanced set soon as he has been enjoying it a lot. My husband wrote about the electronics in greater detail if you would like to read further here.


There has also been much gardening, my husband made some new raised beds for vegetable planting and the children were very much involved in this. They helped with digging and planting and of course the bug hunting and the excavation for treasure! My husband has also written about making raised beds in further detail if you would like to make some yourself, totally from recycled materials.

We have been on some nature walks, looking at the bare trees and for the first signs of spring, using a guide for identifying trees from their bare twigs and buds which has been very informative. I found some vintage books for sale for £1.50 by Enid Blyton and we have been reading them together to while away the winter evenings... I found the language used in these adorable and old fashioned and the children love them very much.


You may remember from previous posts that I was putting together small crafts to make a Valentines day card for my husband, I made a woven heart and some paper quilled hearts then assembled them as you can see in the photograph below, don't worry it is a close up to spare you the details.


And that was February! 

Monday 21 February 2011

Vintage finds

I have recently noticed on twitter that a group of people have been blogging about their vintage and charity shop finds, and linking up as a Magpie Monday post. So I thought I would join in as this is one of my passions, and will start off this week with a couple of very small, cheap items that I have come across.


I have been looking out for various transfer printed plates in different colours for a long time now, I personally love the way food looks when displayed on them. So far I have only found one that I really like as vintage transfer plates seem to be very popular where I live and the charity shops very rarely have any in. The above plate was just 50p and not really that vintage but it is well liked here.


It has a frontier picture on the front and my daughter loves looking for the horses and cows in the scene, the above photograph is of the stamp on the back of the plate, appears to be American.


These candlesticks I originally saw and dismissed I'm ashamed to say, as they are not quite a matching pair I know that sounds so bad! After returning home, I realised my mistake and my lovely husband offered to go back to the charity shop and purchase them for me, luckily they were still there. They cost 80p for the pair, what a bargain! The slight differences are not really noticeable as they sit one at each end of the mantelpiece.


This little posy vase cost just 50p again and really wouldn't look out of place in many of the modern colour schemes, it reminds me of an owl for some reason, which is probably why I like it. It is hard to see from the photographs but the top colour almost has a texture to it.


 This is the bottom of the vase... I guess it comes from Devon!

Well that is an introduction to some of my stuff... what do you think?


The link up is over at the above blog, me and my shadow by missielizzie.

Sunday 13 February 2011

Woven paper hearts

As I said earlier I have been busy with little bits of crafting here and there to put on a card to give my husband on Valentines day. This time I have tried paper weaving, the same card strips that I have been using for quilling.


As you can see in the above photograph, it's just a simple under, over technique until you reach the required size. I haven't glued it at all as I plan to give the heart a paint effect but you could glue it if you choose to, you could also do this with coloured paper, to create a lovely design.


As with the quilled hearts I wanted to give the woven paper a vintage, antique feel so I started with a red paint and a very dry, stiff brush. I just lightly dipped my brush in the paint and then wiped most of the paint off before dragging the brush across the card, the effect looks a little like a fabric.


I then lightly sprayed over the red paint with gold spray, don't worry if you spray this too thick as you can gently rub off some of the gold after it is dry. This actually adds to the vintage look and you should end up with the red just showing like an undercoat.


I then decided to cut out a heart shape from the woven card, the paint should have fixed it together but if you find a loose bit a quick dab of glue should sort it out. At this stage you could really cut out any shape you want to, as long as you weave to the required size. I loved the heart like this but thought I would add some beads to see what it looked like.


I added tiny, little red beads at the point at which the card strips cross, I'm not really sure yet which I like better... with or without but I can change it back if I want to and the beads give the card an extra depth. So that is another little piece of the Valentines card finished, got to work on the design now for tomorrow, that is the hard part.

Paper quilled hearts

I have been working on a few small craft projects this last week, to use as decoration on the Valentines card that I am making for my husband. Obviously I can't show you the whole card because his desk is next to mine and he reads this. One of the crafts I tried before Christmas was paper quilling and I made these snowflakes, this time I have tried little hearts.


First I shredded my card with a paper shredder, the home made quilling tool that my husband made is also in the photograph, there is a link to make your own at the bottom of the snowflake post if you want to. I chose white paper as I had no red available but you can quill in any colour, saving time with the paint effects later.


These are the two different types of heart that I made, very simple ones as they are for the front of a card. The two at the sides are made by folding the strip of paper in half and just rolling the two ends inwards with the quilling tool and adding a spot of quick drying glue to hold the two curls together. The hearts at the top and bottom are made by rolling two whole strips up, letting them loosen slightly, then pinching one side to produce a tear shape. The two of these tear shapes are then glued together to give you the heart shape.


Then I thought I would give the hearts an old antique feel with paint effects, so first I sprayed them very lightly with a gold coloured spray paint. Lightly is the key word here because if the paper gets too wet the curls unroll. It is not the end of the world if they do though as you can just get the quilling tool and roll them up again, before they set.


 Then to give them a valentines feel I got a dry, stiff paint brush and lightly brushed red paint on the curls as you can see it has given them an interesting vintage look with the hint of redness. Now just have to complete the card.

Tuesday 8 February 2011

Crayon Heart Mobile

Valentines day is coming up very soon and the children have been getting involved in some heart related crafts. We loved the look of the crayon window pictures we had seen but we didn't have any waxed paper so at first we dismissed this idea but my husband came up with the idea of printing / staining normal paper with melted crayon, so we thought we would give it a go and see what happened.


As you can see the effect is rather stunning, we ended up printing flat sheets of paper and paper after it had been crumpled to see the different effects left by the melted crayon. After assembly our mobile looked like this.


Doesn't it look lovely?  The children love crafts and we are hoping to try as many different crafts as we can, this was the first time they had melted wax crayons and it was quite exciting. First we took some old broken crayons in valentine related colours and the children grated them.


They then sprinkled the gratings onto baking paper, we placed some card onto the table first to protect the wood surface.


After they were happy with their design, we put another sheet of baking paper over the crayons and ironed them until the gratings were melted. Keep checking as this happens very quickly.


After the wax crayon has melted and cooled very slightly, peel off the top layer of baking parchment and put a normal sheet of printer paper or any other paper onto the wax, replace the parchment and iron again. This time the wax will stain or print the normal paper, we managed to repeat this process several times before all the wax ran out, sometimes we crumpled up the paper first to get a different, textured effect.


Leave each stained sheet to dry, the photograph above is one of the crumpled pieces of paper drying. It doesn't take long to dry then you can cut out your chosen shapes, we have chosen hearts for valentines day.


We cut out lots of different size hearts, the photograph above shows the range and contrast in colours, patterns and textures of the paper.


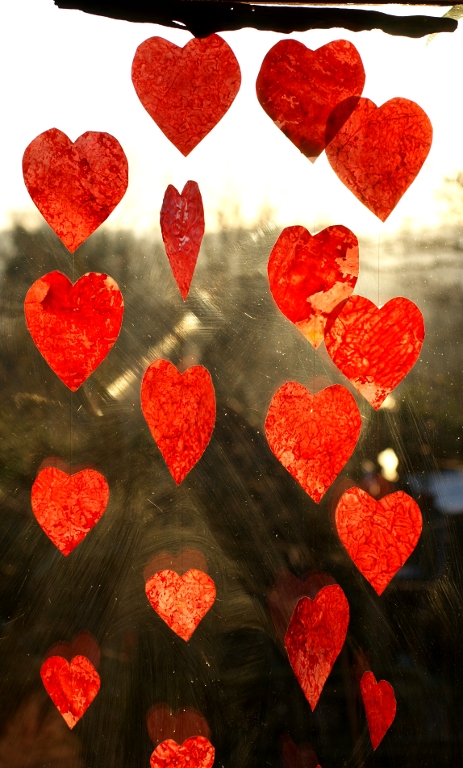
We then strung the hearts onto a piece of driftwood that we collected in the summer, any thing will do here you could even use any twig from the garden. We chose the driftwood as we felt it gave an interesting dimension to the mobile. Each piece of thread has to be long enough to accommodate how many hearts you chose to thread, we have threaded 4 or 5 on each string along with a wooden bead at the bottom to finish it off. You can use a needle to thread on the hearts and beads or just use invisible tape on the back.


There you have it an alternative way to use wax crayons to make something very pretty to hang in the window.


We had very little sun when we made this as it was a very cloudy day, but we had a few minutes to snap this picture to try to show the effect of the sun shining through the hearts. Trust me the photographs really do not do justice to the hearts at all.


They are very beautiful, each one is uniquely coloured and patterned.


As we made so many of these hearts, I have kept some in the craft stores to be used on other projects, I think they would look really nice on greetings cards or even gift labels.


Saturday 5 February 2011

Chinese new year and review


We have had so much fun learning about the Chinese new year celebrations, we have done many craft projects, some of them have been featured in previous posts. We have also located China on our globe and looked up it's flag, as part of our China project we have looked at traditional lion dancing, some of the history through stories and studied the well known story of how the new year animals came to be. We have also looked at some man made features and some of the geological features of the country, naturally, as there are many dinosaurs dug up there!

We didn't stop there though, the children are always very excited to learn new things, so my son tried out some Chinese writing, they both learned how to say 'happy new year' in Chinese and the chorus of a Chinese new year song. Which my 2 year old daughter has been singing constantly! We had a home cooked Chinese meal to celebrate with fortune cookies and of course they had the red envelopes that we made and filled with 8 coins each for luck.

The little gifts you can see in the above photograph were from my eldest daughter, who not only managed to find Chinese gifts, she also found some Chinese coins for the children to see close up. They had such a good time and learned so much they are now wondering what the next celebration is and which country we will be studying next. I'll have to get thinking on that one!


As for me, well I have been trying to crochet these mittens for my daughter... trying being the appropriate word, she has lost hers and as it is still a little cold so she will need some for about another month. I decided to crochet the mittens as it looked easier than knitting them, the thumbs had me confused every time! I know they are not perfect or even close to looking like the pattern but they will do for a month and she loves them. When it gets warmer I'm going to pull them out and try again with a simpler pattern for next winter. It's all good practice isn't it?... and I obviously need lots of practice!