Showing posts with label autumn. Show all posts

Monday, 14 October 2019

Crab Apple Jelly


It's that time of year again when we are having to harvest and preserve all our crops to see us through the winter. Crab apples are often left on trees and not used as they are small and very sharp tasting but it is very easy to turn them into a delicious jelly, jam or wine. We love their taste so much my husband bought me some trees as a gift a few years ago, so we can now harvest our own from the garden.


After harvesting, I usually wash and chop the apples in half to check they are good and not full of insects or rotten inside. Place all your apples into a large pan and add enough water to just reach the top of the apples, the juice of a lemon can be added to help prevent browning of the apples although it's not compulsory, then boil until the apples turn to a pulp.


I leave the cooked apple pulp mixture to cook slightly as it's much easier to get cooled apple into a jelly bag or muslin bag to strain and you are far less likely to burn yourself in the process.

The straining may take some time, maybe even a few hours and I usually tie my jelly bag onto the handle of the kitchen cupboard so that I can leave it and come back to it later. It is important not to squeeze the jelly bag if you would like clear jelly.


You may notice that I haven't given you exact weights and measurements so far... that's because the measurement that matters most is the ratio of sugar to strained liquid. Learning the basic rules like this mean you can make a little or as much jelly as you want, depending on your quantities of apples available.

Once your apple liquid has finished straining measure it and return it to the cooking pan, use a like for like ratio when you add your sugar. For example if you have a litre of liquid add 1 kilogram of sugar. Notice I've used both metric measurements here, if you are using imperial it would be the same ratio but in pints/pounds.


Apples have a high pectin content so it's not necessary to add any further pectin, bring your liquid and sugar to the boil stirring constantly. To check if your jelly will set a plate which has been in the freezer for a little while should help, spoon a little jelly onto the cold plate a leave it for a minute or two to cool. Once cooled, slide your finger through the jelly, it should wrinkle up if it's ready to jar up. If not boil a little longer until you have reached the wrinkle stage.


Pour into sterilised jars and leave to cool, I always find this jelly has a very firm set even though it looks like it will never set. This is one of my favourite jellies and tastes amazing on toast or scones.

Wednesday, 29 November 2017

Pine Cone Garland

I recently posted some photographs of our pine cone garlands on social media and was inundated with questions on how to make these and many people commented on how beautiful the finished garlands looked. So I have decided to post a little guide on our very thrifty and natural Autumn, Yule or Christmas garland decorations.


My husband and I decided over 12 years ago that we would embrace thrifty living... no more shop bought decorations for us!!... Everything we wanted we would make as thriftily as possible. Not only has this saved us so much money, unpacking our lovingly, handmade Christmas decorations every year holds so many memories.

I absolutely love the simplicity and natural beauty of these pine cone garlands, the one above was made for Autumn but I also have one that was made for Christmas a few years ago which has a few more sparkles.


First you will need to collect some pine cones, we usually grab a few throughout the year as we find them. The amount of pine cones you need will depend on the length of garland required, I'm using seven for my mantle piece. I usually leave them outside for a little while to ensure that any critters safely leave the pine cones.


To make the fixings we are using screw eyelets, they are really cheap only a few pence for a bag. I have managed to screw these directly into the end of the pine cone by hand but it is a little fiddly, so if you need help starting your hole, a very thin drill bit may give you a start.


 Next just thread your pine cones onto your chosen string or ribbon, we are using natural jute string here but ribbons work just as well and there is less movement of the pine cones. You may notice if using string that all the pine cones slip to the middle when you try to create a swag in your garland, you could tie them on to keep them still... but I have another remedy for this...


A little trick which allows you to easily fix them in place but still allows them to be movable if you need to change the position of a pine cone. Thread the string through your eyelet and then thread it through again, as seen in the above photo... so you create a loop.


This simple act gives your pine cone a little more resistance so that you can move it but it doesn't slip down the string.

These garlands can be kept natural or decorated for Christmas with a little glitter, paint or fake snow... the best part is it has literally taken a few minutes and cost a few pennies to make, and this beautiful garland can be reused every year.

Thursday, 27 October 2016

Home education update October 2016

The last few weeks have been quite busy, Autumn always is with all the food preservation from the allotment and finishing off the summer projects. The children have been busy with days out, drawing, making Halloween crafts and writing books as well as going swimming and a new home ed sports club. They have also been enjoying the experiments in some science kits with Dad.


Some of the experiments were exploring densities, this first one is to recreate a kind of Lava lamp. They started by pouring water and oil into a jar, waiting for the liquids to separate then they added food colouring and salt. The salt dropped through the oil layer talking some oil with it, after the salt dissolved the oil returned to the top in what looked like bubbles. We have added a short video to show this in action.


The next experiment was to create the look of fireworks in a bowl of water. They first mixed oil and food colouring together and poured the mixture into a large bowl of water.


The oil and food colouring mixture rose to the surface but after a few minutes the food colouring began to sink down and look a little like fireworks, or streaks of colour. We have added a short video to show this in action too.


There was also a fizz bomb experiment but that really didn't work at all well. They then tried out the volcano experiment with vinegar, food colouring and bicarbonate of soda. The first time they tried not much happened at all, just a bit of a trickle, it was a bit of an anticlimax so Dad added more ingredients, this time it worked much better... a little too well.


So well in fact that it left a big red stain on the ceiling! I have spared you the video on this experiment as there was a lot of screaming.


We have enjoyed some lovely nature walks looking at all the leaves changing colour and the jewel like berries and visits to the beach for Autumn beach combing.


Also a trip to the local sea life centre, where the children watched the rays for what seemed like hours and got the chance to see the turtle having his lunch.


Monday, 13 October 2014

Autumn Critter Craft

Autumn can be a magical time of year for children to explore nature with the last of the harvests, the leaves going through a beautiful colour change and then falling along with their nuts and seeds. Our children love to go for long walks and collect many things including pine cones, conkers, teasels and beautiful leaves to use in Autumn crafting of one sort or another. This year they have decided to make some autumn critters with the things they have collected.


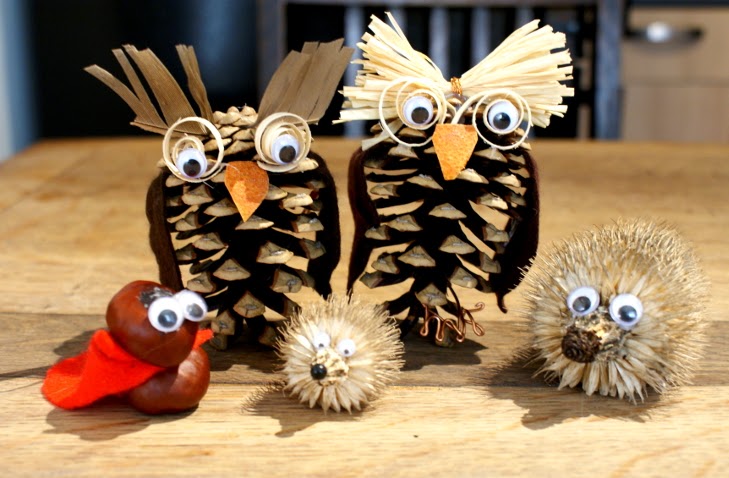
Many things that can be imagined by little ones can be easily made, start with the items you have managed to collect and see where your imagination takes you. As you can see we have made owls, hedgehogs and even conker man!


These are some of the things we started with, the little hedgehog seems like an obvious choice using the prickly teasel.


We have used the stalk as a nose and trimmed back some of the spikes at the stalk end until we had the desired length... this is quite prickly so little ones may need help or gloves. I found the teasel less prickly if you trim a tiny piece off the end of each spike, a bit like giving it a hair cut. Then all we did was add a nose and some googly eyes.


We love owls and the pine cone seemed to lend itself perfectly to the shape of an owl, so all we have done is add a few extra features to make it look a little more owl like. Conker man was made by my youngest daughter using a match stick and glue to hold his head on, she also gave him a lovely red super hero cape and has also been making him a family... so we now have a whole bunch of conker people.

 A few years ago we made nature faeries with our autumn collections if you would like to see I have added the link.


If you decide to collect some Autumn things on your nature walks let us know what you made. Have fun!


Wednesday, 30 November 2011

Autumn Leaf Bowls

Just time to fit in one last craft the children have been doing for Autumn before the season changes, this time we have made leaf shaped clay pots or candle holders. My eldest children made some like these when they were very small and I can remember some children making them when I was at school. So we thought we would have a go using a pack of air drying clay after seeing some recently which reminded me of how pretty the bowls looked.


First thing we did was print and cut out some leaf templates and chose one each, then we rolled out the clay to the required thickness. We rolled ours out quite thin but I think if we make some more I will leave the clay slightly thicker as I was terrified that the children would break them.


My husband put the leaf template onto the clay and cut round them all and we added a few leaf details onto the clay. For more realistic looking veins you could press real leaves into the clay and cut around them.


The cut out leaf was then placed onto a bowl, so that it curled around it and left to completely dry, we used several different sized bowls so that each leaf had a unique shape. There is a lot of waiting to dry in this craft so a little patience is required.


After the clay has dried it was possible to paint the bottom of the leaf while it was still on the bowl, we used acrylic paint for this. After the painted base has dried you can remove your leaf bowl and paint the inside, we started to paint them in Autumnal colours but the children decided to add extra colours to the inside of the bowls.


This is what we ended up with, after adding a little extra sparkle as it is coming up to Christmas. My daughter's one is mostly red, my son has added a little blue glitter and I painted mine red and lightly sprayed it with gold paint. They are not quite finished yet as we will be adding a couple of layers of varnish to make them a little stronger and easier to clean.


It looks very Autumnal with a candle in it, although we are now seeing the start of Winter. My son also made some casts of dinosaur footprints with the left over clay, just like the fossil ones.


Wednesday, 9 November 2011

Autumn Tea light holders

Just a quick post to show you some of the themed tea light holders we made this Autumn, which would look lovely at any bonfire or fireworks party. If you are a regular reader you may remember we made our tea light holders from old recycled jars earlier in the year, if you need to recap on how to put the wire on the top you can find them here.


We have two small schumacher trees in the garden and we waited for the leaves to change colour to make the bonfire picture I wrote about yesterday. With the leaves left over from the children's crafts we glued some on a couple of jars, any leaves can be used last year we used maple leaves and earlier in the year we used leaf skeletons. The schumacher  leaves have the appearance of flames and the beautiful glow they give off when lit make a lovely Autumn addition to any garden.


Here they are after dark, I think they look quite magical like little tiny bonfires. We made these as temporary lanterns for Autumn, and are hoping to make more seasonal ones in the future. If you would like to preserve the leaves and make this autumnal lantern last a little longer you could totally cover the leaves in craft glue or modge podge to seal them in.


Inspire Me Beautiful

Wednesday, 21 September 2011

Nature Faeries

The Autumn Equinox falls on the 23rd of September this year and is the second of the three pagan harvest festivals otherwise called Mabon. We have been on several nature walks but have only collected a few Autumn things for our display so far, therefore the nature faerie craft will be using these natural things like pine cones and acorns.


First select a pine cone for the body and an acorn for the head for each faerie you want to make, we pulled the pointed end off the pine cones to allow a good place for the head to sit.


When it comes to gluing this sort of stuff I have found using a hot glue gun to be the most efficient way, it dries fast and holds well, this means helping the little ones so no one get hot glue on their fingers, but much better than waiting hours for the glue to dry.


This is what they look like with their heads attached, acorns were used with the cups removed for now. Then we added hair, my daughter was very insistent that they should have pink or multi coloured hair and helped to choose the wool. We stuck the hair on the top of the head with a spot of glue and then added the acorn cup as a hat with another spot of glue.


Starting to look a little more faerie like now, next step is to add facial features, we have used googly eyes and sparkly lips, of course.


Nearly done now, sycamore seed pods were used to create wings as that is what we had close to hand but you could use beautiful autumn red maple leaves or the round moon like honesty seed pods.


There you go, Autumn nature faeries, perfect to play with or they can be hung up on display or secretly hidden in the garden for the little ones to find and be surprised by. My husband also helped me with another idea to add little feet so that the faeries could stand, he cut off a couple of one of the larger pine cones scales and glued them to the bottom. I think it makes him look like he is wearing clogs.


If you prefer a more natural look to the faeries, they look just as good without the rainbow hair and googly eyes as you can see below.


This one was made in the same way as the others but without all the added cuteness from the children. I have added cotton to the back and hung it on a plant...hmm...gives me an idea about Christmas or Yule decorations, think I will make some more and spray them in silver or some other festive colour to hang on the tree...Enjoy the Equinox.


Thursday, 14 October 2010

Beach Love


How I do love the earth. I feel it thrill under my feet. I feel somehow as if it were conscious of my love, as if something passed into my dancing blood from it. --James Russell Lowell


A couple of days ago we visited the beach, an Autumn visit, to compare the difference in the things washed ashore by the sea at different times of year. We visited earlier in the year too, in spring, and went beach combing, the things we found this time were a lot different to the spring visit. It was wonderful to get to the beach again and we chose a really sunny day, even though we went to a beach with a town attached it was so quiet, hardly a soul to be seen strolling on the sand.

Spring

On the spring visit we found mostly young cuttlefish bones and some shark and ray egg cases. The photographs show a small sample of our finds. On our Autumn visit, there were no cuttlefish bones, there were a few egg cases (or 'mermaids purses' ) but this time we mostly found a few different kinds of shells. Mussel shells, dog whelk shells, some limpets and slipper limpets. Also much driftwood.

Autumn

We have decided to make some things from our finds to remind us of the times we spent on the seashore. I will post about the things we make at a later time but we have decided to use some of the small perfect whelk shells as jewellery charms for bracelets and to make some beach wind chimes with some of the other things.


Before leaving the seashore , while the children were playing, I took a little time to myself to feel at one with nature. Just for a second between the beach combing and playing I looked far out to sea and took a deep breath... with the wind in my hair and the sand between my toes, then as the breath left my lips I felt a kind of peace, a calmness spread over me... just for a second, I felt the freedom of the gulls and the wildness of the seals... then the call came to leave.


After our beach adventures, we decided to visit the sea life centre, which again we mostly had to ourselves. The children had the the touch pool all to themselves and the staff still gave them the educational talks. They got to touch a large crab, stroke a starfish and be cleaned by a sea anemone. There were some very happy children that day! We absolutely adore the seashore, my children especially, and often speculate what it would be like to live by the sea.

I wonder... does the seashore still hold it's magical quality if you see it everyday?

photographs numbered 1,4 and 5 were taken by my lovely husband.found here.