Thursday 27 October 2016

Home education update October 2016

The last few weeks have been quite busy, Autumn always is with all the food preservation from the allotment and finishing off the summer projects. The children have been busy with days out, drawing, making Halloween crafts and writing books as well as going swimming and a new home ed sports club. They have also been enjoying the experiments in some science kits with Dad.


Some of the experiments were exploring densities, this first one is to recreate a kind of Lava lamp. They started by pouring water and oil into a jar, waiting for the liquids to separate then they added food colouring and salt. The salt dropped through the oil layer talking some oil with it, after the salt dissolved the oil returned to the top in what looked like bubbles. We have added a short video to show this in action.


The next experiment was to create the look of fireworks in a bowl of water. They first mixed oil and food colouring together and poured the mixture into a large bowl of water.


The oil and food colouring mixture rose to the surface but after a few minutes the food colouring began to sink down and look a little like fireworks, or streaks of colour. We have added a short video to show this in action too.


There was also a fizz bomb experiment but that really didn't work at all well. They then tried out the volcano experiment with vinegar, food colouring and bicarbonate of soda. The first time they tried not much happened at all, just a bit of a trickle, it was a bit of an anticlimax so Dad added more ingredients, this time it worked much better... a little too well.


So well in fact that it left a big red stain on the ceiling! I have spared you the video on this experiment as there was a lot of screaming.


We have enjoyed some lovely nature walks looking at all the leaves changing colour and the jewel like berries and visits to the beach for Autumn beach combing.


Also a trip to the local sea life centre, where the children watched the rays for what seemed like hours and got the chance to see the turtle having his lunch.


Sunday 23 October 2016

Halloween Dementor Head


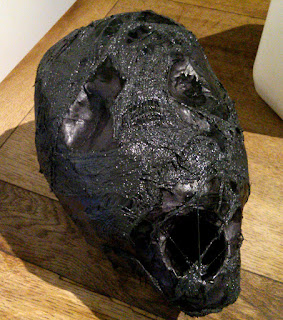
Last year for Halloween the children had a Harry Potter themed party, we decorated the house accordingly and added many homemade props, one of which was a dementor hidden in the stairs. If you read my wonderful husband's blog you will have seen the post he wrote recently on the amazing Dementor hands  he made, I had the job of making the head.


We have made papier mache figures and crafts before but nothing quite this large! As you can see from the photograph I have filled a paper cat food bag with newspaper and used egg boxes and a card tube to make the hollows for the eyes and mouth cavity. Sticky tape has been used to obtain the head shape and to keep the details we have added in the correct position. It doesn't matter how much sticky tape you use to get the shape as this will be covered by the next stage.


Completely cover your model with several layers of newspaper and PVA glue, I tend to use my hands here to finish as you can further mould and smooth it to shape better than with a brush. Leave to dry for a while and it could be painted if you prefer.


However, we chose to cover the head with another layer of papier mache, only this time we used black paper. Is it starting to look quite scary yet?


We wanted to give our head a little more texture so that it had the appearance of being older and more decayed and ripped up gauze seemed to be the way to go.


First we mixed a little black poster paint with PVA glue and dipped our gauze into it. Then simply applied small pieces to the head until we achieved the desired effect.


As you can see it looks quite creepy! The children are still wondering whether to add some more spooky effects.... After it has dried you can assemble your dementor, we fixed the head and hands to long sticks and covered these with long black fabric. It really looked very scary hiding in the stairwell.

Hope you have a Spooky Halloween from everyone here.

Monday 19 September 2016

Heritage open days 2016

Last week the Heritage free open days took up a lot of our time, we love this time of year and to get the chance to visit some of our local Heritage sites is always very exciting. Day one started with two garden tours, the Bishop's beautiful garden is a favourite of ours and has many different plants from all over the world.


This year there was an added attraction for the children, the Bishop's cat! Well we assume it was the Bishop's cat as it came running from the house to greet us and insisted on giving us a tour of the woodland gardens.


The children love the wildflower maze and the large swing that hangs from a very old tree near the ruins. As these visits coincided with the anniversary of when we first met, my husband and I took some photos of us sitting on this swing as a memento of the many wonderful years we have spent together.


The garden has some quite quirky plants like a tree that oozes the smell of curry, and a vine with flowers that resemble snails and smells incredible. Did I mention the little cat?... best buddies, they spent ages together.


After lunch we went on to look around a gallery housed in an old Victorian skating rink with a unique and extremely vast collection of South Asian art and objects. Followed by a medieval church in which our children got the chance to try their hand at some brass rubbing.


Day two we visited two small museums, another church and an old shawl and clothing exhibition. The first Museum is in a centuries old merchants house with a 14th century under croft and very old herb garden. We got to try on costumes, play old games, learn to write in Tudor letters, complete a shakespeare quiz and make old puppets on sticks.


We finished the week on day three with a visit to the castle museum, the children got to watch and chat to some stone masons at work which was very interesting. My daughter made a crown and they both made a shield using the heraldry pictures to describe themselves.


We had a wonderful time visiting all these places and were extremely exhausted by the end of the week.

Tuesday 6 September 2016

Not back to school 2016

Over the years we have been to theme parks, zoos, beaches and picnics to mark the occasion of not going back to school as a home educating family... it has become a kind of tradition. However this year we have decided to take a more leisurely approach to the day as we have a really busy week planned out ahead of us.


So to start the day we went to visit a local park for a spot of hill rolling and playing, it turned out to be quite a relaxing day.


After this we went on a nature walk to look for the common lizard colony we have been watching for a few years. Many of them were out sunning themselves and we even managed to spot several young baby ones which shows the colony is doing quite well. Thank-you to my wonderful husband for this photo as they move to fast for me.


We also took the chance to collect the elderberries for this seasons elderberry syrup, we had noticed that they were very ripe and didn't want to miss the chance to be ready for the cold and flu season.


If you would like to make your own elderberry syrup or to read about it a little more, my post can be found right here.

Wednesday 31 August 2016

Glass Ball and Wire Cane Tops

Our garden backs onto the countryside with a small river running past, every summer beautiful dragonflies and damselflies fill every available space and when the seasons change we start to miss them. So we came up with the idea of making a small piece of sculpture to brighten the garden during the cold winter months using some of the parts from a broken mobile.


This is the broken mobile... I kept the parts as we have a passion for recycling and reusing things but the cane tops can just as easily be made with garden wire and glass balls or marbles if you fancy making some yourself.


The first thing we did was make the body of the dragonfly, my husband used a bar with a hole in to hold the wire still, but a cane works just as well. Put the end of the wire into the hole and keep winding the wire round until it starts to resemble a large spring and could fit the required amount of marbles in. We have used six marbles in total.


With the marbles pushed into the spring it automatically starts to look like the body of a dragonfly, you can then use pliers to spiral the wire at the end to finish it off nicely, leaving a little excess wire at the head end to attach to the cane. We have used a larger marble for the head.


We have made the wings with a slightly thinner garden wire because it is so much easier to shape and can be bought very cheaply. Once you have your wing shape twist the wire together to hold it in place remembering to leave enough spare wire on the underside of the wings to fix onto the body of your dragonfly.


A little detail was added using very thin wire and beads, this was wound around the edges of the wings to fix them in place and create a representation of the veining on the dragonflies wings.


Then all that's left to do is fix the wings to the body by wrapping the long piece of wire around the body. A glass bead can be fixed to the insects thorax to cover the knotted wire using hot glue or resin. In the photograph above you can see some of the other things we have made using the glass balls and wire from the broken mobile.


These garden cane tops have been made in a similar way to the dragonfly using a simple spiral to hold the glass balls and adding a few beads as a finishing touch. I have left the bottom end of the wire straight to slide into the end of a bamboo cane but they can also be spiralled to slip over the top of the cane.


Here is the finished dragonfly in the garden, the wire at the front of it's head was straightened and slid into the top of a bamboo cane, which is hidden by the bush. As the body has been made using a spring shape and it is only fixed to the cane at the front it has given the sculpture a subtle movement which has enchanted the children.


These are some of the cane tops which remind us of little moons orbiting planets and definitely liven up a dull looking cane. A small magical touch to add a little cheer to the gardens in the winter.

As there have been a few reports of fires caused by people having glass on sunny window ledges we will be using these to brighten pots in shady corners.


Tuesday 16 August 2016

Rock pooling

We recently went on an educational adventure to one of our local beaches to explore the rock pools. The beach we chose has an interesting chalky foreshore and lots of flints leading to a range of good rock pools and even some fossils.


The children started searching the pools as soon as the tide started to recede, with the hope of finding something new. They were very soon rewarded with something we hadn't seen in a rock pool before... a moon jellyfish... in fact we found several different kinds of jelly fish by the time the day was over.


The jellyfish was quite large, it was approximately the size of an adult hand and you can see the exposed chalk foreshore behind it. Another new sighting for us occurred not long after when we spotted a shedding or moulting shore crab, it was a chance which was too good to miss so we have taken a short video for you to see.


We waited for the crab to move away and hide in the weed and decided to look at the now empty crab shell, it had stayed together and from a distance still looked like an actual crab.


This was a lovely experience for the children and after this we found many crabs that had also moulted and quite a few cast off shells.


There were hundreds of tiny baby crabs all over the pools most of them much smaller than my daughters little finger nail. We also found a few hermit crabs and managed to take a really short video of one for you to see.


As the day went on we had found many of the usual rock pooling finds like anemones, winkles, prawns and even some tiny fish. Although we never seem to find starfish at this beach.


There are a few of our finds in this bucket, although we did have to empty it often to stop it getting too full. Below is a close up of one of the small crabs caught in our net.


As I mentioned before this place is very good for finding fossils, even in the chalk foreshore belemnites are a common find and often get washed out of the chalk after the high tide.


These are some of our fossil finds today, previously we have found sea urchins and sea sponges. This beach is a place of scientific interest because of the exposed fossil beds in the cliffs and we intend to revisit in the Autumn to examine the geology in more detail and see if any fossils have been exposed at high tide. A steppe Mammoth was found in the freshwater fossil beds at the base of these cliffs a few years ago and the children are quite excited to see where it was found.

You can read more about West Runton here, this site also directs you to good sites to explore for fossils in your area.

The photographs and videos on this post were taken by my wonderful husband.

Wednesday 10 August 2016

Berry Cordial

Following on from my last post, we are still inundated with various berries, our currants have had especially large crops this year. As I hate things to go to waste we have decided to make a berry cordial for the children to enjoy in the late summer sunshine.


We have used 500g of mixed berries, make sure these are clean but there is no need to remove the stalks or pips as we will be putting the mixture through a straining bag to remove them later.


Place the berries in a pan, add a litre of water and bring to the boil. I have used a potato masher whilst the mixture is cooking to help release the juice from the berries.


Turn of the heat after about 10 minutes as the berries should have broken down and leave the mixture to infuse and cool slightly. As you can see in the photographs the juice is a beautiful, rich jewel colour.


After it has cooled slightly pour the mixture through a straining bag or some muslin to get rid of all stalks and pips and leave you with a lovely clear liquid.


Measure your liquid once strained as you need to add approximately half the amount of sugar to liquid when you return it to the heat. I had 700g of liquid once the straining had finished so I intended to add 350g of sugar but as the berries I used were very sharp tasting we found we needed to add a little more to suit the children's taste buds. Once your liquid is returned to the heat and the sugar has dissolved your cordial should look quite syrupy and can now be bottled up into a sterilised bottle.


This is a cordial so it needs to be diluted in water like a squash when it comes to drink it. This smells amazing and very strongly of the berries added and the children loved their drink. We also used some of this diluted cordial to make our ice lollies for warm summer days.

Friday 29 July 2016

Red Currant Jelly

We have a large redcurrant bush in our garden and this year it has given us a bumper crop of berries, over two kilos and still going. So we have been thinking of extra things to make to preserve the berries into the winter.


Looking into the history of redcurrant jelly, I found that it was traditionally used in England as an accompaniment for Sunday roasts and Christmas dinner before the cranberry version was introduced from America and became the norm.


I decided to just make a small batch of redcurrant jelly, mostly to keep for the festive season and my husband has used the remaining berries for a batch of homemade wine, which I have to say smells amazing. The recipe I have used is a very simple one just using an equal amount of berries to sugar, the same as I use for all the jams and jellies I make.


First clean your berries, there is no need to de-stalk them as we will be straining the mixture through a jelly bag later. A sieve and a piece of muslin will do if you do not own a jelly bag. I have used 500 grams of berries and just covered them in the pan with water as you can see above.


Boil the berries for a few minutes until they soften using a masher or back of a spoon to help release the juices. Then allow to cool for a while before straining the mixture through the jelly bag to remove any stalks and pips. Try not to squeeze the jelly bag while it is straining as this may give you a cloudy jelly, some people prefer to leave this over night.


Once you have your strained mixture it should be a beautiful clear jewel colour, you can then measure how much fluid you have to see how much sugar you need to add.

** Remember**  if you have 500 ml of fluid you will need to add 500 grams of sugar ... keep this measurement like for like and you can't really go wrong. ( keep to either both metric or both imperial)

Return your fruit and sugar mixture to the pan and bring to a boil, stirring all the time, to get your setting point, this will probably only take about 5 to 10 minutes. You can check if your jelly has reached a setting point by placing a small drop onto a cold plate, after a couple of minutes this drop will wrinkle when you push your finger into it.


Then simply pour into your sterilised jars and allow to cool.... I will need to add a sticker to mine saying do not open until Christmas dinner or there may not be any left.