Showing posts with label wire. Show all posts

Wednesday, 31 August 2016

Glass Ball and Wire Cane Tops

Our garden backs onto the countryside with a small river running past, every summer beautiful dragonflies and damselflies fill every available space and when the seasons change we start to miss them. So we came up with the idea of making a small piece of sculpture to brighten the garden during the cold winter months using some of the parts from a broken mobile.


This is the broken mobile... I kept the parts as we have a passion for recycling and reusing things but the cane tops can just as easily be made with garden wire and glass balls or marbles if you fancy making some yourself.


The first thing we did was make the body of the dragonfly, my husband used a bar with a hole in to hold the wire still, but a cane works just as well. Put the end of the wire into the hole and keep winding the wire round until it starts to resemble a large spring and could fit the required amount of marbles in. We have used six marbles in total.


With the marbles pushed into the spring it automatically starts to look like the body of a dragonfly, you can then use pliers to spiral the wire at the end to finish it off nicely, leaving a little excess wire at the head end to attach to the cane. We have used a larger marble for the head.


We have made the wings with a slightly thinner garden wire because it is so much easier to shape and can be bought very cheaply. Once you have your wing shape twist the wire together to hold it in place remembering to leave enough spare wire on the underside of the wings to fix onto the body of your dragonfly.


A little detail was added using very thin wire and beads, this was wound around the edges of the wings to fix them in place and create a representation of the veining on the dragonflies wings.


Then all that's left to do is fix the wings to the body by wrapping the long piece of wire around the body. A glass bead can be fixed to the insects thorax to cover the knotted wire using hot glue or resin. In the photograph above you can see some of the other things we have made using the glass balls and wire from the broken mobile.


These garden cane tops have been made in a similar way to the dragonfly using a simple spiral to hold the glass balls and adding a few beads as a finishing touch. I have left the bottom end of the wire straight to slide into the end of a bamboo cane but they can also be spiralled to slip over the top of the cane.


Here is the finished dragonfly in the garden, the wire at the front of it's head was straightened and slid into the top of a bamboo cane, which is hidden by the bush. As the body has been made using a spring shape and it is only fixed to the cane at the front it has given the sculpture a subtle movement which has enchanted the children.


These are some of the cane tops which remind us of little moons orbiting planets and definitely liven up a dull looking cane. A small magical touch to add a little cheer to the gardens in the winter.

As there have been a few reports of fires caused by people having glass on sunny window ledges we will be using these to brighten pots in shady corners.


Saturday, 21 December 2013

Wool Wrapped Wire Reindeer

Yesterday I wrote about the wool wrapped wire snowflakes we made... Today I'm bringing you something much cuter, Rudolf the red nosed reindeer, made in the same way as the snowflakes.


We started in a similar way to the snowflakes, my husband began by drilling small holes into some left over dowel and inserting the wire to make a reindeer shape as seen in the photo below. My daughter also made one with an old cork and some wooden skewers as you will see in the last photo.


After getting the basic shape I then wrapped the entire reindeer in brown wool until every last piece was covered. I managed to use one continuous piece of wool again as this is easier to fasten off the end with a spot of glue.


To finish I toyed with the idea of a small, shiny red button or bead for his nose but in the end we opted for a little red pom pom and a quick spray of glitter.


He makes a very cute addition to our festive decorations this year, my daughter absolutely loves him and has made one of her own. She decided to paint her reindeer instead of wrapping him in wool.


 And then there were two...


Friday, 20 December 2013

Wool Wrapped Wire Snowflakes

Every year we try to make some new decorations for our tree, this year we have been so busy I'm only just getting around to posting them here. One of my favourite things were the wool wrapped wire snowflakes... so simple but they look so lovely on the tree.


First I made the basic shape of a snowflake with wire, any wire will do as it will be covered, I've just used cheap garden wire. My husband soldered three lengths of wire in the middle to hold them together but it is possible just to wind the wire to get the basic shape. The smaller pieces of wire on each arm are just wrapped around the larger wire, once the wool is added they will fix better in place.


Then it's time to wrap the entire wire snowflake in wool, I used white for snow. I did this in one continuous piece starting from the centre and going down each arm in turn then back to the centre so that it is covered with two layers of wool, before going down the next arm. This made it easier to fix the end of the wool when the snowflake is completely covered with just one spot of glue.


When the wool wrapping is finished your snowflake will look like the photograph above. I decided to add a tiny pearl bead to the end of each wire like a little stopper, adding a spot of glue to hold it on. This not only looks pretty it also covers the wire ends in case it is a little scratchy and helps to hold all the wool in place.


Here is the finished snowflake after a quick spray with glitter spray, ready to have a loop added to hang on the tree. These look gorgeous hanging on the tree, are very simple and quick to make and we think they look quite stylish too.


We would like to take the chance to wish you all a Merry Yule / Christmas from all of us here.


Tuesday, 10 December 2013

Garden Charms and Bird Treats

At this time of year, as the weather gets colder, our thoughts go to feeding the birds. This is our way of giving something back to nature to replace the berries we foraged in autumn. As well as making sure the bird table and feeders are full we have also been making some garden charms, which look very pretty hanging in the trees and provide an extra feast for our feathered friends.


For the charms we have used some garden wire bent into the shape of a heart or star and various dried berries and nuts. The heart shape has been threaded with rosehips and raisins.


When fully threaded the shape was secured safely with either tape, string or wire and a loop was added to hang it on the tree.


We also made a star shape which was threaded with chestnuts and Rowan berries. It is harder to see the shape of this one as the chestnuts are much larger. Anything that birds find tasty can be threaded onto your wire shape and they look gorgeous hanging in the garden.


The pine cone feeders have been a firm favourite with the children for quite a few years now. First attach string or wire for attaching the feeder to the tree as seen in the above photo. Then coat your pine cone with either peanut butter or lard and roll it in bird seed.


These little pine cone feeders usually attract the small birds that are a bit nervous about visiting the bird table when larger birds are around. They are very simple and a lot of fun to make even for very small children.


I will leave you with a couple of photographs of the garden charms and pine cone bird feeders hanging in the trees. They add some much needed colour to the garden this time of year.


The children love feeding the birds and this also provides them with extra opportunities for bird watching.


Friday, 17 February 2012

wire bending

Recently when we were experimenting with the wire bending for the frame of the wooden hearts, I got a little carried away and decided to explore this project a little further, as you do. So began by twisting garden wire into a heart shape, very easy to do with thick gloves and a pair of pliers, I'm also thinking of doing spirals.


This is what I ended up with... it will be a plant support and I am going to be hanging something in the middle with the name of the seedling on but haven't quite got that far yet. As it has a rounded top you won't accidentally poke yourself in the eye whilst gardening either unlike normal canes.


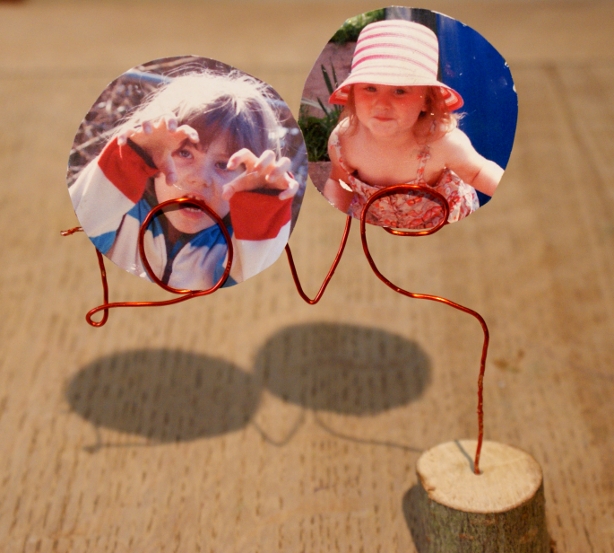
I also had a go at writing with wire as you can see above.... it's a bit shaky but it is definitely still readable... just about. I have used a much thinner, red wire for this and pushed the end into a small piece of wood so that it stands up alone and can be used as a quirky photograph or memo holder.


Although I am tempted to fix the wire to the top of our family pin board along with the two little photographs.