As Halloween is approaching fast we thought we would have a go at some seasonally inspired paper quilling choosing a bat and pumpkin to try and quill. First you need a quilling tool and paper, I use a quilling tool made for me by my husband, I will put a link at the bottom of the page if you would like to make your own tool and we have used a paper shredder to shred the card for quilling.
Start by making a spiral and this is done by rolling the paper around the quilling tool as seen in the above photograph, continue until all of the strip of paper is tightly rolled.
Remove your coil from the tool and allow it to loosen to the desired size, you should be left with a spiral like the one above. Once it has loosened enough put a spot of glue on the loose end to fix it and you are ready to mould it to the shape you require.
For the bat's body I allowed the spiral to open up quite a way to give a larger shape then squeeze the bottom until it has a point like the one shown above.
Then squeeze the top down while holding the shape firming on each side, this will give you the heart shape shown above. Once you have achieved this shape pinch the two top points or ears as they will become, this will make them more bat like.
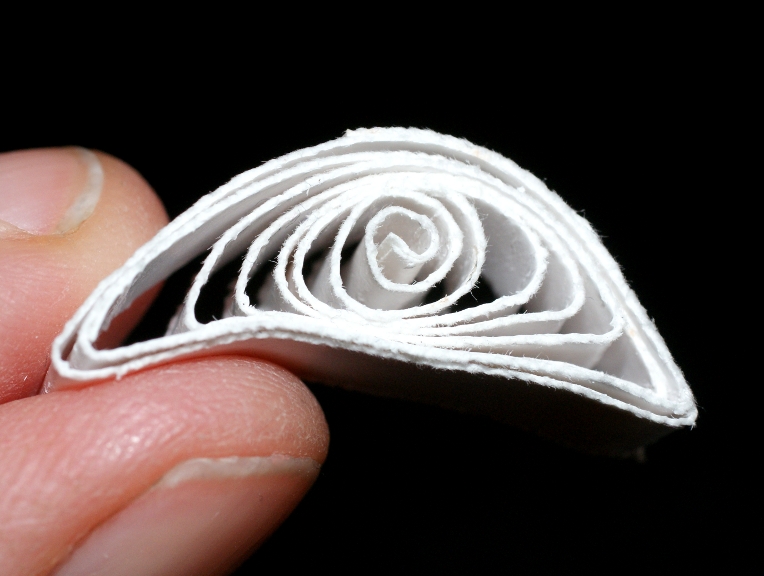
Next you need to make four semi circles, all shapes start as a circle on the quilling tool, then the above shape is made by pinching both sides downwards. The more you pull it down, the more pronounced the bat wing shape is.
Once you have your body shape and four semi circles you can glue them together like the above photograph shows to give you the basic bat shape.
For the pumpkin you need to make another two semi circle shapes and one eye shaped one, which is made by just squeezing both sides of the initial circle. These three shapes then need to be stuck together, with the eye shape in the middle.
We have pinched the top of the middle shape to make the stalk of the pumpkin and added a small curl of paper to represent a vine. what do you think?
If we had used coloured card for the quilling we would be finished now but unfortunately I only had white card so we had to paint our quilled shapes. The bat was spray painted black and googly eyes were glued on and the pumpkin was brushed lightly with acrylic paints to give a hint of colour. We are going to add thread to these to hang them up for Halloween on our haunted tree.
This craft can also be done by children, my son who is 7 years old is always very interested in having a go at quilling, today he made the pumpkin seen above on the left and is very happy with the results. My daughter who is only 3 years old also enjoyed having a go, she made some lovely spirals around a pencil. If you would like to make your own tool my husband's guide is here.
A thrifty and natural life...full of magical crafts, money saving tips and home educating along the way.
Showing posts with label paper quilling. Show all posts
Friday, 28 October 2011
Wednesday, 26 October 2011
Halloween Paper Banner
Halloween / Samhain is almost upon us, it is one of my favourite holidays and it always ends up the one I have the least preparation time for, with it being exam season. Every year I say I will make fabric banners so that we can re use them but time just runs out, so this year I have made an easy paper banner.
This is one of many dictionaries we have in the house, it is old, battered and broken with many missing pages. It was only fit for the recycling bin really but I am always reluctant to bin things that may have other uses, so I have been using it for crafts. Making gift boxes, paper flowers, for drawing and painting on in an altered page style, journalling and mixed media art and herb labels to name a few things, and now this banner...
First you will need to ready your printer and find a font for your spooky writing, then just print the letters out onto your old pages. The above pages were just used as test sheets to get the printed letters in the right place and to work out the size of the flag, once you are happy, mark and cut out the shape of the flag. I decided to age the paper to give it a spooky vintage feel by dabbing a used tea bag around the edges of the flags.
As you can see above the tea bag leaves an old brown mark, good for making treasure maps too. Then fold the top over a piece of wool or string and glue down, I have used a glue stick here as it is just paper.
That's it... one completed banner, just hang it up. You can really go to town here if you want to, as long as the printer will print on your old paper you could print in colours or spooky pictures.
My husband also made a banner making the lettering look a little spookier than mine as you can see above. He has printed out the letters with added cobwebs, bat wings, ghosts and some kind of splatter effect.
This is a close up of one of his pages, we decided to make these flags a slightly different shape to the first ones but they are fastened to the wool in the same manner.
This is what both banners look like on the wall, it should enlarge if you click on it. This is an easy paper craft all letters and pictures could be painted or drawn on if you have no printer. It is also very easy for small children to paint their own banner for a Halloween party centre piece and hang spooky things on it.
This is one of many dictionaries we have in the house, it is old, battered and broken with many missing pages. It was only fit for the recycling bin really but I am always reluctant to bin things that may have other uses, so I have been using it for crafts. Making gift boxes, paper flowers, for drawing and painting on in an altered page style, journalling and mixed media art and herb labels to name a few things, and now this banner...
First you will need to ready your printer and find a font for your spooky writing, then just print the letters out onto your old pages. The above pages were just used as test sheets to get the printed letters in the right place and to work out the size of the flag, once you are happy, mark and cut out the shape of the flag. I decided to age the paper to give it a spooky vintage feel by dabbing a used tea bag around the edges of the flags.
As you can see above the tea bag leaves an old brown mark, good for making treasure maps too. Then fold the top over a piece of wool or string and glue down, I have used a glue stick here as it is just paper.
That's it... one completed banner, just hang it up. You can really go to town here if you want to, as long as the printer will print on your old paper you could print in colours or spooky pictures.
My husband also made a banner making the lettering look a little spookier than mine as you can see above. He has printed out the letters with added cobwebs, bat wings, ghosts and some kind of splatter effect.
This is a close up of one of his pages, we decided to make these flags a slightly different shape to the first ones but they are fastened to the wool in the same manner.
Monday, 20 June 2011
Paper Quilled Sun
I thought I would have another go at paper quilling, this time a sun for the summer solstice. We have already made tea light lanterns for the garden, so this will hang in the window and hopefully catch the sun.
First, I shredded a sheet of yellow card as you can see above, the quilling tool was made by my husband and If you would like to make one yourself I will put a link at the end of this post.
I made lots of different sized circles very simply by rolling the strips of card around the quilling tool, loosening slightly and sticking the end down at the required size. Some circles are made with the full length A4 strip and some with half a strip. They were then fixed with a spot of glue into a circle of card to give the body of the sun.
Then I made these shapes to go around the outside, I made the circle in the same way, loosened to the desired size and pinched one side of the circle. This gives you this tear drop or flame shape. Do enough of these to totally go around your sun.
Stick them at random orientations around the outside like the photograph above to finish the sun shape. After this I sprayed just a touch of gold paint on to the sun, not enough to cover the yellow but just enough to give a gold glow in the sun.
The link to the post for making your own quilling tool is here.
First, I shredded a sheet of yellow card as you can see above, the quilling tool was made by my husband and If you would like to make one yourself I will put a link at the end of this post.
I made lots of different sized circles very simply by rolling the strips of card around the quilling tool, loosening slightly and sticking the end down at the required size. Some circles are made with the full length A4 strip and some with half a strip. They were then fixed with a spot of glue into a circle of card to give the body of the sun.
Then I made these shapes to go around the outside, I made the circle in the same way, loosened to the desired size and pinched one side of the circle. This gives you this tear drop or flame shape. Do enough of these to totally go around your sun.
Stick them at random orientations around the outside like the photograph above to finish the sun shape. After this I sprayed just a touch of gold paint on to the sun, not enough to cover the yellow but just enough to give a gold glow in the sun.
A piece of gold thread was added to the top so that it could be hung in the window and I wanted to add a bell or some glass beads to the bottom but I couldn't find any so sequins have been added to catch the sun.
Here it is in the window, not a very sunny day but hopefully this will look lovely with the sun shining on it.
Sunday, 13 February 2011
Paper quilled hearts
I have been working on a few small craft projects this last week, to use as decoration on the Valentines card that I am making for my husband. Obviously I can't show you the whole card because his desk is next to mine and he reads this. One of the crafts I tried before Christmas was paper quilling and I made these snowflakes, this time I have tried little hearts.
First I shredded my card with a paper shredder, the home made quilling tool that my husband made is also in the photograph, there is a link to make your own at the bottom of the snowflake post if you want to. I chose white paper as I had no red available but you can quill in any colour, saving time with the paint effects later.
These are the two different types of heart that I made, very simple ones as they are for the front of a card. The two at the sides are made by folding the strip of paper in half and just rolling the two ends inwards with the quilling tool and adding a spot of quick drying glue to hold the two curls together. The hearts at the top and bottom are made by rolling two whole strips up, letting them loosen slightly, then pinching one side to produce a tear shape. The two of these tear shapes are then glued together to give you the heart shape.
Then I thought I would give the hearts an old antique feel with paint effects, so first I sprayed them very lightly with a gold coloured spray paint. Lightly is the key word here because if the paper gets too wet the curls unroll. It is not the end of the world if they do though as you can just get the quilling tool and roll them up again, before they set.
Then to give them a valentines feel I got a dry, stiff paint brush and lightly brushed red paint on the curls as you can see it has given them an interesting vintage look with the hint of redness. Now just have to complete the card.
First I shredded my card with a paper shredder, the home made quilling tool that my husband made is also in the photograph, there is a link to make your own at the bottom of the snowflake post if you want to. I chose white paper as I had no red available but you can quill in any colour, saving time with the paint effects later.
These are the two different types of heart that I made, very simple ones as they are for the front of a card. The two at the sides are made by folding the strip of paper in half and just rolling the two ends inwards with the quilling tool and adding a spot of quick drying glue to hold the two curls together. The hearts at the top and bottom are made by rolling two whole strips up, letting them loosen slightly, then pinching one side to produce a tear shape. The two of these tear shapes are then glued together to give you the heart shape.
Then I thought I would give the hearts an old antique feel with paint effects, so first I sprayed them very lightly with a gold coloured spray paint. Lightly is the key word here because if the paper gets too wet the curls unroll. It is not the end of the world if they do though as you can just get the quilling tool and roll them up again, before they set.
Then to give them a valentines feel I got a dry, stiff paint brush and lightly brushed red paint on the curls as you can see it has given them an interesting vintage look with the hint of redness. Now just have to complete the card.
Sunday, 12 December 2010
Paper Quilled Snowflakes
As home educators, we hope to provide our children with the opportunity to try as many different and exciting arts and crafts as we can fit in over the years, with the aim of finding the ones the children love most and wish to continue with. Some of this enthusiasm has also rubbed off on us and this season I have tried out the art of paper quilling.
I found a free guide on a craft site, which looked very self explanatory (link at the bottom of this page) and my husband made me a quilling tool from a cut down needle stuck into a piece of wood, isn't he lovely! We then used the paper shredder to get the strips of card or paper to the correct size. I used the card we use to make greetings cards from as I wanted my snowflake to be sturdy enough to go on the tree.
The snowflake was sprayed with silver paint and glitter spray, which made it a little stronger, and matched the colour scheme of my tree.
This is a photograph of my finished snowflake, with ribbon added so that it will hang on the tree. I really enjoyed making this and I think it looks beautiful hanging on the tree. You could also fix the snowflake to the front of a home made Yule or Christmas card and wow the recipient. My eldest daughter has also tried it out, although she has taken it a little further and created her own designs.
My daughters remind me a little of fractals, these are also waiting to be put onto the tree. The art of paper quilling has a long history which you can read about on this site. If you would like to try this very relaxing craft out for your self and create these beautiful snowflakes for your tree you can find the guide here. My husband has done a guide for making your own quilling tool which you can see here.
I found a free guide on a craft site, which looked very self explanatory (link at the bottom of this page) and my husband made me a quilling tool from a cut down needle stuck into a piece of wood, isn't he lovely! We then used the paper shredder to get the strips of card or paper to the correct size. I used the card we use to make greetings cards from as I wanted my snowflake to be sturdy enough to go on the tree.
The snowflake was sprayed with silver paint and glitter spray, which made it a little stronger, and matched the colour scheme of my tree.
This is a photograph of my finished snowflake, with ribbon added so that it will hang on the tree. I really enjoyed making this and I think it looks beautiful hanging on the tree. You could also fix the snowflake to the front of a home made Yule or Christmas card and wow the recipient. My eldest daughter has also tried it out, although she has taken it a little further and created her own designs.
My daughters remind me a little of fractals, these are also waiting to be put onto the tree. The art of paper quilling has a long history which you can read about on this site. If you would like to try this very relaxing craft out for your self and create these beautiful snowflakes for your tree you can find the guide here. My husband has done a guide for making your own quilling tool which you can see here.
Subscribe to:
Posts (Atom)