Showing posts with label natural. Show all posts

Wednesday, 20 December 2017

Natural wreaths

Following on from my last post showing how we made the wreath bases, I promised to add a few photos when we had finished decorating them. We prefer the natural look and usually prune a little overgrown greenery from our gardens to decorate with, which has the added bonus of being completely free.


This is our front door wreath, as you can see it has a completely green and natural look. I have used clippings from holly, ivy, pine and added a few pinecones. Some twigs have just been woven straight into the twig ring bases and some things, mainly the pinecones, have been wired on to hold them still.


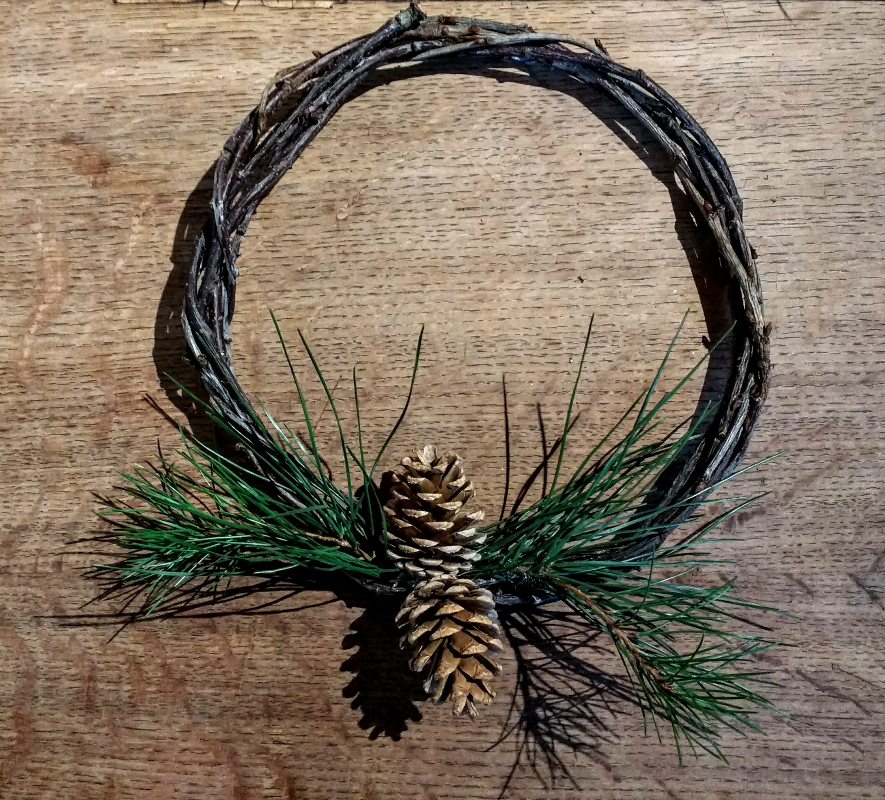
I have also made a few very simple ones to add to the back of some of our internal doors, as you can see I have woven in a small piece of pine and stuck a couple of pinecones on with a hot glue gun. I'm not sure yet whether to add a little snow spray.

These ring bases can be decorated as elaborate or as simply as you choose and the bases can be kept and used year after year with a new decor each time. Very simple, very quick and very thrifty.


Sunday, 17 December 2017

Twig wreath and star bases


Following on from our theme of thrifty or free homemade Christmas / yule decorations we have been making the bases for our wreaths and stars. As keen gardeners we tend to save any useful looking clippings and my husband had recently pruned our cherry tree which has beautiful reddish tinted bark, so we set to work creating the bases to woven wreaths seen above.


This is the pile of twigs I started with... when freshly cut, the twigs are still very pliable and can quite easily be bent and twisted into shape. To form the rings I first took one stick and bent it into a ring shape, then held it in place with one hand whilst intertwining the next stick around the ring. This is quite fiddly and it is possible to tie the first stick into a ring shape if you'd prefer but I always find that once you've woven in a couple of sticks it holds it's shape by itself.


Once it holds it's own shape you can then decide on how many sticks to weave in, you could go for a simple ring with just a few sticks or something much thicker and more substantial.


 We have gone for something in between as you can see in our first photograph... all ready to decorate for the season now. These bases have cost us nothing to make just using a few clippings from the garden and a little time, I usually decorate our wreaths with the natural look of fresh holly, ivy and pinecones from our gardens.

The stars are also easily made from twigs, cut five to the same size, lay them out in a star shape and tie off the corners. These can also be decorated to fit your decor.

I'll be back to post a couple of photos to show you the finished results when the wreaths have been decorated. After Christmas / Yule these wreath bases can be saved until they are needed again, I usually strip them back of all the fresh foliage and pack them away ready to be redecorated on their next outing.

Wednesday, 29 November 2017

Pine Cone Garland

I recently posted some photographs of our pine cone garlands on social media and was inundated with questions on how to make these and many people commented on how beautiful the finished garlands looked. So I have decided to post a little guide on our very thrifty and natural Autumn, Yule or Christmas garland decorations.


My husband and I decided over 12 years ago that we would embrace thrifty living... no more shop bought decorations for us!!... Everything we wanted we would make as thriftily as possible. Not only has this saved us so much money, unpacking our lovingly, handmade Christmas decorations every year holds so many memories.

I absolutely love the simplicity and natural beauty of these pine cone garlands, the one above was made for Autumn but I also have one that was made for Christmas a few years ago which has a few more sparkles.


First you will need to collect some pine cones, we usually grab a few throughout the year as we find them. The amount of pine cones you need will depend on the length of garland required, I'm using seven for my mantle piece. I usually leave them outside for a little while to ensure that any critters safely leave the pine cones.


To make the fixings we are using screw eyelets, they are really cheap only a few pence for a bag. I have managed to screw these directly into the end of the pine cone by hand but it is a little fiddly, so if you need help starting your hole, a very thin drill bit may give you a start.


 Next just thread your pine cones onto your chosen string or ribbon, we are using natural jute string here but ribbons work just as well and there is less movement of the pine cones. You may notice if using string that all the pine cones slip to the middle when you try to create a swag in your garland, you could tie them on to keep them still... but I have another remedy for this...


A little trick which allows you to easily fix them in place but still allows them to be movable if you need to change the position of a pine cone. Thread the string through your eyelet and then thread it through again, as seen in the above photo... so you create a loop.


This simple act gives your pine cone a little more resistance so that you can move it but it doesn't slip down the string.

These garlands can be kept natural or decorated for Christmas with a little glitter, paint or fake snow... the best part is it has literally taken a few minutes and cost a few pennies to make, and this beautiful garland can be reused every year.

Saturday, 13 June 2015

30 Days Wild - day 13

It's elderflower time again, on one of our recent adventures we took the time to collect a few flowers to make elderflower cordial. We absolutely love this drink it evokes memories of summer and tastes amazing.


If you would like to make some Elderflower cordial yourself I have added this link with the recipe we have used.


I enjoyed a glass of this wild flower juice on the back doorstep enjoying the smell of the rain and listening to the birds singing whilst they sheltered in the trees. A wonderful wild taste that will forever remind us of summer... even in the rain!

Thursday, 1 January 2015

Goodbye 2014... Hello 2015

Just a short post to wish you all a Happy new year and to say goodbye to 2014. We have put quite a few things off recently due to a death in the family, blogging has been one of those things but we have still been muddling through in a quiet way and we are now very much looking forward to 2015 and all the new challenges it may bring.


We still made some Christmas decorations for our home, but this year things seem to have taken a simple, more natural approach. Both my husband and I have made some Christmas baubles, complete with pyrography, from a section of an old branch.


I made this pine cone garland, another very simple, natural craft that looked so beautiful on the fireplace. I am definitely thinking of making some more of these next year.


Another one of my favourite additions this year was the snowflake mobile. My husband hung a twisted willow branch, that had been sprayed slightly with silver glitter to give it a frosty feel, in the window. We then hung snowflake decorations and crystals from it to give a feel of snow. It was very difficult to get good photos of this but it looked amazingly magical.


My husband helped the children to make these wooden snowmen using offcuts of wood, which they chose to paint. So most of the decorations we made this year had a wooden feel to them.

Well that's some of the things we have been doing at this very busy time, all that's left to do is wish you all a very Happy new year!


Monday, 13 October 2014

Autumn Critter Craft

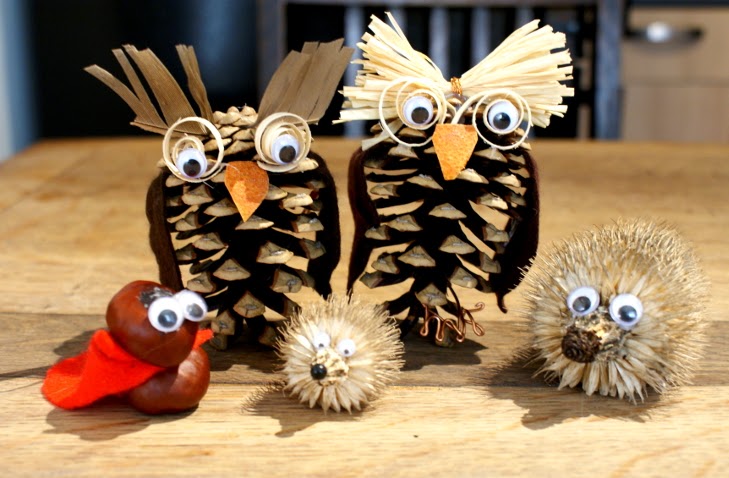
Autumn can be a magical time of year for children to explore nature with the last of the harvests, the leaves going through a beautiful colour change and then falling along with their nuts and seeds. Our children love to go for long walks and collect many things including pine cones, conkers, teasels and beautiful leaves to use in Autumn crafting of one sort or another. This year they have decided to make some autumn critters with the things they have collected.


Many things that can be imagined by little ones can be easily made, start with the items you have managed to collect and see where your imagination takes you. As you can see we have made owls, hedgehogs and even conker man!


These are some of the things we started with, the little hedgehog seems like an obvious choice using the prickly teasel.


We have used the stalk as a nose and trimmed back some of the spikes at the stalk end until we had the desired length... this is quite prickly so little ones may need help or gloves. I found the teasel less prickly if you trim a tiny piece off the end of each spike, a bit like giving it a hair cut. Then all we did was add a nose and some googly eyes.


We love owls and the pine cone seemed to lend itself perfectly to the shape of an owl, so all we have done is add a few extra features to make it look a little more owl like. Conker man was made by my youngest daughter using a match stick and glue to hold his head on, she also gave him a lovely red super hero cape and has also been making him a family... so we now have a whole bunch of conker people.

 A few years ago we made nature faeries with our autumn collections if you would like to see I have added the link.


If you decide to collect some Autumn things on your nature walks let us know what you made. Have fun!


Tuesday, 10 December 2013

Garden Charms and Bird Treats

At this time of year, as the weather gets colder, our thoughts go to feeding the birds. This is our way of giving something back to nature to replace the berries we foraged in autumn. As well as making sure the bird table and feeders are full we have also been making some garden charms, which look very pretty hanging in the trees and provide an extra feast for our feathered friends.


For the charms we have used some garden wire bent into the shape of a heart or star and various dried berries and nuts. The heart shape has been threaded with rosehips and raisins.


When fully threaded the shape was secured safely with either tape, string or wire and a loop was added to hang it on the tree.


We also made a star shape which was threaded with chestnuts and Rowan berries. It is harder to see the shape of this one as the chestnuts are much larger. Anything that birds find tasty can be threaded onto your wire shape and they look gorgeous hanging in the garden.


The pine cone feeders have been a firm favourite with the children for quite a few years now. First attach string or wire for attaching the feeder to the tree as seen in the above photo. Then coat your pine cone with either peanut butter or lard and roll it in bird seed.


These little pine cone feeders usually attract the small birds that are a bit nervous about visiting the bird table when larger birds are around. They are very simple and a lot of fun to make even for very small children.


I will leave you with a couple of photographs of the garden charms and pine cone bird feeders hanging in the trees. They add some much needed colour to the garden this time of year.


The children love feeding the birds and this also provides them with extra opportunities for bird watching.


Sunday, 1 September 2013

Natural Cleaner

A while ago I promised to post the recipe of some of the natural cleaners we use here, and I have finally got round to it. We made the decision quite a few years ago to ditch the many chemical cleaners due to my allergies... sneezing and itching your way through the cleaning everyday really takes its toll.


The recipe is really simple just dilute white vinegar with an EQUAL amount of water in a squirty bottle... and that's it... yes, really. (For example if you use half a litre of white vinegar you need to add half a litre of water.) White vinegar is a natural cleaner, disinfectant and deodoriser, so far we haven't found anything we haven't been able to get clean naturally. There is a slight smell of vinegar but this dissipates as the surface dries and you can add a few drops of essential oil if you prefer, to give your cleaner a nicer smell. We have used tea tree or lemon for the extra cleaning abilities in the past.

Alternatively, we have a jar which we fill with the white vinegar before it is diluted, then simply add all the citrus peel from the fruit eaten and leave to infuse for a week or two before straining and diluting the vinegar with an equal amount of water, as above. This makes the vinegar smell more like oranges and lemons negating the need for essential oil and making the house smell lovely.

We have also been utilising lemon juice for it's natural cleaning and bleaching effects and bicarbonate of soda can be mixed into a paste and used when you need something a little more abrasive.

I would never go back to conventional cleaners now as I find it very effective, very cheap and it doesn't make me sneeze but if you decide to try out any new cleaners do a patch test first and check online for anything you shouldn't use it on... for example you can't use vinegar on marble.


Saturday, 23 June 2012

Natural Update

This is my 100th post and I would like to take a second and thank everyone for reading my blog, the counter at the bottom of the page stands at over 46,000 visitors. I would also like to thank the many websites around the world that have featured our crafts, and all of you who have been inspired and have inspired me in return. Thank-you again, the children and I have some exciting crafts lined up and we will be sharing here soon.

As so many of you have asked how we are getting on with the natural cleaning and cutting out the chemicals I thought I would give you a quick update.


We are still using and loving the soap nuts, (these are dried berries not nuts) it has been over a year now this is my original post, in fact we still haven't got through the 1 kilo bag we purchased, this cost around £10 delivered to our door with a bottle of free essential oil and has lasted more than a year. There are 300 grams left, and not buying washing powder and fabric softener has saved us a lot of money and decreased the amount of household waste we throw out. I also love the fact that you can add the essential oil of your choice to the washing, I have been adding lavender to the bedding wash to enhance good sleep and citronella to the wash when there are lots of biting insects about. No harsh washing chemicals have also meant no itching and sneezing.

All general purpose kitchen cleaners, window and floor cleaners have been replaced by white vinegar, bicarbonate of soda, lemon juice and essential oils which we make up ourselves. I really haven't noticed any difference in the cleaning ability, it just smells far more natural. We are still loving the home made toothpaste too.

The natural crystal deodorant is absolutely still being used, I bought it in July last year for about £5. I am just as happy with it as I was then, no armpit smell at all. My husband was so impressed he now uses it and there is still over half a stick left, so definitely a good money saving purchase there.

Another money saver for me has been the purchase of a menstrual cup, initially expensive but it pays for itself after a few months and it can last for years. I have been using one for quite a few years now and can honestly say I have never felt so free and comfortable during a period, so this has eliminated the need for any sanitary protection.

I have stopped using shop bought moisturisers and now use either pure coconut oil or a block of shea butter, both of which smell incredible and and make my skin feel amazing. So no more nasty chemicals absorbed through the skin. I have also stopped using hair conditioner, oils to stop frizz and all the other stuff we tend to put on ourselves after washing our hair, I now add a little coconut oil to my hands and work it on the tips of my hair.  One thing I have noticed, bizarrely, is the condition and softness of my hair has vastly improved.

As you can see we have managed to get rid of loads of the chemicals from our daily lives and I am still working on more and will let you know how it goes. Not only have we saved a lot of money... I mean...How many of you can say you have done your entire family's washing for less than £10 for more than a year or less than £5 for deodorant for two people?... but we also feel much better, no sneezing or itching and I am happy that everything we now use is a change for the better for us. I may be adding some of our natural recipes here now and again if anyone is interested.

Wednesday, 14 March 2012

Home made Toothpaste

Trying to get rid of as many chemicals as possible from our daily life has led me to give home made toothpaste a go. I researched many recipes online, searching for all the pros and cons, looking for the simplest ingredients with the most benefits and found this one works best for us.


These are the four ingredients I have gone with, most of the recipes I have seen start with equal amounts of bicarbonate of soda and coconut oil. so, if you use one tablespoon of coconut oil you will need one tablespoon of bicarbonate of soda and mix together. Bicarbonate of soda is also used in conventional toothpaste for the cleaning abilities it has and coconut oil, from what I have read, is anti bacterial, anti fungal and has some tooth and gum benefits.


This is what it looks like after mixing, at this point we added a teaspoon of ground xylitol to make it slightly sweeter but this is optional really and either a few drops of peppermint oil or extract of peppermint. Some recipes use stevia instead of xylitol, both come naturally from plants and both have some benefits. This makes a firm toothpaste and the consistency depends a lot on the temperature in the house due to the coconut oil.


Then store, at first I used the little pots you can see above as I only made up a small amount but having decided we really like it and intend to keep using it I have now made it in a larger quantity so it is being stored in a small mason/kilner jar. Due to sensory problems I have never really liked the way conventional toothpaste foams up in your mouth and this home made toothpaste doesn't foam at all. I have also found the taste mellows slightly after the first day, it was a little zingy the first day I made it.

** If you have been thinking about doing something similar, I would recommend researching both the ingredients in conventional toothpaste and the many home made recipes out there.

Saturday, 4 February 2012

Natural Deodorant

Since reading an article a couple of years ago about the hundreds of chemicals we have in our lives, many of these we liberally apply to our skin every day, I have been on a quest to get rid of as many as I can. The latest change has been deodorant, you have probably read a lot about the dangers of these chemicals (a quick search will tell you all you need to know) and I have decided to try a more natural approach. So I have given up wearing deodorant.... I saw you all take a large step back, but it has been a pleasant surprise. I collected quite a few home made recipes but decided to try the crystal deodorant first as one was on offer.


Here it is... it is made from natural mineral salts, the one above has been shaped to fit into a roll on container and it also comes in a natural crystal shaped form, which I am tempted to try next as it will look good on the window ledge. I have been using it for six months and it has barely got any smaller, maybe just half a centimetre so the five pounds I spent will last a long time. You have to apply it very liberally to a wet armpit but it really works well for me, much better than any conventional deodorant that I have tried.

I know it sounds weird... and believe me it still sounds weird to me, but I am never going back. My nose is very sensitive and with normal deodorant, I didn't smell that fresh even after short periods of time, plus it left me sneezing and with rashes. The crystal doesn't make you smell all pretty like exotic flowers, in fact it doesn't make you smell of anything... my armpit now smells and feels exactly like the rest of my skin. It works by stopping the bacteria growth which causes the smell, it doesn't stop you sweating.

I have also tested this whilst working out to give it a bit of a challenge, I got my poor husband to smell my armpits after cycling 40 kilometres at quite a fast pace and he agreed, no smell. A double win as not only have I managed to get rid of the chemicals but saved a lot of money in the process.

Monday, 23 May 2011

Soap nuts!

I am writing this post as there has been a lot of interest in how we got on with the soap nuts trial. We have been trying lately to rid ourselves of as many of the everyday chemicals as possible, in an attempt to make our lives more natural and greener of course. One of the things changed is the way the laundry is done, we were originally going to make our own environmentally friendly washing powder but in the end decided to give soap nuts a try.


So, here they are.... they don't actually look like they will do the laundry do they?

But it is so simple, just put a few soap nuts in the little bag and I usually wet the bag with hot water and give it a squeeze to give the saponins a head start and toss them in the machine, you don't even need to add fabric softener. We have also been adding a couple of drops of essential oil to the fabric softener drawer to give the laundry our choice of smell but this is not necessary. Each batch of soap nuts can be used for a few washes and composted when finished with, so each wash works out at just a few pence.

More importantly though the laundry has been coming out clean and soft, with absolutely no chemical smell at all. It has been a lovely surprise really, as I wasn't expecting it to work. Things just feel different, in a good way and there has been NO itching what so ever. The big test for me was the the towels, I love to have a soft fluffy towel when getting out of the shower and the soap nuts didn't let me down! While I can't say they clean better than washing products, they definitely do not clean any worse.

The soap nuts can actually be made into many cleaning products including shampoo, but we have not tried this yet. My husband has washed his hands with them after working on his bike and in the garden and they did come up very clean and soft but that's as far as the testing has gone. He was also excited to find some black seeds in our bag of soap nuts which he is now going to try and grow...I'll let you know how that comes along too.

If you would like to find out more about soap nuts you can read more here, or just search yourself.