A recent celebration had us reaching for the scrap paper to make some very quick and cheap party decorations. We try to live very thriftily here and spending money on party decorations which could be used for extra presents seems a little strange and the children have a huge amount of fun in the process.
As we didn't have much time and the children are small, we went for the simplest garlands possible. The top one is just a simple bunting garland made with paper, cut, folded and glued over the string or ribbon. Any paper or card can be used and it can be highly personalised to suit the birthday girl or boy, you can use letters or numbers if you choose, my son is hoping for a dinosaur one on his birthday. As you are making this yourself you can choose the exact length and design.
The butterfly one is another very simple one and takes just a few minutes, I have used a shape cutter and a scrap sheet of sticky paper. The butterflies were just stamped out and stuck back to back over some gold string. We made heart ones like these on valentines day, very pretty, my daughter is planning on having these in her room.
The spring blossom garland continues a craft idea we had a few years ago spring blossom craft.
Each flower is made up of three or four cut out tissue paper flower shapes, stacked and twisted together.
These are then threaded onto your chosen string or wool to make the garland.
You can make these garlands out of anything you choose and what's more, it saves you money and it's a wonderful craft idea to get children involved in the decorating.
We have garlands hanging in the house at quite a few times in the year, mostly made by the children who are quite proud of their creations. A couple of recent, very pretty, seasonal ones have been the Autumn leaf garland and the paper snowflake one.
I am hoping to eventually get round to sewing some more permanent garlands in felt and fabric to keep forever, it's just finding the time, it seems to be in short supply here.
A thrifty and natural life...full of magical crafts, money saving tips and home educating along the way.
Showing posts with label kids. Show all posts
Sunday, 19 May 2013
Friday, 8 February 2013
Snakes for Chinese New Year
Chinese New Year is on the 10th of February this year and it is the year of the snake, the children were very keen to make some snakes to celebrate. We have decided to make them with a few recycled and natural things we had around the house.
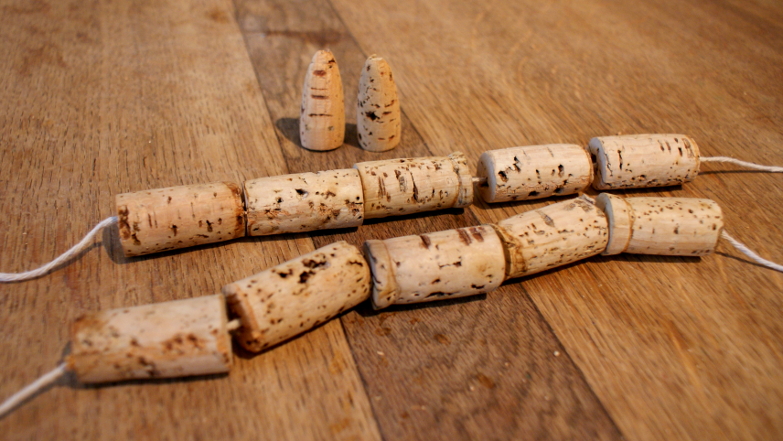
Old wine corks and left over pine cones are perfect for threading opportunities for young children and for the bodies of our snakes. We threaded five corks onto a length of string and knotted each end leaving a small gap between each cork so the snake could slither.
The tail segment was shaped by my husband and was attached to the row of corks by pushing the knot into the hole and sealing it there with a hot glue gun.
Red and gold are lucky colours in China, so the New Year snakes were painted using these colours mostly. The pine cones are going to be used as the head of the snake and have been sprayed with gold paint.
As you can see my husband has also drilled a small hole in the bottom of the pine cone (handy to put the stick in for ease of spraying) it is just a few millimeters deep so the knot can be glued and pushed inside to disguise it.
Eyes and a forked tongue have been added to each snake ready to be attached to the cork body when the paint is dry.
Here are the finished snakes, I think they are really quite cute and they have a very snake like slither movement...The children are very pleased with their work and didn't stop there, deciding to add some gold sequins.
If you don't have the corks available it is possible to make a snake with small branch pieces my husband made this one a couple of years ago, and it is very sturdy and still being played with.
All ready to bring in the year of the snake....Happy New Year China.
Old wine corks and left over pine cones are perfect for threading opportunities for young children and for the bodies of our snakes. We threaded five corks onto a length of string and knotted each end leaving a small gap between each cork so the snake could slither.
The tail segment was shaped by my husband and was attached to the row of corks by pushing the knot into the hole and sealing it there with a hot glue gun.
Red and gold are lucky colours in China, so the New Year snakes were painted using these colours mostly. The pine cones are going to be used as the head of the snake and have been sprayed with gold paint.
As you can see my husband has also drilled a small hole in the bottom of the pine cone (handy to put the stick in for ease of spraying) it is just a few millimeters deep so the knot can be glued and pushed inside to disguise it.
Eyes and a forked tongue have been added to each snake ready to be attached to the cork body when the paint is dry.
Here are the finished snakes, I think they are really quite cute and they have a very snake like slither movement...The children are very pleased with their work and didn't stop there, deciding to add some gold sequins.
If you don't have the corks available it is possible to make a snake with small branch pieces my husband made this one a couple of years ago, and it is very sturdy and still being played with.
All ready to bring in the year of the snake....Happy New Year China.
Tuesday, 8 November 2011
3D bonfire and fireworks art
The children have been making some lovely 3D bonfire and fireworks art pictures incorporating some natural things from the garden and some junk modelling recently and I thought I would share them here.
We have collected little twigs from the garden to make the base of the bonfire, this year we glued them on with a hot glue gun as last year we have to wait a long time for the PVA glue to dry. The children have used the red leaves from a Schumacher tree to simulate the flames on the fire, we waited ages for the leaves to change colour this year.
They marked out the shape of the fireworks with glue and covered them with glitter. Then to make the fireworks look 3D, we have collected the seed heads from some of our herbs, like fennel and dill and sprayed them with spray glue and glitter.
They can either be glued on like the photograph above or the stalk can be poked through the paper and taped down on the back. This then creates your 3D firework and you can use as many as you can find.
We only had a few left in the garden but enough to create this pretty display. Some of the seed heads look like little stars bursting out of the page.
Here is a close up of my sons picture so that you can see the stack of twigs making the 3D bonfire, the leaf flames and the seed head fireworks close up.
Here are both completed works of art waiting to dry. Not only a bright and colourful way to cheer up the wall in these very dark grey days but also 3 dimensional. Leading up to fireworks day they have also done some related junk modelling and made these lovely rockets from some old bottles.
We have collected little twigs from the garden to make the base of the bonfire, this year we glued them on with a hot glue gun as last year we have to wait a long time for the PVA glue to dry. The children have used the red leaves from a Schumacher tree to simulate the flames on the fire, we waited ages for the leaves to change colour this year.
They marked out the shape of the fireworks with glue and covered them with glitter. Then to make the fireworks look 3D, we have collected the seed heads from some of our herbs, like fennel and dill and sprayed them with spray glue and glitter.
They can either be glued on like the photograph above or the stalk can be poked through the paper and taped down on the back. This then creates your 3D firework and you can use as many as you can find.
We only had a few left in the garden but enough to create this pretty display. Some of the seed heads look like little stars bursting out of the page.
Here is a close up of my sons picture so that you can see the stack of twigs making the 3D bonfire, the leaf flames and the seed head fireworks close up.
Here are both completed works of art waiting to dry. Not only a bright and colourful way to cheer up the wall in these very dark grey days but also 3 dimensional. Leading up to fireworks day they have also done some related junk modelling and made these lovely rockets from some old bottles.
Wednesday, 21 September 2011
Nature Faeries
The Autumn Equinox falls on the 23rd of September this year and is the second of the three pagan harvest festivals otherwise called Mabon. We have been on several nature walks but have only collected a few Autumn things for our display so far, therefore the nature faerie craft will be using these natural things like pine cones and acorns.
First select a pine cone for the body and an acorn for the head for each faerie you want to make, we pulled the pointed end off the pine cones to allow a good place for the head to sit.
When it comes to gluing this sort of stuff I have found using a hot glue gun to be the most efficient way, it dries fast and holds well, this means helping the little ones so no one get hot glue on their fingers, but much better than waiting hours for the glue to dry.
This is what they look like with their heads attached, acorns were used with the cups removed for now. Then we added hair, my daughter was very insistent that they should have pink or multi coloured hair and helped to choose the wool. We stuck the hair on the top of the head with a spot of glue and then added the acorn cup as a hat with another spot of glue.
Starting to look a little more faerie like now, next step is to add facial features, we have used googly eyes and sparkly lips, of course.
Nearly done now, sycamore seed pods were used to create wings as that is what we had close to hand but you could use beautiful autumn red maple leaves or the round moon like honesty seed pods.
There you go, Autumn nature faeries, perfect to play with or they can be hung up on display or secretly hidden in the garden for the little ones to find and be surprised by. My husband also helped me with another idea to add little feet so that the faeries could stand, he cut off a couple of one of the larger pine cones scales and glued them to the bottom. I think it makes him look like he is wearing clogs.
If you prefer a more natural look to the faeries, they look just as good without the rainbow hair and googly eyes as you can see below.
This one was made in the same way as the others but without all the added cuteness from the children. I have added cotton to the back and hung it on a plant...hmm...gives me an idea about Christmas or Yule decorations, think I will make some more and spray them in silver or some other festive colour to hang on the tree...Enjoy the Equinox.
First select a pine cone for the body and an acorn for the head for each faerie you want to make, we pulled the pointed end off the pine cones to allow a good place for the head to sit.
When it comes to gluing this sort of stuff I have found using a hot glue gun to be the most efficient way, it dries fast and holds well, this means helping the little ones so no one get hot glue on their fingers, but much better than waiting hours for the glue to dry.
This is what they look like with their heads attached, acorns were used with the cups removed for now. Then we added hair, my daughter was very insistent that they should have pink or multi coloured hair and helped to choose the wool. We stuck the hair on the top of the head with a spot of glue and then added the acorn cup as a hat with another spot of glue.
Starting to look a little more faerie like now, next step is to add facial features, we have used googly eyes and sparkly lips, of course.
Nearly done now, sycamore seed pods were used to create wings as that is what we had close to hand but you could use beautiful autumn red maple leaves or the round moon like honesty seed pods.
There you go, Autumn nature faeries, perfect to play with or they can be hung up on display or secretly hidden in the garden for the little ones to find and be surprised by. My husband also helped me with another idea to add little feet so that the faeries could stand, he cut off a couple of one of the larger pine cones scales and glued them to the bottom. I think it makes him look like he is wearing clogs.
If you prefer a more natural look to the faeries, they look just as good without the rainbow hair and googly eyes as you can see below.
This one was made in the same way as the others but without all the added cuteness from the children. I have added cotton to the back and hung it on a plant...hmm...gives me an idea about Christmas or Yule decorations, think I will make some more and spray them in silver or some other festive colour to hang on the tree...Enjoy the Equinox.
Sunday, 31 July 2011
Corn dragonflies
Tomorrow is Lughnasadh or Lammas, the first of three pagan Autumn harvest festivals, in many different cultures people celebrate at harvest time. So today we are making corn dragonflies, my children are a little young to weave corn dollies so we have gone for something a little easier.
These are some things we collected from the garden, the corn stalk (or barley) had grown up under one of the bird feeders from dropped seeds and the leaves have come from our willow tree.
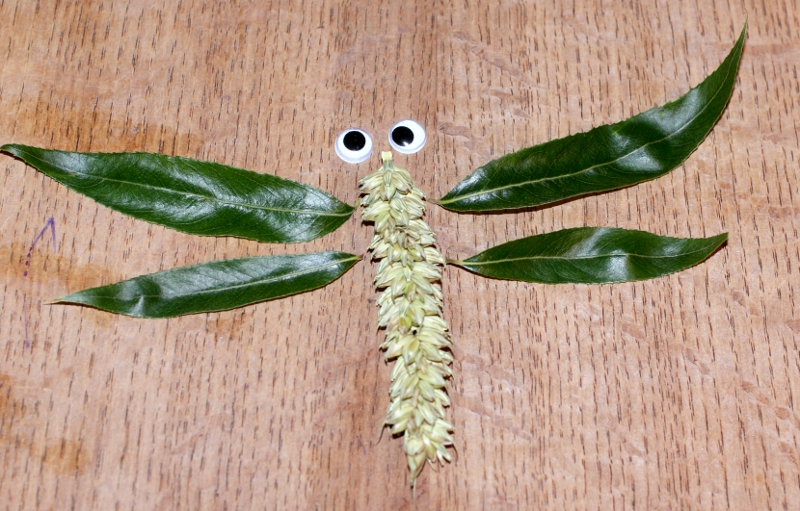
This is the layout for our dragonfly before the sticking commences, large googly eyes will be added at the front end to get the dragonfly look. We have also tried to pair up the leaves to match in size, with two larger ones at the front and two smaller ones at the back.
As you may notice in the above photograph, it is possible to slightly lift the individual seeds in rows and glue the leaves underneath. This will give your final dragonfly a much neater look and it also helps to hold the leaves in the correct position until the glue dries.
And there you go... two little corn dragonflies, once the eyes are fixed in place. We added cotton thread so they could be hung in the window. I originally thought that we would hang them from the trees in the garden so that birds could collect the seeds but the children wanted them hung inside for the time being anyway. We also made lavender butterflies in the same way as a pretty and natural way to infuse the house with the smell of lavender.
Here they are hanging with some of the butterflies, we have grouped them all together and tied them to a piece of stick so that it looks like a small mobile, but they look equally nice hanging on their own. I am thinking of hanging some lavender butterflies in the bathroom window to add a relaxing aroma to the room.
We made the lavender butterflies in the same way except this time we have used lavender flower heads for the body and eucalyptus leaves for the wings. These are a beautiful purple and silver colour and smell fantastic.
This is the layout we used for the butterflies and stuck them together in the same way as before. The children really enjoy
nature crafting in this way and this has the added bonus of smelling wonderful too.
These are some things we collected from the garden, the corn stalk (or barley) had grown up under one of the bird feeders from dropped seeds and the leaves have come from our willow tree.
This is the layout for our dragonfly before the sticking commences, large googly eyes will be added at the front end to get the dragonfly look. We have also tried to pair up the leaves to match in size, with two larger ones at the front and two smaller ones at the back.
As you may notice in the above photograph, it is possible to slightly lift the individual seeds in rows and glue the leaves underneath. This will give your final dragonfly a much neater look and it also helps to hold the leaves in the correct position until the glue dries.
And there you go... two little corn dragonflies, once the eyes are fixed in place. We added cotton thread so they could be hung in the window. I originally thought that we would hang them from the trees in the garden so that birds could collect the seeds but the children wanted them hung inside for the time being anyway. We also made lavender butterflies in the same way as a pretty and natural way to infuse the house with the smell of lavender.
Here they are hanging with some of the butterflies, we have grouped them all together and tied them to a piece of stick so that it looks like a small mobile, but they look equally nice hanging on their own. I am thinking of hanging some lavender butterflies in the bathroom window to add a relaxing aroma to the room.
We made the lavender butterflies in the same way except this time we have used lavender flower heads for the body and eucalyptus leaves for the wings. These are a beautiful purple and silver colour and smell fantastic.
This is the layout we used for the butterflies and stuck them together in the same way as before. The children really enjoy
nature crafting in this way and this has the added bonus of smelling wonderful too.
Sunday, 20 March 2011
Egg Shell Candles
The spring equinox falls tonight and we have decided on a craft to celebrate Ostara, although it would also be a good craft for Easter. We really loved the look of the egg shell candles but as you know, I have really small children and I was not keen on melting the wax to make the candles as they both get very enthusiastic at craft time and hot wax could be a bit dangerous for them if it spilt. So we have decided to make egg shell candles in a totally safe way even for the smallest of children.
We put the egg into an eggcup to steady it and to stop small fingers from accidentally crushing the delicate shell. If you choose to you can neaten the edges of the shell with some scissors but we decided to leave them.
Next we used colourful candle sand so that we did not have to use hot wax, this is available at craft shops or you could use wax beads as an alternative if you have some. Aim to fill the egg shell about half or two thirds full, my children decided to fill the shell right up.
Next is the cheating bit, everyone who has small children will have lots of these laying around in the back of the candle drawer, well if you are anything like me that is. Half used birthday candles make excellent emergency wicks, just push the candle down into the wax sand until just the wick is visible. You could use wick if you prefer but I was thinking of the simplest thing for small children.
This is what the finished multi coloured candles look like, you can't see the birthday candle at all, I think they look quite beautiful and it was absolutely safe for small children to make.
As you can see they look lovely alight too...
First, save some egg shells, I tried to break the eggs in a way to leave one side slightly larger to accommodate the candle. I used a knife to try and get the right size and make it as clean a break as possible and no eggs were wasted, we used them all. I then gave them a quick rinse out and left them to dry.
We put the egg into an eggcup to steady it and to stop small fingers from accidentally crushing the delicate shell. If you choose to you can neaten the edges of the shell with some scissors but we decided to leave them.
Next we used colourful candle sand so that we did not have to use hot wax, this is available at craft shops or you could use wax beads as an alternative if you have some. Aim to fill the egg shell about half or two thirds full, my children decided to fill the shell right up.
Next is the cheating bit, everyone who has small children will have lots of these laying around in the back of the candle drawer, well if you are anything like me that is. Half used birthday candles make excellent emergency wicks, just push the candle down into the wax sand until just the wick is visible. You could use wick if you prefer but I was thinking of the simplest thing for small children.
This is what the finished multi coloured candles look like, you can't see the birthday candle at all, I think they look quite beautiful and it was absolutely safe for small children to make.
As you can see they look lovely alight too...
Subscribe to:
Posts (Atom)