At this time of year, as the weather gets colder, our thoughts go to feeding the birds. This is our way of giving something back to nature to replace the berries we foraged in autumn. As well as making sure the bird table and feeders are full we have also been making some garden charms, which look very pretty hanging in the trees and provide an extra feast for our feathered friends.
For the charms we have used some garden wire bent into the shape of a heart or star and various dried berries and nuts. The heart shape has been threaded with rosehips and raisins.
When fully threaded the shape was secured safely with either tape, string or wire and a loop was added to hang it on the tree.
We also made a star shape which was threaded with chestnuts and Rowan berries. It is harder to see the shape of this one as the chestnuts are much larger. Anything that birds find tasty can be threaded onto your wire shape and they look gorgeous hanging in the garden.
The pine cone feeders have been a firm favourite with the children for quite a few years now. First attach string or wire for attaching the feeder to the tree as seen in the above photo. Then coat your pine cone with either peanut butter or lard and roll it in bird seed.
These little pine cone feeders usually attract the small birds that are a bit nervous about visiting the bird table when larger birds are around. They are very simple and a lot of fun to make even for very small children.
I will leave you with a couple of photographs of the garden charms and pine cone bird feeders hanging in the trees. They add some much needed colour to the garden this time of year.
The children love feeding the birds and this also provides them with extra opportunities for bird watching.
A thrifty and natural life...full of magical crafts, money saving tips and home educating along the way.
Tuesday, 10 December 2013
Thursday, 24 October 2013
Pumpkin sun catchers
Just thought I would share this quick Halloween craft with you. If your children are as busy with crafts as mine, it is inevitable that you will have many left over pre cut out sheets of random shapes... I always save these just in case they come in useful and it makes perfect sense to re-use craft items to save money.
This is a left over sparkly, foam sheet with pre cut pumpkins on it. First cut out one of the pumpkin shapes... sounds odd cutting out an already cut out shape but you will need to leave a border around the shape, a bit like a photo frame...see below.
This is our sparkly pumpkin border, which was then stuck down to a piece of orange tissue paper. Our craft sheet was already self adhesive making it very simple. Then cut out the whole shape and it will look like a coloured in pumpkin.
All that's left to do is add your facial features and stick on the window, for some pumpkins we cut out eye, nose and mouth shapes and stuck them on, but in others we just used a marker pen.
These are some of the finished sun catcher pumpkins which can also be fixed around a light source like a jar with a tea light inside to be used after dark.
This is a very thrifty and easy craft for children to do using something that normally gets thrown away. This could be tried with any shapes you have, but if you don't have the craft sheets you can always cut out your own shapes in black card.
This is a left over sparkly, foam sheet with pre cut pumpkins on it. First cut out one of the pumpkin shapes... sounds odd cutting out an already cut out shape but you will need to leave a border around the shape, a bit like a photo frame...see below.
This is our sparkly pumpkin border, which was then stuck down to a piece of orange tissue paper. Our craft sheet was already self adhesive making it very simple. Then cut out the whole shape and it will look like a coloured in pumpkin.
All that's left to do is add your facial features and stick on the window, for some pumpkins we cut out eye, nose and mouth shapes and stuck them on, but in others we just used a marker pen.
These are some of the finished sun catcher pumpkins which can also be fixed around a light source like a jar with a tea light inside to be used after dark.
This is a very thrifty and easy craft for children to do using something that normally gets thrown away. This could be tried with any shapes you have, but if you don't have the craft sheets you can always cut out your own shapes in black card.
Wednesday, 23 October 2013
Corn Husk Beads
I'm back to show you my daughter's corn husk recycling craft. The idea came from the paper beads we all used to make as children, the dried corn husks looked like a similar shape to the paper template, so we thought it was worth trying.
First take your dried out corn husk, which is an elongated triangle shape, and start to roll it around a skewer as shown above. A little glue may help it stick here. Carry on rolling right to the end of the corn husk and glue it down.
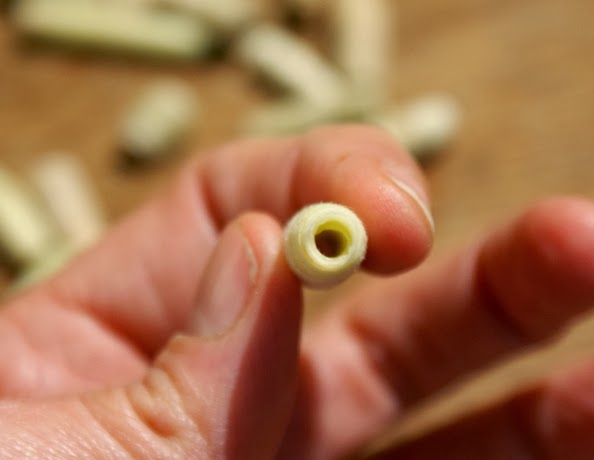
At this stage it looks a little like a cotton bud. You now need to slip it off the skewer carefully to preserve the hole in the center as this is where you will thread your bead later.
Once we had made as many as we needed they can be trimmed to neaten up the ends and to the size you require.
My daughter chose to paint them in beautiful colours with some metallic paints, they could also be varnished if you want to make them more hard wearing.
After the beads were dry they were threaded onto a piece of thin elastic, just the right size for a bracelet or necklace.
This is the finished bracelet, very pretty colours... I think she did a wonderful job. If you don't have corn husks to use have a go at the traditional paper bead making... it's a lot of fun.
First take your dried out corn husk, which is an elongated triangle shape, and start to roll it around a skewer as shown above. A little glue may help it stick here. Carry on rolling right to the end of the corn husk and glue it down.
At this stage it looks a little like a cotton bud. You now need to slip it off the skewer carefully to preserve the hole in the center as this is where you will thread your bead later.
Once we had made as many as we needed they can be trimmed to neaten up the ends and to the size you require.
My daughter chose to paint them in beautiful colours with some metallic paints, they could also be varnished if you want to make them more hard wearing.
After the beads were dry they were threaded onto a piece of thin elastic, just the right size for a bracelet or necklace.
This is the finished bracelet, very pretty colours... I think she did a wonderful job. If you don't have corn husks to use have a go at the traditional paper bead making... it's a lot of fun.
Saturday, 19 October 2013
Mini corn husk broomsticks
As Halloween is approaching fast we thought we would make some mini decorations to hang on our spooky Halloween tree. After the crops were harvested on our allotment we had a lot of corn husks left over so we have decided to use them.
First take a small stick and wrap the dried corn husks around one end, any small twigs or raffia will do if you don't have any corn husks. Then trim the ends to an appropriate length for a broomstick, we have cut ours at about a couple of inches.
Tie the corn husks to your stick tightly, we have used copper wire as we have quite a lot of it but any string will do.
Snip up from the bottom to give the little decoration an authentic broomstick look. We gave ours a spray with the glitter spray to finish it off with a magic dust sparkle.
That's all there is too it, all that is left is to hang them on the spooky Halloween tree when it is put up.
Last year we made corn husk dolls and a corn husk sunflower wreath with our left over corn husks. My youngest daughter has also been crafting this week with these leaves and I will be back soon to show you her wonderful creation.
First take a small stick and wrap the dried corn husks around one end, any small twigs or raffia will do if you don't have any corn husks. Then trim the ends to an appropriate length for a broomstick, we have cut ours at about a couple of inches.
Tie the corn husks to your stick tightly, we have used copper wire as we have quite a lot of it but any string will do.
Snip up from the bottom to give the little decoration an authentic broomstick look. We gave ours a spray with the glitter spray to finish it off with a magic dust sparkle.
That's all there is too it, all that is left is to hang them on the spooky Halloween tree when it is put up.
Last year we made corn husk dolls and a corn husk sunflower wreath with our left over corn husks. My youngest daughter has also been crafting this week with these leaves and I will be back soon to show you her wonderful creation.
Saturday, 5 October 2013
not back to school days out
As a home educating family we usually plan quite a few trips out in September as all the parks, zoos and museum suddenly become much emptier with the return of the school year. Also this time coincides with the heritage free open days when many museums and other heritage sites open their doors free of charge for everyone to explore, naturally we take full advantage of this.
This year we started with a trip to a zoo containing wildlife from south America, this was a wonderful experience for the children to back up some of the things they had been studying throughout the year. South America had sparked their interest earlier in the year and we have been on a wonderful learning journey from it's history, geology, botany, ancient civilizations and wildlife to mention a few things. The advantage of the emptiness of the zoo is that the children got to watch the animals being fed at close range and ask the keepers a million and one questions about everything.
We managed to fit in quite a lot on the free heritage days, we visited three museums, two very old churches, one of which had an ongoing archaeological dig and a photography exhibition.
The three museums covered so many eras between them it gave the children lots to think about. The castle had armour to be tried on and siege engines like the ones we made earlier in the year. They also spent a lot of time looking at the art gallery and studying the different styles of two of the artists exhibited there.
This is one of my favourite exhibitions at the museum about the history of our city. It is a replica of an old chemist, I could stand here for ages looking at all the old jars and books.
There are also lots of drawers to open here containing herbs and other ingredients to look at or smell. This museum has many things to touch, smell and try on, the children really love to be able to interact with things and it is very beneficial to the learning process. All these visits have sparked much more interest in a number of things we can continue to explore further during the winter.
We still have more days out planned to enjoy the rest of the autumn days and quite a few crafts inspired by some of our activities. This is always a very busy time of year for us will all the harvesting and preserving too.
This year we started with a trip to a zoo containing wildlife from south America, this was a wonderful experience for the children to back up some of the things they had been studying throughout the year. South America had sparked their interest earlier in the year and we have been on a wonderful learning journey from it's history, geology, botany, ancient civilizations and wildlife to mention a few things. The advantage of the emptiness of the zoo is that the children got to watch the animals being fed at close range and ask the keepers a million and one questions about everything.
We managed to fit in quite a lot on the free heritage days, we visited three museums, two very old churches, one of which had an ongoing archaeological dig and a photography exhibition.
The three museums covered so many eras between them it gave the children lots to think about. The castle had armour to be tried on and siege engines like the ones we made earlier in the year. They also spent a lot of time looking at the art gallery and studying the different styles of two of the artists exhibited there.
This is one of my favourite exhibitions at the museum about the history of our city. It is a replica of an old chemist, I could stand here for ages looking at all the old jars and books.
There are also lots of drawers to open here containing herbs and other ingredients to look at or smell. This museum has many things to touch, smell and try on, the children really love to be able to interact with things and it is very beneficial to the learning process. All these visits have sparked much more interest in a number of things we can continue to explore further during the winter.
We still have more days out planned to enjoy the rest of the autumn days and quite a few crafts inspired by some of our activities. This is always a very busy time of year for us will all the harvesting and preserving too.
Sunday, 1 September 2013
Natural Cleaner
A while ago I promised to post the recipe of some of the natural cleaners we use here, and I have finally got round to it. We made the decision quite a few years ago to ditch the many chemical cleaners due to my allergies... sneezing and itching your way through the cleaning everyday really takes its toll.
The recipe is really simple just dilute white vinegar with an EQUAL amount of water in a squirty bottle... and that's it... yes, really. (For example if you use half a litre of white vinegar you need to add half a litre of water.) White vinegar is a natural cleaner, disinfectant and deodoriser, so far we haven't found anything we haven't been able to get clean naturally. There is a slight smell of vinegar but this dissipates as the surface dries and you can add a few drops of essential oil if you prefer, to give your cleaner a nicer smell. We have used tea tree or lemon for the extra cleaning abilities in the past.
Alternatively, we have a jar which we fill with the white vinegar before it is diluted, then simply add all the citrus peel from the fruit eaten and leave to infuse for a week or two before straining and diluting the vinegar with an equal amount of water, as above. This makes the vinegar smell more like oranges and lemons negating the need for essential oil and making the house smell lovely.
We have also been utilising lemon juice for it's natural cleaning and bleaching effects and bicarbonate of soda can be mixed into a paste and used when you need something a little more abrasive.
I would never go back to conventional cleaners now as I find it very effective, very cheap and it doesn't make me sneeze but if you decide to try out any new cleaners do a patch test first and check online for anything you shouldn't use it on... for example you can't use vinegar on marble.
The recipe is really simple just dilute white vinegar with an EQUAL amount of water in a squirty bottle... and that's it... yes, really. (For example if you use half a litre of white vinegar you need to add half a litre of water.) White vinegar is a natural cleaner, disinfectant and deodoriser, so far we haven't found anything we haven't been able to get clean naturally. There is a slight smell of vinegar but this dissipates as the surface dries and you can add a few drops of essential oil if you prefer, to give your cleaner a nicer smell. We have used tea tree or lemon for the extra cleaning abilities in the past.
Alternatively, we have a jar which we fill with the white vinegar before it is diluted, then simply add all the citrus peel from the fruit eaten and leave to infuse for a week or two before straining and diluting the vinegar with an equal amount of water, as above. This makes the vinegar smell more like oranges and lemons negating the need for essential oil and making the house smell lovely.
We have also been utilising lemon juice for it's natural cleaning and bleaching effects and bicarbonate of soda can be mixed into a paste and used when you need something a little more abrasive.
I would never go back to conventional cleaners now as I find it very effective, very cheap and it doesn't make me sneeze but if you decide to try out any new cleaners do a patch test first and check online for anything you shouldn't use it on... for example you can't use vinegar on marble.
Thursday, 25 July 2013
Elderflower cordial
Due to the late start to spring, I was able to enjoy one of my favourite drinks on my birthday this year... Elderflower cordial. I love everything about this drink, the mere taste reminds me of summer. Even the children love it, my daughter has a cute name for it, she calls it 'flower juice'. So I thought I would share our recipe here.
You need to pick about 20 to 30 flower heads on a sunny day, as fresh as possible. I love the smell of these flowers, to me they smell exactly like the cordial tastes.
We usually leave them upside down for a short while to ensure any bugs trapped in the flowers can escape safely. Then pour two litres of boiling water into a large tub, we use our wine fermenting tub, and mix in one kilogram of sugar until it dissolves. Prepare two lemons... we usually zest and juice them, chop up the remains and toss them all into the boiling water.
Once the water has cooled to warm, drop the flowers in too. At this point you add two teaspoons of citric acid, this is a preservative and is available at the chemist. This helps your finished cordial last a little longer, however, we have made it without adding the extra citric acid before without any problems. Everyone here loves it so much it never lasts longer than a few days anyway. Give your mixture a stir and leave it to infuse for 24 to 48 hours depending on the strength you prefer.
After infusing you will need to strain the flowers out of the liquid and bottle it up in sterilised bottles. It will be strong as it needs to be diluted with water to drink it. Then just enjoy...
You need to pick about 20 to 30 flower heads on a sunny day, as fresh as possible. I love the smell of these flowers, to me they smell exactly like the cordial tastes.
We usually leave them upside down for a short while to ensure any bugs trapped in the flowers can escape safely. Then pour two litres of boiling water into a large tub, we use our wine fermenting tub, and mix in one kilogram of sugar until it dissolves. Prepare two lemons... we usually zest and juice them, chop up the remains and toss them all into the boiling water.
Once the water has cooled to warm, drop the flowers in too. At this point you add two teaspoons of citric acid, this is a preservative and is available at the chemist. This helps your finished cordial last a little longer, however, we have made it without adding the extra citric acid before without any problems. Everyone here loves it so much it never lasts longer than a few days anyway. Give your mixture a stir and leave it to infuse for 24 to 48 hours depending on the strength you prefer.
After infusing you will need to strain the flowers out of the liquid and bottle it up in sterilised bottles. It will be strong as it needs to be diluted with water to drink it. Then just enjoy...
Subscribe to:
Posts (Atom)