I'm back to show you my daughter's corn husk recycling craft. The idea came from the paper beads we all used to make as children, the dried corn husks looked like a similar shape to the paper template, so we thought it was worth trying.
First take your dried out corn husk, which is an elongated triangle shape, and start to roll it around a skewer as shown above. A little glue may help it stick here. Carry on rolling right to the end of the corn husk and glue it down.
At this stage it looks a little like a cotton bud. You now need to slip it off the skewer carefully to preserve the hole in the center as this is where you will thread your bead later.
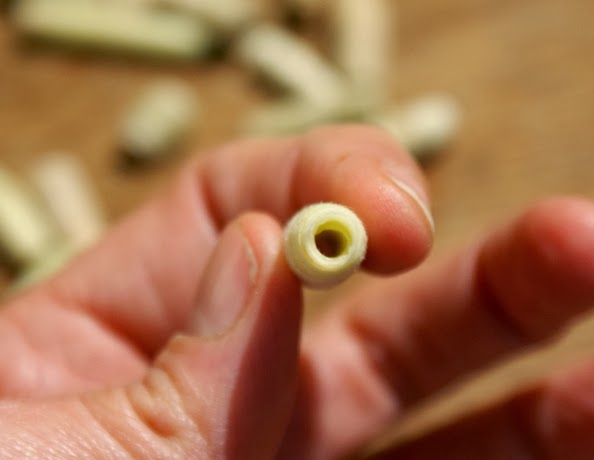
Once we had made as many as we needed they can be trimmed to neaten up the ends and to the size you require.
My daughter chose to paint them in beautiful colours with some metallic paints, they could also be varnished if you want to make them more hard wearing.
After the beads were dry they were threaded onto a piece of thin elastic, just the right size for a bracelet or necklace.
This is the finished bracelet, very pretty colours... I think she did a wonderful job. If you don't have corn husks to use have a go at the traditional paper bead making... it's a lot of fun.
A thrifty and natural life...full of magical crafts, money saving tips and home educating along the way.
Showing posts with label corn husks. Show all posts
Wednesday, 23 October 2013
Saturday, 19 October 2013
Mini corn husk broomsticks
As Halloween is approaching fast we thought we would make some mini decorations to hang on our spooky Halloween tree. After the crops were harvested on our allotment we had a lot of corn husks left over so we have decided to use them.
First take a small stick and wrap the dried corn husks around one end, any small twigs or raffia will do if you don't have any corn husks. Then trim the ends to an appropriate length for a broomstick, we have cut ours at about a couple of inches.
Tie the corn husks to your stick tightly, we have used copper wire as we have quite a lot of it but any string will do.
Snip up from the bottom to give the little decoration an authentic broomstick look. We gave ours a spray with the glitter spray to finish it off with a magic dust sparkle.
That's all there is too it, all that is left is to hang them on the spooky Halloween tree when it is put up.
Last year we made corn husk dolls and a corn husk sunflower wreath with our left over corn husks. My youngest daughter has also been crafting this week with these leaves and I will be back soon to show you her wonderful creation.
First take a small stick and wrap the dried corn husks around one end, any small twigs or raffia will do if you don't have any corn husks. Then trim the ends to an appropriate length for a broomstick, we have cut ours at about a couple of inches.
Tie the corn husks to your stick tightly, we have used copper wire as we have quite a lot of it but any string will do.
Snip up from the bottom to give the little decoration an authentic broomstick look. We gave ours a spray with the glitter spray to finish it off with a magic dust sparkle.
That's all there is too it, all that is left is to hang them on the spooky Halloween tree when it is put up.
Last year we made corn husk dolls and a corn husk sunflower wreath with our left over corn husks. My youngest daughter has also been crafting this week with these leaves and I will be back soon to show you her wonderful creation.
Thursday, 18 October 2012
Corn Husk Sunflower Wreath
After harvesting our corn from the allotment the children have been trying to find craft uses for the left over husks, last week we made the corn husk dolls and this week we are making a sunflower wreath. We love sunflowers and due to bad weather and slugs we didn't manage to grow any this year, so the children have made one starting by painting the corn husks.
After they painted the husks yellow they were left to dry and we twisted some garden wire into a circle to form the basic outline for our sunflower shape.
The 'petals' were then bent around this wire and glued in place, we used hot glue as it is very quick and dries fast.
When bending aim to have the yellow side facing forward and glue on the back, this should keep the front looking nice, continue around the hoop as seen below.
We started with the larger petals first to get a complete circle all about the same size.
Once you have finished the first circle if you want to you can layer the flower to add more fullness, just continue going around building more layers until you are happy with the result or run out of petals.
Here's ours after the layering, as you can see it has a beautiful 3D effect. I have pinned it on the notice board so you can see how it hangs, I really love the wreath like this but the children decided it needed something else to make it more sunflower like. They have cut out a circle of brown felt and glued it to the back.
The children are really pleased with their sunflower wreath and I think it looks lovely. This could also be achieved with leaves if you don't have access to corn husks, as there are some beautiful coloured leaves about at the moment. We may try a red one when we collect enough leaves.
After they painted the husks yellow they were left to dry and we twisted some garden wire into a circle to form the basic outline for our sunflower shape.
The 'petals' were then bent around this wire and glued in place, we used hot glue as it is very quick and dries fast.
When bending aim to have the yellow side facing forward and glue on the back, this should keep the front looking nice, continue around the hoop as seen below.
We started with the larger petals first to get a complete circle all about the same size.
Once you have finished the first circle if you want to you can layer the flower to add more fullness, just continue going around building more layers until you are happy with the result or run out of petals.
Here's ours after the layering, as you can see it has a beautiful 3D effect. I have pinned it on the notice board so you can see how it hangs, I really love the wreath like this but the children decided it needed something else to make it more sunflower like. They have cut out a circle of brown felt and glued it to the back.
The children are really pleased with their sunflower wreath and I think it looks lovely. This could also be achieved with leaves if you don't have access to corn husks, as there are some beautiful coloured leaves about at the moment. We may try a red one when we collect enough leaves.
Thursday, 11 October 2012
Corn Husk Dolls
After harvesting the corn from our allotment we had many of the outer leaves or husks left over which usually get composted but I thought I would get the children to fit in a few extra crafts. The traditional corn husk dolls are a very beautiful Native American Indian craft but I thought I would try a simpler way of making them for small children to try. When I was a little girl I used to make wool dolls with my grandmother, like the ones below, which could be worn on a brooch.
This is the style we thought we would use for our corn husk dolls. First you need the outer leaves of a corn cob, these can be used fresh as I have or they can be dried.
Gather them all together in your hand as tightly as possible and tie a knot around one end as seen in the photograph below.
Trim your knot up and the corn leaves to make it look neat and level, then tie another knot a little further down.... this will now be the head.
Next you need to make the arms, we have used a couple of leaves tied at each end to look like hands. Separate the trailing leaves on your doll as seen above and insert the arms.
Then tie another knot under your arms to hold them in place, in the above photograph I have tied a little extra wool around the chest in a criss cross style, just as decoration, in the pink one we have left this out. Your corn doll is now taking shape, if you would like a lady corn doll it can be left like this, just trim the bottom leaves and she looks like she is wearing a long dress.
For a man corn doll, split the bottom leaves in two and tie off in legs like the photograph above... we have drawn on a little face but the traditional ones are faceless.
This one even stands up by herself.... my daughter has really enjoyed making and playing with these over the last few days, I think they have taken up residence in her doll's house at the moment. I will leave you with a photo of the whole family.
This is the style we thought we would use for our corn husk dolls. First you need the outer leaves of a corn cob, these can be used fresh as I have or they can be dried.
Gather them all together in your hand as tightly as possible and tie a knot around one end as seen in the photograph below.
Trim your knot up and the corn leaves to make it look neat and level, then tie another knot a little further down.... this will now be the head.
Next you need to make the arms, we have used a couple of leaves tied at each end to look like hands. Separate the trailing leaves on your doll as seen above and insert the arms.
Then tie another knot under your arms to hold them in place, in the above photograph I have tied a little extra wool around the chest in a criss cross style, just as decoration, in the pink one we have left this out. Your corn doll is now taking shape, if you would like a lady corn doll it can be left like this, just trim the bottom leaves and she looks like she is wearing a long dress.
For a man corn doll, split the bottom leaves in two and tie off in legs like the photograph above... we have drawn on a little face but the traditional ones are faceless.
This one even stands up by herself.... my daughter has really enjoyed making and playing with these over the last few days, I think they have taken up residence in her doll's house at the moment. I will leave you with a photo of the whole family.
Subscribe to:
Posts (Atom)