Saturday, 26 January 2013

Happy New Year

I know it's a belated Happy New Year as I have been taking some much needed time off to spend with my family, but I thought I would send you all good wishes for this year and share some of the things we made over the Yule season.

As we had been studying life on the home front during WWII, we thought it would be nice to try and hand make some of the small stocking presents for the children. During the war many children received home made gifts at Christmas time and we thought this would make a change from the usual gifts. My husband made some beautifully turned spinning tops and cup and ball sets and I thought I would have a go at amigurumi, a sort of miniature crochet toy.


There are many patterns online but I had a huge problem following them and in the end I gave up and made up my own simply based on the style of a hat I made for my daughter last year. Not bad really for a first attempt, I have tried to give the little monsters a character matching one of the children's interests. A little ballerina and an alien, I had plans for more things but totally ran out of time.


We even made Christmas gifts for the cat, he has a little felt bird on a stick complete with feathers and catnip.

It has been very cold here the last couple of weeks and the children have spent a lot of time playing in the snow, they have also conducted so many experiments I have lost count. It has been cold enough to freeze the water in the chicken feeder on a daily basis, giving us beautiful ice bowls which have been saved in the freezer to be used as lanterns.


This is the smallest one with a candle inside, so beautiful... definitely worth saving. I hope you are all having as interesting start to the new year as we are.


Thursday, 13 December 2012

Recycled Tin Christmas Decorations

The children love to try their hand at many different crafts and this year we thought we would have a go at a recycling craft and some metal punching. The metal circles were cut from the bottom of the cardboard tubes containing snacks often eaten at this time of year, in fact I saved these ones from last year.


The photograph above shows the equipment we gathered together to make our decorations and the metal disc. You could use a hammer and large nail for this but as we had small children keen to try, my husband put together a child friendly tool for small hands. This comprises of an old knitting needle fixed into a handle. If you look closely at the metal disc you will see I have marked the central point for my design. We have drawn on all of the designs or punched free hand but if you want to you could stick on a pattern to copy.


You just line up your pointed tool or nail onto your line and hit it with a hammer... very simple. I have moved along the lines tapping and making a pattern, in this case a snowflake. Remember to have a spare piece of wood under your metal disc to stop you going right through and leaving holes in your table.


The children loved this craft especially being let loose with a hammer and it got rather noisy at the table. My daughter also added some letters to her disc with a letter punch set.


These are the finished decorations, we have added some string to hang them with. They are quite shiny and catch the light beautifully hanging on the Christmas tree. I might hang some of them in the garden in the spring to use them to scare the birds away from our peas as they reflect so well.


The patterns could be as simple or intricate as you choose, I think the children have managed to make some lovely decorations from recycling something that usually just gets thrown away.


Friday, 30 November 2012

Homemade Granola

I have been wanting to make our own granola for a while now but kept putting it off for one reason or another, finally last month I took the plunge and loved it so much found myself wishing I had done it years ago. I wanted to make it wheat and sugar free, still be tasty and very heavy on the nuts, seeds and dried fruit. I went through a process of picking out which nuts and seeds would have the best health benefits for our family and gave the recipe a go.


First things first start mixing the main ingredients, I have used 400g of oats and 150g of honey this may seem like a lot but I have been making up a batch to last the week. I have chosen to use coconut oil in the recipe due to it's health benefits and lovely toasted coconut taste in the finished granola, melt about 75g of the oil and brush some on the baking tray  and pour the rest into the oats.

After mixing well, spread onto the baking tray or dish... the recipe needs to cook for about 25 to 30 minutes at 180 degrees centigrade but it will need stirring every 10 minutes to ensure even cooking. I usually put the nuts and seeds in half way through cooking while I am stirring as I don't like them too toasted.


I have used about 100g of mixed seeds (pumpkin, sunflower, linseed/flax and sesame) and about 75g of mixed chopped nuts (brazil, almonds etc) and mixed them in to the granola after the first 10 minutes although it could all be done at the start to save time.

After it has finished cooking leave it to cool completely it will crisp up... at this point stir in about 75g of your chosen dried fruit. We have found the honey to be sweet enough without any other sugar. Once it has cooled it can be stored in a jar to keep it fresh.

This is absolutely delicious, such an easy recipe to make and really simple to customise to include your favourite things. Perfect for breakfast with milk, with yoghurt or just out of the jar as a snack.


Wednesday, 28 November 2012

Hawthorn Berry Syrup

The hawthorn berry was the last syrup I have made this year, and it was made in exactly the same way as the elderberry syrup and the rosehip syrup. I decided to make just a small amount of this syrup and started with just 200g of berries. Please do not use any berries that you cannot identify without any doubt, we are very experienced.


The berries were sorted and those which were not used were put out on the bird table, so none were wasted. I won't list the recipe again, it can be found under the rosehip page above if you would like it. Hawthorn berries have lots of heart benefits amongst other things, more can be read here if you are interested.


This syrup tastes quite like the crab apple jelly I made last year and is an equally beautiful colour. Will be keeping this one for myself, although the children have been using the rosehip and the elderberry syrup to help with their recent cold.


Wednesday, 31 October 2012

Happy Halloween

Just a short post to wish you all a Happy Halloween / Blessed Samhain and show you a few of the things we have been doing. We have brought in our Halloween tree, this is usually made from some spooky looking sticks which the children decorate.


I had to squeeze it on the window ledge between our ginger and turmeric plants that we have been growing. It looked a little sparse so we thought we would make a few extra decorations, one of these was a twig star.


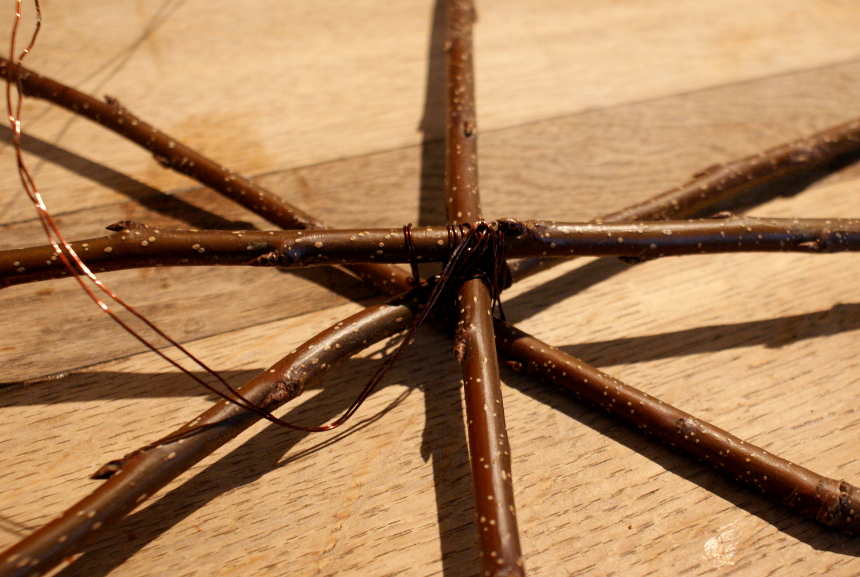
As you can see in the photograph these are very easy to make, I have used some small twigs saved from when my husband pruned a shrub recently and copper wire. Any wire or string would do, I have used copper wire as we seem to have loads of it about, my husband saves it from broken appliances to use in craft projects. If you are interested in salvaging your own copper wire you can read about it at the bottom of this post.


The twigs are just tied in the shape of a star and hung on a piece of thread onto the Halloween tree. We also made some ghostly cupcakes.... my daughter thought they looked really cute. We added blueberries to our cake mixture to represent 'eye of newt' and desiccated coconut for 'bat toe nail clippings'. The ghost shape is just formed from icing. Very tasty.


We have been really busy and my husband has been doing some crafts too for Mexico's day of the dead (Día de los Muertos),  If you would like to see his sugar skulls, cupcakes and pumpkins you can read here. They look really cool.


Friday, 26 October 2012

Very Large Cobweb

With Halloween / Samhain approaching fast the children have been decorating the house to give it a spooky feel and a few new crafty things were needed. A couple of years ago we made small woven cobwebs with conker spiders ( see here) but they didn't survive this year so we decided to make some more on a much bigger scale.


My husband had been pruning back a couple of trees recently, so we collected some straight sticks that he had put aside to use as bean canes next year. They were laid out to give the best shape for a web, we used four sticks and fixed them together in the middle.


We have used wire for this but any kind of string or wool would do as long as it was fixed quite firmly.


As you can see in the photograph above my daughter tested them for sturdiness. We then chose some old wispy wool from the craft cupboard to make the web.


We wound the wool around in a web style pattern trying to leave equal gaps all the way to the edge of the sticks. To help the wool stay in place it has been wrapped around the stick a couple of times and we have taken advantage of little buds and the natural pieces that stick out.


Here is the end result... a very large cobweb. The size is only limited by the length of the sticks you have available.


 Complete with spider ready to scare people.


Thursday, 18 October 2012

Corn Husk Sunflower Wreath

After harvesting our corn from the allotment the children have been trying to find craft uses for the left over husks, last week we made the corn husk dolls and this week we are making a sunflower wreath. We love sunflowers and due to bad weather and slugs we didn't manage to grow any this year, so the children have made one starting by painting the corn husks.


After they painted the husks yellow they were left to dry and we twisted some garden wire into a circle to form the basic outline for our sunflower shape.


The 'petals' were then bent around this wire and glued in place, we used hot glue as it is very quick and dries fast.


When bending aim to have the yellow side facing forward and glue on the back, this should keep the front looking nice, continue around the hoop as seen below.


We started with the larger petals first to get a complete circle all about the same size.


Once you have finished the first circle if you want to you can layer the flower to add more fullness, just continue going around building more layers until you are happy with the result or run out of petals.


Here's ours after the layering, as you can see it has a beautiful 3D effect. I have pinned it on the notice board so you can see how it hangs, I really love the wreath like this but the children decided it needed something else to make it more sunflower like. They have cut out a circle of brown felt and glued it to the back.


The children are really pleased with their sunflower wreath and I think it looks lovely. This could also be achieved with leaves if you don't have access to corn husks, as there are some beautiful coloured leaves about at the moment. We may try a red one when we collect enough leaves.