Wednesday, 31 October 2012

Happy Halloween

Just a short post to wish you all a Happy Halloween / Blessed Samhain and show you a few of the things we have been doing. We have brought in our Halloween tree, this is usually made from some spooky looking sticks which the children decorate.


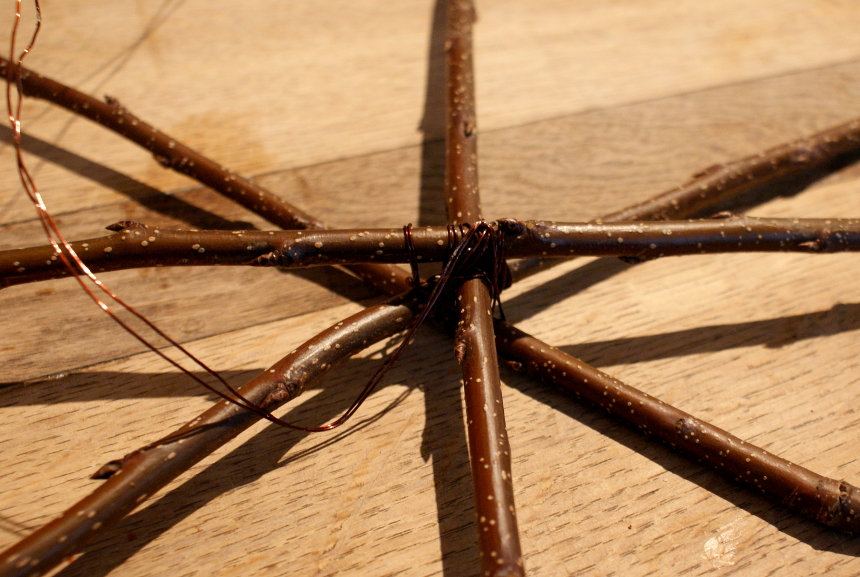
I had to squeeze it on the window ledge between our ginger and turmeric plants that we have been growing. It looked a little sparse so we thought we would make a few extra decorations, one of these was a twig star.


As you can see in the photograph these are very easy to make, I have used some small twigs saved from when my husband pruned a shrub recently and copper wire. Any wire or string would do, I have used copper wire as we seem to have loads of it about, my husband saves it from broken appliances to use in craft projects. If you are interested in salvaging your own copper wire you can read about it at the bottom of this post.


The twigs are just tied in the shape of a star and hung on a piece of thread onto the Halloween tree. We also made some ghostly cupcakes.... my daughter thought they looked really cute. We added blueberries to our cake mixture to represent 'eye of newt' and desiccated coconut for 'bat toe nail clippings'. The ghost shape is just formed from icing. Very tasty.


We have been really busy and my husband has been doing some crafts too for Mexico's day of the dead (Día de los Muertos),  If you would like to see his sugar skulls, cupcakes and pumpkins you can read here. They look really cool.


Friday, 26 October 2012

Very Large Cobweb

With Halloween / Samhain approaching fast the children have been decorating the house to give it a spooky feel and a few new crafty things were needed. A couple of years ago we made small woven cobwebs with conker spiders ( see here) but they didn't survive this year so we decided to make some more on a much bigger scale.


My husband had been pruning back a couple of trees recently, so we collected some straight sticks that he had put aside to use as bean canes next year. They were laid out to give the best shape for a web, we used four sticks and fixed them together in the middle.


We have used wire for this but any kind of string or wool would do as long as it was fixed quite firmly.


As you can see in the photograph above my daughter tested them for sturdiness. We then chose some old wispy wool from the craft cupboard to make the web.


We wound the wool around in a web style pattern trying to leave equal gaps all the way to the edge of the sticks. To help the wool stay in place it has been wrapped around the stick a couple of times and we have taken advantage of little buds and the natural pieces that stick out.


Here is the end result... a very large cobweb. The size is only limited by the length of the sticks you have available.


 Complete with spider ready to scare people.


Thursday, 18 October 2012

Corn Husk Sunflower Wreath

After harvesting our corn from the allotment the children have been trying to find craft uses for the left over husks, last week we made the corn husk dolls and this week we are making a sunflower wreath. We love sunflowers and due to bad weather and slugs we didn't manage to grow any this year, so the children have made one starting by painting the corn husks.


After they painted the husks yellow they were left to dry and we twisted some garden wire into a circle to form the basic outline for our sunflower shape.


The 'petals' were then bent around this wire and glued in place, we used hot glue as it is very quick and dries fast.


When bending aim to have the yellow side facing forward and glue on the back, this should keep the front looking nice, continue around the hoop as seen below.


We started with the larger petals first to get a complete circle all about the same size.


Once you have finished the first circle if you want to you can layer the flower to add more fullness, just continue going around building more layers until you are happy with the result or run out of petals.


Here's ours after the layering, as you can see it has a beautiful 3D effect. I have pinned it on the notice board so you can see how it hangs, I really love the wreath like this but the children decided it needed something else to make it more sunflower like. They have cut out a circle of brown felt and glued it to the back.


The children are really pleased with their sunflower wreath and I think it looks lovely. This could also be achieved with leaves if you don't have access to corn husks, as there are some beautiful coloured leaves about at the moment. We may try a red one when we collect enough leaves.


Friday, 12 October 2012

Rose Hip Syrup

We have just made the rose hip syrup for the winter season, these small fruits of the dog rose contain a huge amount of vitamin C amongst other things which helps protect against catching colds and flu, if you would like to know more about the benefits you can read here.


We started by collecting the rose hips, but please remember only pick berries if you know exactly what you are picking. After washing and sorting out the good ones we ended up with about 500g.


Due to their hardness it is best to chop the rose hips first either by hand or in a food processor. Then put the whole lot in a pan and bring to the boil with double the amount of liquid to rose hips, so in our case we put in a litre.


We boiled this for about 5 to 10 minutes then left it to steep for 20 minutes. The cooled mixture was then put through a straining bag to leave us with just liquid and no pips. This strained liquid needs to be returned to the pan and re heated to add and dissolve the sugar, usually with syrups I add an equal amount of sugar to the liquid... so if your end product is 1 litre you would add 1 kilogram of sugar but I have found this quite sweet so we have added slightly less. If you add the sugar a little at a time you can stop at a level which is sweet enough for you, it is also possible to add honey instead of sugar which is something we will be doing next year.


Here is the finished product, I have taken the photograph outside so that you can see the wonderful colour. This is not only a very effective natural remedy but also tastes divine on natural yoghurt or ice cream.

The rose hip syrup has had special meaning to the children this year as we have been watching a wonderful history program called Wartime Farm, and they went into details of how important this was to children's health during the war.


We have also made elderberry syrup again this year as another of our natural remedies for the home medicine cabinet. We made double the amount of this as it was so effective last year, if you would like to make some you can find it here.


Thursday, 11 October 2012

Corn Husk Dolls

After harvesting the corn from our allotment we had many of the outer leaves or husks left over which usually get composted but I thought I would get the children to fit in a few extra crafts. The traditional corn husk dolls are a very beautiful Native American Indian craft but I thought I would try a simpler way of making them for small children to try. When I was a little girl I used to make wool dolls with my grandmother, like the ones below, which could be worn on a brooch.


This is the style we thought we would use for our corn husk dolls. First you need the outer leaves of a corn cob, these can be used fresh as I have or they can be dried.


Gather them all together in your hand as tightly as possible and tie a knot around one end as seen in the photograph below.


 Trim your knot up and the corn leaves to make it look neat and level, then tie another knot a little further down.... this will now be the head.


Next you need to make the arms, we have used a couple of leaves tied at each end to look like hands. Separate the trailing leaves on your doll as seen above and insert the arms.


Then tie another knot under your arms to hold them in place, in the above photograph I have tied a little extra wool around the chest in a criss cross style, just as decoration, in the pink one we have left this out. Your corn doll is now taking shape, if you would like a lady corn doll it can be left like this, just trim the bottom leaves and she looks like she is wearing a long dress.


For a man corn doll, split the bottom leaves in two and tie off in legs like the photograph above... we have drawn on a little face but the traditional ones are faceless.


This one even stands up by herself.... my daughter has really enjoyed making and playing with these over the last few days, I think they have taken up residence in her doll's house at the moment. I will leave you with a photo of the whole family.


Sunday, 30 September 2012

Hot box project update.

We have been trying to use as much of the garden space as possible this year as well as the allotment in an effort to produce as much as possible of our food. Unfortunately this year was a really bad year for growing food due to the weather but despite this we have done quite well and had a few successful projects along the way. Now that most of the fruit and vegetables have been preserved I can show you one of these... I call them the hot boxes.

We have a really warm spot in the garden, a real sun trap, it's where I sit to relax and read a book....and it's where I got to thinking what an ideal spot this would be to grow some extra food. Unfortunately the downside to this idea is that there is no soil here, we already have pots of herbs along this wall but there was lots of wasted space.


So my husband came up with this.... rows of extra planting areas....just like window boxes. They have been quite successful this year and suffered much less slug damage than the vegetables planted in the ground. The above photograph was taken in the spring when they were just planted up, the top box has radishes, easy to care for and pick as you need them for lunch. The idea was to keep them going all summer on a rotation so more seeds were planted as the food was eaten.

The lower box in the photograph was planted up with a row of spring onions and a row of chantenay carrots, as these are small enough to fit.


These are some of the carrots, quite a good haul. We really enjoyed our experiments into vertical gardening and making the best use of our space, the boxes were a really good height for the children to help out with and too high for the chickens to help with....thankfully.

If you would like to make some yourself my husband has written about them here.

Sunday, 16 September 2012

'Not back to school' week

Every year, as a home educating family, we celebrate 'not going back to school' as the parks, libraries, zoos and museums become less full. Usually we have a quiet picnic somewhere in a natural setting and the children have time to explore but this year we thought we would try something different. So we started off the week with a trip to a theme park, the children had a fabulous time and we didn't have to queue for a single ride.


The week coincided with the Heritage open days, and many historical places were open to experience absolutely FREE of charge. To take advantage of this opportunity we chose four activities or places to explore and got set for a very busy few days. 


The photograph above shows the booklets we have collected from each activity for the children to keep and read to help them remember our days out. The first place we visited was a church from our area which had recently had restoration work completed, we had a member of the church take us on a private guided tour and tell us the history of the building and answered all our questions.

Then to the great delight of the children we took a open topped bus tour of our city usually aimed at tourists, so the commentary told us the historic facts of all the places we passed. This was very exciting for the children and not something you usually do when you have lived somewhere for a long time.

Next we took the chance to visit a museum which has been closed for several years having refurbishments done, so the children had never been. we loved this museum it told the history of our city, with many stories of the local people and industries through the ages. We explored an amazingly reconstructed old pharmacy, our city through WW2 and even spent some time relaxing in a 1950's lounge. 

Lastly we went to the castle museum and art gallery, we visit here quite regularly and really enjoyed the costumed characters that were walking about on the open day. My favourite section is the celebration of the Victorians and their collections and documentation of the world around them. Also the food available to the castle occupants in medieval times which was laid out for us to see today. The children loved all the interactive displays and things they are allowed to touch and they also got the chance to ride in a chariot in the Boudicca section.

Overall we had so much fun and had the chance to learn so much about the city we live in, surprisingly, we have decided to visit some more places. I have also managed to get a book from our library about the history of our city from a children's perspective, which is proving very popular.