We are back after our winter break and would like to wish all our readers a very Happy new year full of new adventures. Just thought we would give you an update of a few of our adventures over the last week or two. Our baby Christmas / Yule tree has been outside now for a couple of weeks and is looking much better.... hopefully it will continue to grow all year ready to be brought in again for next year.
The decorations have been very carefully packed away... If you follow our blogs you will know that we hand make a lot of decorations and each one contains so much love and so many memories of past seasons and the children growing up that we would absolutely hate to lose any of them.
As an extremely thrifty living family this careful packing also saves us much money each year... Talking about thrifty living, we have used the January sales to stock up on anything we may need for next Christmas at just a fraction of the price!
We have bought the crackers and all of the wrapping paper for next year for bargain prices many things were just a few pence, plus some rolls of paper which could also double up as other occasion wrapping paper, for example stars can be used as birthday or congratulation wrapping paper too. Extra thrifty bonus points! No need to worry or stress about these things throughout the year or in the run up to Christmas now.
Another good money saving tip is to look out for bargain foods after Christmas... most supermarkets are wanting to offload their seasonal excesses very cheaply. One of the things we bought were these parsnips for just 3p a bag, I have to admit we bought lots... more than 10 bags. Well, we do eat a lot of vegetables and most of them have been prepared for the freezer, ideal to grab a handful for a casserole or just for roast parsnips. We have also been enjoying parsnip crisps too.
My freezer is also now full of carrots too, apart from the ones used for carrot stick snacks and of course carrot cake. Not only has this saved us a lot of money, it has also stopped a lot of food being discarded and ending up in landfill. As a zero food waste family this means a lot to us!
For the whole festive season we have been enjoying the beautiful flowers on my rhipsalis pilocarpa cactus plant, it's like looking up a lots of tiny white stars. We are also looking forward to the new season of growing especially with the arrival of our new seeds.
So once again we wish you a very happy new year and good bargain hunting!
A thrifty and natural life...full of magical crafts, money saving tips and home educating along the way.
Showing posts with label Yule. Show all posts
Tuesday, 9 January 2018
New Year, Bargains and Excesses!
Labels:
bargains,
cacti,
cactus,
carrot cake,
carrots,
Christmas,
crackers,
decorations,
flowers,
happy new year,
memories,
parsnip crisps,
parsnips,
seeds,
stars,
thrifty,
thrifty living,
wrapping paper,
Yule,
zero food waste
Wednesday, 20 December 2017
Natural wreaths
Following on from my last post showing how we made the wreath bases, I promised to add a few photos when we had finished decorating them. We prefer the natural look and usually prune a little overgrown greenery from our gardens to decorate with, which has the added bonus of being completely free.
This is our front door wreath, as you can see it has a completely green and natural look. I have used clippings from holly, ivy, pine and added a few pinecones. Some twigs have just been woven straight into the twig ring bases and some things, mainly the pinecones, have been wired on to hold them still.
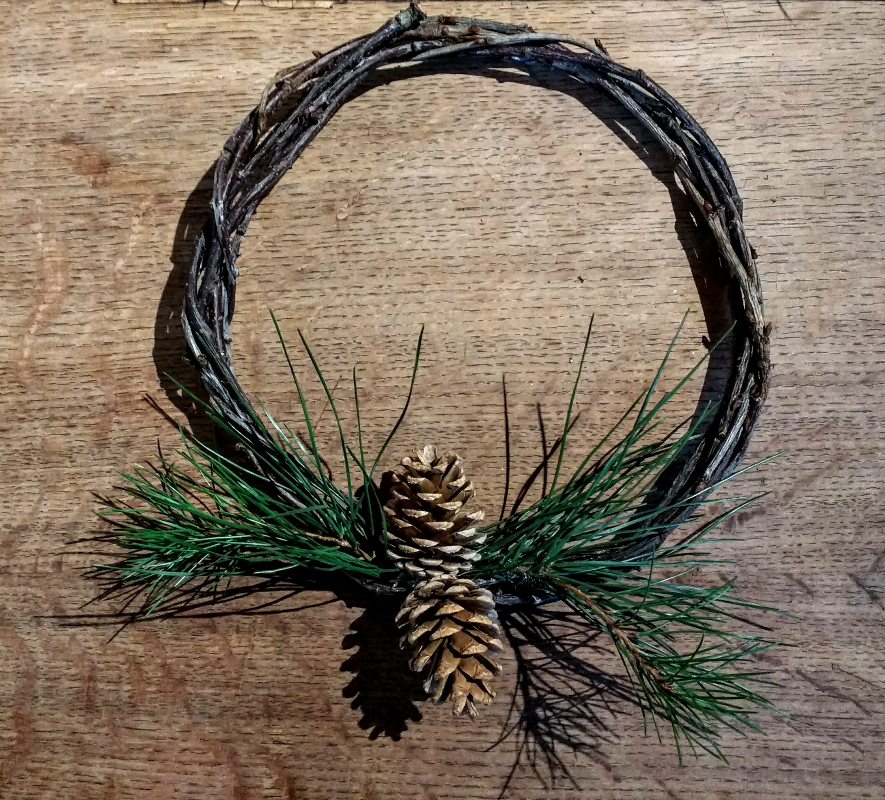
I have also made a few very simple ones to add to the back of some of our internal doors, as you can see I have woven in a small piece of pine and stuck a couple of pinecones on with a hot glue gun. I'm not sure yet whether to add a little snow spray.
These ring bases can be decorated as elaborate or as simply as you choose and the bases can be kept and used year after year with a new decor each time. Very simple, very quick and very thrifty.
This is our front door wreath, as you can see it has a completely green and natural look. I have used clippings from holly, ivy, pine and added a few pinecones. Some twigs have just been woven straight into the twig ring bases and some things, mainly the pinecones, have been wired on to hold them still.
I have also made a few very simple ones to add to the back of some of our internal doors, as you can see I have woven in a small piece of pine and stuck a couple of pinecones on with a hot glue gun. I'm not sure yet whether to add a little snow spray.
These ring bases can be decorated as elaborate or as simply as you choose and the bases can be kept and used year after year with a new decor each time. Very simple, very quick and very thrifty.
Sunday, 17 December 2017
Twig wreath and star bases
Following on from our theme of thrifty or free homemade Christmas / yule decorations we have been making the bases for our wreaths and stars. As keen gardeners we tend to save any useful looking clippings and my husband had recently pruned our cherry tree which has beautiful reddish tinted bark, so we set to work creating the bases to woven wreaths seen above.
This is the pile of twigs I started with... when freshly cut, the twigs are still very pliable and can quite easily be bent and twisted into shape. To form the rings I first took one stick and bent it into a ring shape, then held it in place with one hand whilst intertwining the next stick around the ring. This is quite fiddly and it is possible to tie the first stick into a ring shape if you'd prefer but I always find that once you've woven in a couple of sticks it holds it's shape by itself.
Once it holds it's own shape you can then decide on how many sticks to weave in, you could go for a simple ring with just a few sticks or something much thicker and more substantial.
We have gone for something in between as you can see in our first photograph... all ready to decorate for the season now. These bases have cost us nothing to make just using a few clippings from the garden and a little time, I usually decorate our wreaths with the natural look of fresh holly, ivy and pinecones from our gardens.
The stars are also easily made from twigs, cut five to the same size, lay them out in a star shape and tie off the corners. These can also be decorated to fit your decor.
I'll be back to post a couple of photos to show you the finished results when the wreaths have been decorated. After Christmas / Yule these wreath bases can be saved until they are needed again, I usually strip them back of all the fresh foliage and pack them away ready to be redecorated on their next outing.
Labels:
Christmas,
crafts,
decorations,
free,
natural,
star,
sticks,
thrifty living,
twigs,
wreath,
Yule
Wednesday, 29 November 2017
Pine Cone Garland
I recently posted some photographs of our pine cone garlands on social media and was inundated with questions on how to make these and many people commented on how beautiful the finished garlands looked. So I have decided to post a little guide on our very thrifty and natural Autumn, Yule or Christmas garland decorations.
My husband and I decided over 12 years ago that we would embrace thrifty living... no more shop bought decorations for us!!... Everything we wanted we would make as thriftily as possible. Not only has this saved us so much money, unpacking our lovingly, handmade Christmas decorations every year holds so many memories.
I absolutely love the simplicity and natural beauty of these pine cone garlands, the one above was made for Autumn but I also have one that was made for Christmas a few years ago which has a few more sparkles.
First you will need to collect some pine cones, we usually grab a few throughout the year as we find them. The amount of pine cones you need will depend on the length of garland required, I'm using seven for my mantle piece. I usually leave them outside for a little while to ensure that any critters safely leave the pine cones.
To make the fixings we are using screw eyelets, they are really cheap only a few pence for a bag. I have managed to screw these directly into the end of the pine cone by hand but it is a little fiddly, so if you need help starting your hole, a very thin drill bit may give you a start.
Next just thread your pine cones onto your chosen string or ribbon, we are using natural jute string here but ribbons work just as well and there is less movement of the pine cones. You may notice if using string that all the pine cones slip to the middle when you try to create a swag in your garland, you could tie them on to keep them still... but I have another remedy for this...
A little trick which allows you to easily fix them in place but still allows them to be movable if you need to change the position of a pine cone. Thread the string through your eyelet and then thread it through again, as seen in the above photo... so you create a loop.
This simple act gives your pine cone a little more resistance so that you can move it but it doesn't slip down the string.
These garlands can be kept natural or decorated for Christmas with a little glitter, paint or fake snow... the best part is it has literally taken a few minutes and cost a few pennies to make, and this beautiful garland can be reused every year.
My husband and I decided over 12 years ago that we would embrace thrifty living... no more shop bought decorations for us!!... Everything we wanted we would make as thriftily as possible. Not only has this saved us so much money, unpacking our lovingly, handmade Christmas decorations every year holds so many memories.
I absolutely love the simplicity and natural beauty of these pine cone garlands, the one above was made for Autumn but I also have one that was made for Christmas a few years ago which has a few more sparkles.
First you will need to collect some pine cones, we usually grab a few throughout the year as we find them. The amount of pine cones you need will depend on the length of garland required, I'm using seven for my mantle piece. I usually leave them outside for a little while to ensure that any critters safely leave the pine cones.
To make the fixings we are using screw eyelets, they are really cheap only a few pence for a bag. I have managed to screw these directly into the end of the pine cone by hand but it is a little fiddly, so if you need help starting your hole, a very thin drill bit may give you a start.
Next just thread your pine cones onto your chosen string or ribbon, we are using natural jute string here but ribbons work just as well and there is less movement of the pine cones. You may notice if using string that all the pine cones slip to the middle when you try to create a swag in your garland, you could tie them on to keep them still... but I have another remedy for this...
A little trick which allows you to easily fix them in place but still allows them to be movable if you need to change the position of a pine cone. Thread the string through your eyelet and then thread it through again, as seen in the above photo... so you create a loop.
This simple act gives your pine cone a little more resistance so that you can move it but it doesn't slip down the string.
These garlands can be kept natural or decorated for Christmas with a little glitter, paint or fake snow... the best part is it has literally taken a few minutes and cost a few pennies to make, and this beautiful garland can be reused every year.
Saturday, 26 January 2013
Happy New Year
I know it's a belated Happy New Year as I have been taking some much needed time off to spend with my family, but I thought I would send you all good wishes for this year and share some of the things we made over the Yule season.
As we had been studying life on the home front during WWII, we thought it would be nice to try and hand make some of the small stocking presents for the children. During the war many children received home made gifts at Christmas time and we thought this would make a change from the usual gifts. My husband made some beautifully turned spinning tops and cup and ball sets and I thought I would have a go at amigurumi, a sort of miniature crochet toy.
There are many patterns online but I had a huge problem following them and in the end I gave up and made up my own simply based on the style of a hat I made for my daughter last year. Not bad really for a first attempt, I have tried to give the little monsters a character matching one of the children's interests. A little ballerina and an alien, I had plans for more things but totally ran out of time.
We even made Christmas gifts for the cat, he has a little felt bird on a stick complete with feathers and catnip.
It has been very cold here the last couple of weeks and the children have spent a lot of time playing in the snow, they have also conducted so many experiments I have lost count. It has been cold enough to freeze the water in the chicken feeder on a daily basis, giving us beautiful ice bowls which have been saved in the freezer to be used as lanterns.
This is the smallest one with a candle inside, so beautiful... definitely worth saving. I hope you are all having as interesting start to the new year as we are.
As we had been studying life on the home front during WWII, we thought it would be nice to try and hand make some of the small stocking presents for the children. During the war many children received home made gifts at Christmas time and we thought this would make a change from the usual gifts. My husband made some beautifully turned spinning tops and cup and ball sets and I thought I would have a go at amigurumi, a sort of miniature crochet toy.
There are many patterns online but I had a huge problem following them and in the end I gave up and made up my own simply based on the style of a hat I made for my daughter last year. Not bad really for a first attempt, I have tried to give the little monsters a character matching one of the children's interests. A little ballerina and an alien, I had plans for more things but totally ran out of time.
We even made Christmas gifts for the cat, he has a little felt bird on a stick complete with feathers and catnip.
It has been very cold here the last couple of weeks and the children have spent a lot of time playing in the snow, they have also conducted so many experiments I have lost count. It has been cold enough to freeze the water in the chicken feeder on a daily basis, giving us beautiful ice bowls which have been saved in the freezer to be used as lanterns.
This is the smallest one with a candle inside, so beautiful... definitely worth saving. I hope you are all having as interesting start to the new year as we are.
Labels:
alien,
amigurumi,
ballerina,
cat toy,
Christmas,
crochet,
gifts,
happy new year,
ice,
lanterns,
little monster,
snow,
wwii,
Yule
Thursday, 13 December 2012
Recycled Tin Christmas Decorations
The children love to try their hand at many different crafts and this year we thought we would have a go at a recycling craft and some metal punching. The metal circles were cut from the bottom of the cardboard tubes containing snacks often eaten at this time of year, in fact I saved these ones from last year.
The photograph above shows the equipment we gathered together to make our decorations and the metal disc. You could use a hammer and large nail for this but as we had small children keen to try, my husband put together a child friendly tool for small hands. This comprises of an old knitting needle fixed into a handle. If you look closely at the metal disc you will see I have marked the central point for my design. We have drawn on all of the designs or punched free hand but if you want to you could stick on a pattern to copy.
You just line up your pointed tool or nail onto your line and hit it with a hammer... very simple. I have moved along the lines tapping and making a pattern, in this case a snowflake. Remember to have a spare piece of wood under your metal disc to stop you going right through and leaving holes in your table.
The children loved this craft especially being let loose with a hammer and it got rather noisy at the table. My daughter also added some letters to her disc with a letter punch set.
These are the finished decorations, we have added some string to hang them with. They are quite shiny and catch the light beautifully hanging on the Christmas tree. I might hang some of them in the garden in the spring to use them to scare the birds away from our peas as they reflect so well.
The patterns could be as simple or intricate as you choose, I think the children have managed to make some lovely decorations from recycling something that usually just gets thrown away.
The photograph above shows the equipment we gathered together to make our decorations and the metal disc. You could use a hammer and large nail for this but as we had small children keen to try, my husband put together a child friendly tool for small hands. This comprises of an old knitting needle fixed into a handle. If you look closely at the metal disc you will see I have marked the central point for my design. We have drawn on all of the designs or punched free hand but if you want to you could stick on a pattern to copy.
You just line up your pointed tool or nail onto your line and hit it with a hammer... very simple. I have moved along the lines tapping and making a pattern, in this case a snowflake. Remember to have a spare piece of wood under your metal disc to stop you going right through and leaving holes in your table.
The children loved this craft especially being let loose with a hammer and it got rather noisy at the table. My daughter also added some letters to her disc with a letter punch set.
These are the finished decorations, we have added some string to hang them with. They are quite shiny and catch the light beautifully hanging on the Christmas tree. I might hang some of them in the garden in the spring to use them to scare the birds away from our peas as they reflect so well.
The patterns could be as simple or intricate as you choose, I think the children have managed to make some lovely decorations from recycling something that usually just gets thrown away.
Tuesday, 21 December 2010
Thursday, 16 December 2010
Origami Tree cards
Just a quick post to show you what I made last night, we are making all our Yule / Christmas cards this year and we are going to be trying out many different styles, some for us and some for the children.
Last night I made this card for someone, it had to be posted so I wanted to get it done quickly, it was my first attempt at an origami card, those of you who follow me on twitter will know I failed miserably to make an origami paper crane for my husband on our 1st wedding anniversary (paper). So although this is quite easy I am still very pleased with it. If you would like to try out this card there are many guides on line. Happy folding.
Sunday, 12 December 2010
Paper Quilled Snowflakes
As home educators, we hope to provide our children with the opportunity to try as many different and exciting arts and crafts as we can fit in over the years, with the aim of finding the ones the children love most and wish to continue with. Some of this enthusiasm has also rubbed off on us and this season I have tried out the art of paper quilling.
I found a free guide on a craft site, which looked very self explanatory (link at the bottom of this page) and my husband made me a quilling tool from a cut down needle stuck into a piece of wood, isn't he lovely! We then used the paper shredder to get the strips of card or paper to the correct size. I used the card we use to make greetings cards from as I wanted my snowflake to be sturdy enough to go on the tree.
The snowflake was sprayed with silver paint and glitter spray, which made it a little stronger, and matched the colour scheme of my tree.
This is a photograph of my finished snowflake, with ribbon added so that it will hang on the tree. I really enjoyed making this and I think it looks beautiful hanging on the tree. You could also fix the snowflake to the front of a home made Yule or Christmas card and wow the recipient. My eldest daughter has also tried it out, although she has taken it a little further and created her own designs.
My daughters remind me a little of fractals, these are also waiting to be put onto the tree. The art of paper quilling has a long history which you can read about on this site. If you would like to try this very relaxing craft out for your self and create these beautiful snowflakes for your tree you can find the guide here. My husband has done a guide for making your own quilling tool which you can see here.
I found a free guide on a craft site, which looked very self explanatory (link at the bottom of this page) and my husband made me a quilling tool from a cut down needle stuck into a piece of wood, isn't he lovely! We then used the paper shredder to get the strips of card or paper to the correct size. I used the card we use to make greetings cards from as I wanted my snowflake to be sturdy enough to go on the tree.
The snowflake was sprayed with silver paint and glitter spray, which made it a little stronger, and matched the colour scheme of my tree.
This is a photograph of my finished snowflake, with ribbon added so that it will hang on the tree. I really enjoyed making this and I think it looks beautiful hanging on the tree. You could also fix the snowflake to the front of a home made Yule or Christmas card and wow the recipient. My eldest daughter has also tried it out, although she has taken it a little further and created her own designs.
My daughters remind me a little of fractals, these are also waiting to be put onto the tree. The art of paper quilling has a long history which you can read about on this site. If you would like to try this very relaxing craft out for your self and create these beautiful snowflakes for your tree you can find the guide here. My husband has done a guide for making your own quilling tool which you can see here.
Friday, 10 December 2010
Tree and Star
Finally got the tree up, well, mostly up! We still have some decorations to go on the tree which are in various stages of being made, painted, glittered or drying. Some of them I'm quite excited about and will be writing about them soon but at the moment this is how far we have got. This photograph doesn't do the tree justice, it is so sparkly in real life. I have to admit to being a little obsessive with the tree and getting it just right, I don't know why because after a few days it always looks like it has been attacked by several bears.
This is one of the stars my husband made to adorn our ceiling, it looks so beautiful reflected in light, it has also been sprayed with silver paint and glitter. I was originally going to make these with holographic paper to be more reflective but I think they look OK. So as you can see we are a little bit closer to being ready... if you would like to make the above star you can find a guide on this site.
Tuesday, 7 December 2010
Yule log and door wreath started
Time is moving so fast, I'm really behind in the seasonal preparations, I've managed to get the Yule log inside and partially decorated as you can see in the above photograph. The wood has been carefully selected to reflect our current situation and my husband has made a hole for the candle. I have decorated it with small clippings of holly and ivy from our garden, I need to add a few more things but for now that is as far as I have got. I was hoping that other family members might add a little of something they like, my daughter did add a couple of white pebbles and a drawing of a four leaf clover but she has since moved them on somewhere else. I will post another photograph when it is finished so you can see the end result.
This is our door wreath, I got the basic ring with the circle of twigs for a pound locally about six years ago. It has lasted very well and I still really like the simplicity of the twig style ring but this year I thought I would enhance it slightly with nature. I have carefully wound in a couple of trimmings from our garden of holly and ivy, I could have gone overboard and made a huge holly wreath but I really love my little holly bush by the front door and would much rather it stayed alive. I intend to wire on a few more pine cones as we have loads of these and maybe some fir tree clippings too, but so far I'm quite impressed with my handy work, definitely OK for hardly any cost. I will post another photograph of the end result so you can judge for yourself.
Sunday, 5 December 2010
Pine Cone Trees
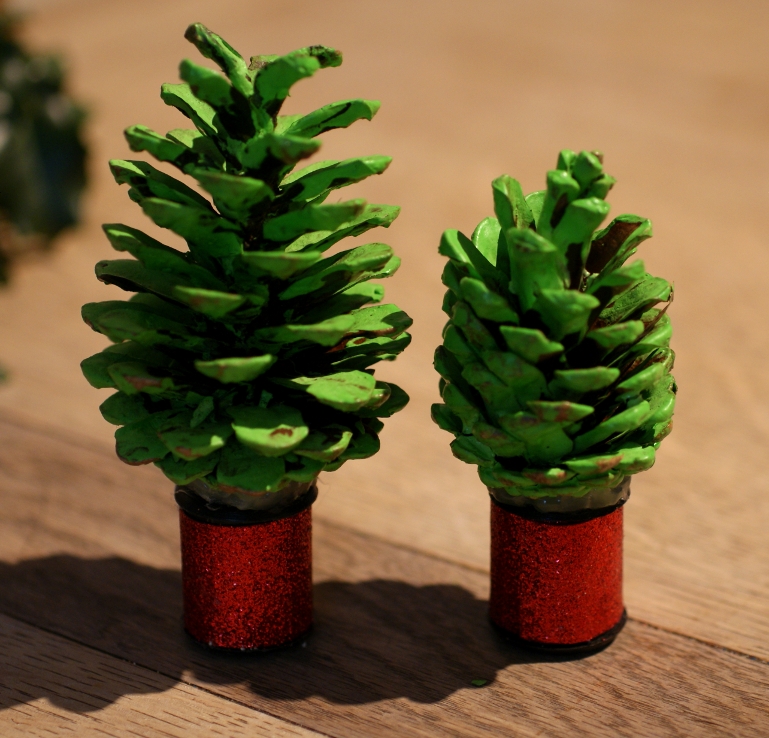
This is the first of our Yule / Christmas crafts this year, little pine cone trees. It is very easy, so even the smallest of the little folk can try this one. We always find ourselves with loads of pine cones this time of year, collected from many nature walks and displayed on our seasonal nature table. So finding something to use them for is always on my mind.
First, the children selected a good shaped pine cone and painted it green, these were then left to dry while we prepared the pots. Anything pot like can be used here, (bottle lids for example) but we have used old cotton reels and wrapped a piece of sparkly paper around them. My husband then glued the two together as you can see in the above photograph.
The next stage is also very easy, though a little messy, adorn with your chosen decorations. As you can see above my children have used as many sparkly things as they could find, totally raided the craft cupboards. We dabbed with glue then added sequins, jewels and glitter, of course! My daughter even found a different way of getting sequins and glitter on the little trees, smear with glue and roll the pine cone in them, seems to have worked well.
I think the final effect is very magical, they look so cute on the window ledge. The children had a really good time decorating the little trees and are quite impressed with their craft work. This craft can very easily be adapted to suit any age child and we hope you have as much fun as we did making them.
First, the children selected a good shaped pine cone and painted it green, these were then left to dry while we prepared the pots. Anything pot like can be used here, (bottle lids for example) but we have used old cotton reels and wrapped a piece of sparkly paper around them. My husband then glued the two together as you can see in the above photograph.
The next stage is also very easy, though a little messy, adorn with your chosen decorations. As you can see above my children have used as many sparkly things as they could find, totally raided the craft cupboards. We dabbed with glue then added sequins, jewels and glitter, of course! My daughter even found a different way of getting sequins and glitter on the little trees, smear with glue and roll the pine cone in them, seems to have worked well.
I think the final effect is very magical, they look so cute on the window ledge. The children had a really good time decorating the little trees and are quite impressed with their craft work. This craft can very easily be adapted to suit any age child and we hope you have as much fun as we did making them.
Quick Update
December has roared in with lots of snow and freezing cold weather, and for the last week or so we have been stuck inside due to stomach bugs and bad weather. Only venturing outside to play with the snow in short bursts as it is so cold. We have been getting ready for the Yule / Christmas craft sessions and choosing which things we will try to make. Very exciting stuff!
I still haven't improved much with the crochet, I made the above headband for my daughter, but not much else. I think maybe using the cheap wool that has been in the craft cupboard for years is probably not a good idea, so before I carry on with more I'll probably buy some of the good wool.
With the onset of bad weather our thoughts have been with the birds that visit our garden, my husband and the children have been busy making bird feeders from coconut shells as you can see above, and various other ways of feeding the birds. If you would like to read more on our bird feeders you can check out my husbands blog here. Last year we made bird treats by rolling pine cones in peanut butter then in bird seed, which they loved, both the birds and the children.
I still haven't improved much with the crochet, I made the above headband for my daughter, but not much else. I think maybe using the cheap wool that has been in the craft cupboard for years is probably not a good idea, so before I carry on with more I'll probably buy some of the good wool.
With the onset of bad weather our thoughts have been with the birds that visit our garden, my husband and the children have been busy making bird feeders from coconut shells as you can see above, and various other ways of feeding the birds. If you would like to read more on our bird feeders you can check out my husbands blog here. Last year we made bird treats by rolling pine cones in peanut butter then in bird seed, which they loved, both the birds and the children.
My husband has also been making lots of these little wooden plaques for me, various designs and all from recycled materials. Isn't he handy and thoughtful and just plain lovely. If you would like to read more about these and see all the other designs have a quick look here .
Well, that was a very quick round up but I will be back here very soon with some of our Yule / Christmas crafts. We are intending to make as much as possible ourselves, some hand made things make the season much more magical and will bring many lovely memories for future years.
Subscribe to:
Posts (Atom)