I do not know what to call these really, but we thought we would try something new with some of our left over pumpkin purée from the Autumn harvests. Where I live potato cakes are something to make with your left over mash potato and a little flour, so I wondered what would happen if I replaced the potato with pumpkin purée instead... I have to say the result was very tasty.
I have started with 200g of pumpkin purée and mixed in about 200g of all purpose flour and a small knob of butter. I have said about 200g of flour because sometimes you need to add a little more to be able to knead it like dough, as that's the consistency you are aiming for. Roll it out to about half a centimetre thick and cut into your preferred shapes.
I have cut them in rectangle shapes so that they fit neatly on a lightly oiled baking tray and cook them in the oven at 200C for about 10 to 15 mins.
That's about it... very simple and very tasty especially hot straight from the oven spread with melting butter. My husband and daughter like to cut their's open down the side like the pocket in pitta bread and spread the butter on the inside. They are also a handy size to put in the toaster and warm through.
But however you choose to eat them it's a very quick and easy way to use up some left overs and has a very intense pumpkin flavour.
A thrifty and natural life...full of magical crafts, money saving tips and home educating along the way.
Showing posts with label pumpkin. Show all posts
Monday, 30 November 2015
Saturday, 31 January 2015
Pumpkin Relish
We still have some pumpkins stored from our allotment and as time is ticking on I needed to think of some different ways to use them up. My husband is making a batch of pumpkin wine so I thought about preserving them in a similar way to the courgettes...Relish!
We love the courgette relish I make every year and it never lasts very long at all, so the only change to my usual recipe was to swap most of the courgette with pumpkin. The results were so tasty I will probably make it this way again.
As you can see in the photo it is an amazing colour, a slightly richer more orange colour and has a very pleasing crunch.
I won't put the whole recipe on again but if you would like to try this... and I would definitely recommend it, I will put a link on to my courgette relish here...
I have used exactly the same recipe and method as this courgette relish recipe except the 750g of courgette was swapped instead for 500g of pumpkin and 250g of courgette.
These jars should keep us going for a little while, although if it lasts as long as the courgette relish I may have to make a larger batch next time.
We love the courgette relish I make every year and it never lasts very long at all, so the only change to my usual recipe was to swap most of the courgette with pumpkin. The results were so tasty I will probably make it this way again.
As you can see in the photo it is an amazing colour, a slightly richer more orange colour and has a very pleasing crunch.
I won't put the whole recipe on again but if you would like to try this... and I would definitely recommend it, I will put a link on to my courgette relish here...
I have used exactly the same recipe and method as this courgette relish recipe except the 750g of courgette was swapped instead for 500g of pumpkin and 250g of courgette.
These jars should keep us going for a little while, although if it lasts as long as the courgette relish I may have to make a larger batch next time.
Thursday, 24 October 2013
Pumpkin sun catchers
Just thought I would share this quick Halloween craft with you. If your children are as busy with crafts as mine, it is inevitable that you will have many left over pre cut out sheets of random shapes... I always save these just in case they come in useful and it makes perfect sense to re-use craft items to save money.
This is a left over sparkly, foam sheet with pre cut pumpkins on it. First cut out one of the pumpkin shapes... sounds odd cutting out an already cut out shape but you will need to leave a border around the shape, a bit like a photo frame...see below.
This is our sparkly pumpkin border, which was then stuck down to a piece of orange tissue paper. Our craft sheet was already self adhesive making it very simple. Then cut out the whole shape and it will look like a coloured in pumpkin.
All that's left to do is add your facial features and stick on the window, for some pumpkins we cut out eye, nose and mouth shapes and stuck them on, but in others we just used a marker pen.
These are some of the finished sun catcher pumpkins which can also be fixed around a light source like a jar with a tea light inside to be used after dark.
This is a very thrifty and easy craft for children to do using something that normally gets thrown away. This could be tried with any shapes you have, but if you don't have the craft sheets you can always cut out your own shapes in black card.
This is a left over sparkly, foam sheet with pre cut pumpkins on it. First cut out one of the pumpkin shapes... sounds odd cutting out an already cut out shape but you will need to leave a border around the shape, a bit like a photo frame...see below.
This is our sparkly pumpkin border, which was then stuck down to a piece of orange tissue paper. Our craft sheet was already self adhesive making it very simple. Then cut out the whole shape and it will look like a coloured in pumpkin.
All that's left to do is add your facial features and stick on the window, for some pumpkins we cut out eye, nose and mouth shapes and stuck them on, but in others we just used a marker pen.
These are some of the finished sun catcher pumpkins which can also be fixed around a light source like a jar with a tea light inside to be used after dark.
This is a very thrifty and easy craft for children to do using something that normally gets thrown away. This could be tried with any shapes you have, but if you don't have the craft sheets you can always cut out your own shapes in black card.
Friday, 28 October 2011
Halloween Paper Quilling
As Halloween is approaching fast we thought we would have a go at some seasonally inspired paper quilling choosing a bat and pumpkin to try and quill. First you need a quilling tool and paper, I use a quilling tool made for me by my husband, I will put a link at the bottom of the page if you would like to make your own tool and we have used a paper shredder to shred the card for quilling.
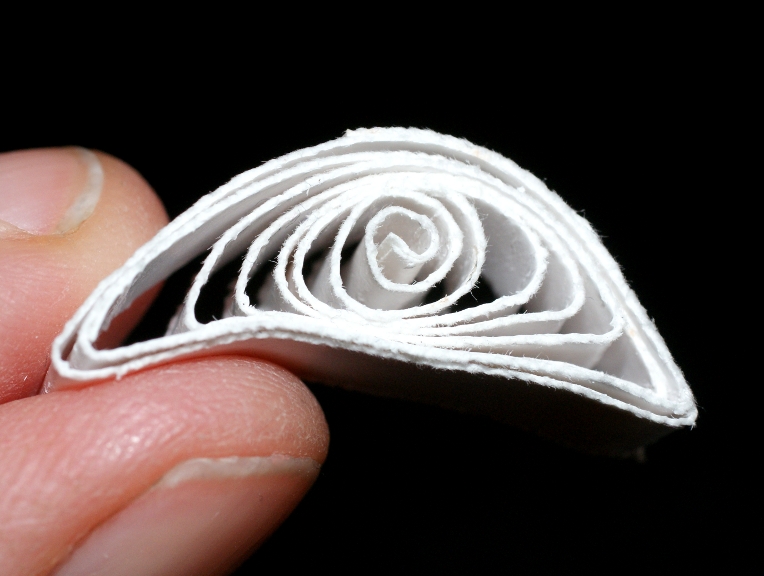
Start by making a spiral and this is done by rolling the paper around the quilling tool as seen in the above photograph, continue until all of the strip of paper is tightly rolled.
Remove your coil from the tool and allow it to loosen to the desired size, you should be left with a spiral like the one above. Once it has loosened enough put a spot of glue on the loose end to fix it and you are ready to mould it to the shape you require.
For the bat's body I allowed the spiral to open up quite a way to give a larger shape then squeeze the bottom until it has a point like the one shown above.
Then squeeze the top down while holding the shape firming on each side, this will give you the heart shape shown above. Once you have achieved this shape pinch the two top points or ears as they will become, this will make them more bat like.
Next you need to make four semi circles, all shapes start as a circle on the quilling tool, then the above shape is made by pinching both sides downwards. The more you pull it down, the more pronounced the bat wing shape is.
Once you have your body shape and four semi circles you can glue them together like the above photograph shows to give you the basic bat shape.
For the pumpkin you need to make another two semi circle shapes and one eye shaped one, which is made by just squeezing both sides of the initial circle. These three shapes then need to be stuck together, with the eye shape in the middle.
We have pinched the top of the middle shape to make the stalk of the pumpkin and added a small curl of paper to represent a vine. what do you think?
If we had used coloured card for the quilling we would be finished now but unfortunately I only had white card so we had to paint our quilled shapes. The bat was spray painted black and googly eyes were glued on and the pumpkin was brushed lightly with acrylic paints to give a hint of colour. We are going to add thread to these to hang them up for Halloween on our haunted tree.
This craft can also be done by children, my son who is 7 years old is always very interested in having a go at quilling, today he made the pumpkin seen above on the left and is very happy with the results. My daughter who is only 3 years old also enjoyed having a go, she made some lovely spirals around a pencil. If you would like to make your own tool my husband's guide is here.
Start by making a spiral and this is done by rolling the paper around the quilling tool as seen in the above photograph, continue until all of the strip of paper is tightly rolled.
Remove your coil from the tool and allow it to loosen to the desired size, you should be left with a spiral like the one above. Once it has loosened enough put a spot of glue on the loose end to fix it and you are ready to mould it to the shape you require.
For the bat's body I allowed the spiral to open up quite a way to give a larger shape then squeeze the bottom until it has a point like the one shown above.
Then squeeze the top down while holding the shape firming on each side, this will give you the heart shape shown above. Once you have achieved this shape pinch the two top points or ears as they will become, this will make them more bat like.
Next you need to make four semi circles, all shapes start as a circle on the quilling tool, then the above shape is made by pinching both sides downwards. The more you pull it down, the more pronounced the bat wing shape is.
Once you have your body shape and four semi circles you can glue them together like the above photograph shows to give you the basic bat shape.
For the pumpkin you need to make another two semi circle shapes and one eye shaped one, which is made by just squeezing both sides of the initial circle. These three shapes then need to be stuck together, with the eye shape in the middle.
We have pinched the top of the middle shape to make the stalk of the pumpkin and added a small curl of paper to represent a vine. what do you think?
If we had used coloured card for the quilling we would be finished now but unfortunately I only had white card so we had to paint our quilled shapes. The bat was spray painted black and googly eyes were glued on and the pumpkin was brushed lightly with acrylic paints to give a hint of colour. We are going to add thread to these to hang them up for Halloween on our haunted tree.
This craft can also be done by children, my son who is 7 years old is always very interested in having a go at quilling, today he made the pumpkin seen above on the left and is very happy with the results. My daughter who is only 3 years old also enjoyed having a go, she made some lovely spirals around a pencil. If you would like to make your own tool my husband's guide is here.
Thursday, 4 November 2010
Remains of the Pumpkin
We have finally got through the rest of the pumpkin flesh that was scraped out of the lanterns made for Halloween. I made this spicy pumpkin soup with a difference... as it was a spooky time of year I have added a dumpling to the bowl, to give a hint that it may contain brains... not really! A small amount of crispy bacon and onion has been added to the top for added flavour (or just onion for vegetarians) It made a very warming dinner.
We also made pumpkin scones and these were so yummy they were all gone within minutes of coming out of the oven. I used my home made pumpkin puree for these replacing any liquid I used in the scone recipe. It was a bit of an experiment as I hadn't made these before, but it was a very big success... and that was the last we saw of the little Halloween pumpkins... Till next year (insert evil laugh here).
Saturday, 30 October 2010
More Halloween Preparation
My husband carved the pumpkins today, as you can see above, what do you think?... scary enough? He tries to carve a different face every year and I think he's rather good at it. Last year he did Jack Skellington, he also likes to carve something in the back so that you get the shape projected onto the wall behind, this year he did bats. A little added magic for the children. With two pumpkins there is a lot of pumpkin insides to be removed, and we like to make use of as much as possible. I started off by collecting all the seeds and tossed them in a little oil, salt, pepper and cajun spices, these were then roasted for us to snack on.
The pumpkin flesh that was scraped out we have divided in half. One half I've kept to make soup, the other I've cooked and made into a puree to use to cook other things with. Today we made pumpkin pie, or should I say pies, as the recipe we used had very big portions.
This was really nice and as there are two pies we will be eating it again tomorrow. The children have been enjoying all the Halloween preparations, especially all the crafts.
They have made this banner, I wanted to make a fabric one to keep forever but ran out of time so they have made the banner using Halloween shapes, colouring them in and sticking the pumpkin faces on. So today has been another very busy day full of baking and crafting.
Bats and Lanterns.
More Halloween crafts, this time we have decided to make lanterns in the style of the sleepy hollow ones, only much more child friendly. The lamp on the left is a faerie lantern that my children bought for me (we didn't make this one) the one on the right is the one we made. we chose some stiff black board and made sure it would fix around a jar. Using a jar ensures that your cardboard doesn't burn and your tea light candle is held safely. We cut out our Halloween picture from the card and fixed a piece of tissue paper to the rear of the cut out shapes. Orange in this case to match the pumpkins waiting to be carved.
Once this is completed you can roll your cardboard into a cylinder and fix it, we just used tape. then put your cylinder over the jar with the tea light inside. wait until after dark and light the candle. This will definitely wow the children and provide a spooky atmosphere. A really eye catching lantern for our display. We will be keeping ours out of reach of our youngest children for candle safety reasons.
I really love bats and no Halloween display is complete without bats, the above bats were very, very simple to make. We love to recycle as much as we can so we cut the bat shapes out from the crinkly black paper covering that comes in chocolate boxes. this gives them a slight 3D look and they make a crinkly noise when you touch them. Once cut out, the children stuck little sequins on for eyes so that they catch the light... added spookiness. Then they were hung onto a hanger using fishing line and left in a doorway to brush against the face of an unsuspecting passer by.
We had some bats left over and didn't want them to go to waste so these were positioned on the wall as if they were just flying past. So as you can see we have been really busy, these are just a sample of the things the children have been making.
Thursday, 28 October 2010
Spider webs for Halloween
The children have been really busy crafting scary things for Halloween, we have had to find crafts suitable for a 2 year old to join in because she absolutely loves everything crafty the messier the better. Yesterday we made cobwebs with great, big hairy spiders in them. Do you think they look spooky or just rather cute?
We have used conkers to hold the wooden skewers in place as we have many hanging around thanks to our Autumn collecting, but you could also use large crafting polystyrene balls, clay or indeed anything round you can find. Then the conker was covered in glue and rolled in wool that has been cut up very small so that it was all fuzzy. Pipe cleaner legs were added and googly eyes. The web part was very simple to make as you can see, it is easy to wind wool around the skewers. This does tend to slip a bit if played with too much, so some discrete dots of glue would hold this in place if you choose to.
They are now ready to hang up on the wall to scare people for Halloween. My husband also helped our son to make a PVA glue cobweb. He drew out the web shape in glue on a laminate sheet and left it to dry overnight. Once dry it could be peeled off the laminate sheet, and stuck on a window. The thinner you can get the web the better here as it tends to spread out a little, but it looks very effective.
Subscribe to:
Posts (Atom)