Showing posts with label candles. Show all posts

Wednesday, 30 November 2011

Autumn Leaf Bowls

Just time to fit in one last craft the children have been doing for Autumn before the season changes, this time we have made leaf shaped clay pots or candle holders. My eldest children made some like these when they were very small and I can remember some children making them when I was at school. So we thought we would have a go using a pack of air drying clay after seeing some recently which reminded me of how pretty the bowls looked.


First thing we did was print and cut out some leaf templates and chose one each, then we rolled out the clay to the required thickness. We rolled ours out quite thin but I think if we make some more I will leave the clay slightly thicker as I was terrified that the children would break them.


My husband put the leaf template onto the clay and cut round them all and we added a few leaf details onto the clay. For more realistic looking veins you could press real leaves into the clay and cut around them.


The cut out leaf was then placed onto a bowl, so that it curled around it and left to completely dry, we used several different sized bowls so that each leaf had a unique shape. There is a lot of waiting to dry in this craft so a little patience is required.


After the clay has dried it was possible to paint the bottom of the leaf while it was still on the bowl, we used acrylic paint for this. After the painted base has dried you can remove your leaf bowl and paint the inside, we started to paint them in Autumnal colours but the children decided to add extra colours to the inside of the bowls.


This is what we ended up with, after adding a little extra sparkle as it is coming up to Christmas. My daughter's one is mostly red, my son has added a little blue glitter and I painted mine red and lightly sprayed it with gold paint. They are not quite finished yet as we will be adding a couple of layers of varnish to make them a little stronger and easier to clean.


It looks very Autumnal with a candle in it, although we are now seeing the start of Winter. My son also made some casts of dinosaur footprints with the left over clay, just like the fossil ones.


Wednesday, 9 November 2011

Autumn Tea light holders

Just a quick post to show you some of the themed tea light holders we made this Autumn, which would look lovely at any bonfire or fireworks party. If you are a regular reader you may remember we made our tea light holders from old recycled jars earlier in the year, if you need to recap on how to put the wire on the top you can find them here.


We have two small schumacher trees in the garden and we waited for the leaves to change colour to make the bonfire picture I wrote about yesterday. With the leaves left over from the children's crafts we glued some on a couple of jars, any leaves can be used last year we used maple leaves and earlier in the year we used leaf skeletons. The schumacher  leaves have the appearance of flames and the beautiful glow they give off when lit make a lovely Autumn addition to any garden.


Here they are after dark, I think they look quite magical like little tiny bonfires. We made these as temporary lanterns for Autumn, and are hoping to make more seasonal ones in the future. If you would like to preserve the leaves and make this autumnal lantern last a little longer you could totally cover the leaves in craft glue or modge podge to seal them in.


Inspire Me Beautiful

Tuesday, 7 June 2011

Tea light holders

It is coming up to the summer solstice / midsummer / Litha, it's celebrated on the 21st June and is the longest day of the year, so we thought we would make some Tea light holders from old, recycled jars to use in the garden. In the lovely summer evenings these lanterns look very pretty hanging from branches, and give the garden a magical touch.


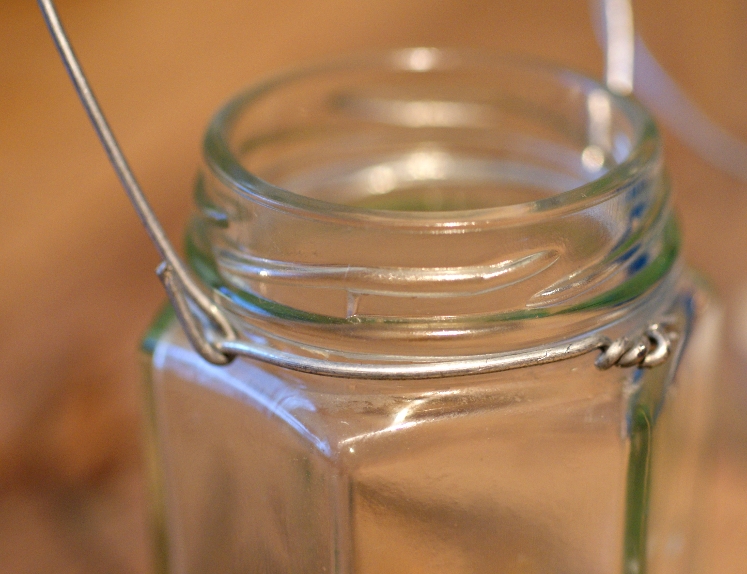
This craft can very easily be done by children, but it does require that an adult first makes the handle from wire if the children are very small. The wire handles above were twisted by my husband and he has used various methods and wires to do this.


This one is the simplest one, the wire has been wound round the top of the jar, twisted together and then the handle has been looped through and bent up.


This one has had a loop incorporated into wire each side of the jar and then wound round and fastened off. The handle has then been added as shown above.


This handle on this jar has been made by twisting the thin copper wire salvaged from a coil in the back of an old computer power supply. So choose your method of fixing and type of wire and once this part has been done anyone can decorate the lanterns, even small children or they can be left plain.


The blue jar has been sprayed with glass paint to give it this wonderfully deep colour and it is quite possible to use stencils to get a design on the jar but we have chosen to add star shaped sequins. We call this one 'the starry night lantern'.


Next we tried to make a lantern look like it was surrounded by fireflies, some have been stuck on the jar and some have been suspended on wire to give the illusion that they are flying around the flame. So this is 'the firefly lantern'.


We decided to leave the little hexagonal jar plain as the light reflects nicely and the last jar was decorated with leaf skeletons as you can see below. The photograph enlarges if you click on it, in case you need a closer look.


The decorations are purely personal choice and you could really go to town with this and be as ornate as you like,my daughter was considering jewels. This is a lovely way to recycle jars and they make a nice touch to the garden.


This is the starry night lantern hanging in my willow tree in the grotto, looks lovely all lit up but my photographs after dark did not come out too well. If you are hanging the lanterns please be sure you do it safely, make sure they can't be knocked down and smashed, or that pieces of the tree will not catch fire.


The lanterns after dark look really quite beautiful and definitely add a touch of magic and a hint of romance.

Sunday, 20 March 2011

Egg Shell Candles

The spring equinox falls tonight and we have decided on a craft to celebrate Ostara, although it would also be a good craft for Easter. We really loved the look of the egg shell candles but as you know, I have really small children and I was not keen on melting the wax to make the candles as they both get very enthusiastic at craft time and hot wax could be a bit dangerous for them if it spilt. So we have decided to make egg shell candles in a totally safe way even for the smallest of children.


First, save some egg shells, I tried to break the eggs in a way to leave one side slightly larger to accommodate the candle. I used a knife to try and get the right size and make it as clean a break as possible and no eggs were wasted, we used them all. I then gave them a quick rinse out and left them to dry.


We put the egg into an eggcup to steady it and to stop small fingers from accidentally crushing the delicate shell. If you choose to you can neaten the edges of the shell with some scissors but we decided to leave them.


Next we used colourful candle sand so that we did not have to use hot wax, this is available at craft shops or you could use wax beads as an alternative if you have some. Aim to fill the egg shell about half or two thirds full, my children decided to fill the shell right up.


Next is the cheating bit, everyone who has small children will have lots of these laying around in the back of the candle drawer, well if you are anything like me that is. Half used birthday candles make excellent emergency wicks, just push the candle down into the wax sand until just the wick is visible. You could use wick if you prefer but I was thinking of the simplest thing for small children.


This is what the finished multi coloured candles look like, you can't see the birthday candle at all, I think they look quite beautiful and it was absolutely safe for small children to make.


As you can see they look lovely alight too...

Tuesday, 18 January 2011

Decorating Candles

We thought we would get an early start on the up coming celebrations, and start some of our crafts early. On February 1st / 2nd there is the Pagan festival Imbolc (or on the 2nd Candlemas if you are a Christian), I have to find crafts suitable for a very independent 2 year old and a 6 year old to participate in, so for the festival we have decided to decorate candles rather than make the candles.


I had the idea that a nature inspired,decorative candle would look very nice and thought we would stick the rest of the flowers that we have already pressed to the pillar candle, the children have also added some of their own ideas too. So we have started by pasting PVA glue on the candle and sticking dried, pressed leaves and flowers, we have also added some plants and herbs from the garden and some coloured leaf skeletons too.


This sort of craft can be done by any age group, I had the idea that I might make one myself using a tapered candle and some tendrils but haven't got round to that yet. Once the children were happy with their designs the candles were left out to dry.


Once dry an adult can brush over the leaves and flowers with melted wax to seal them in if you choose to. The photograph below is of the finished candles, the children are quite proud of these and no glitter in sight for a change. All ready now for February 2nd. What do you think?


*Safe candle burning rules are ALWAYS observed in our house, no candles are ever left burning alone for even a second or any where they can be knocked into by children. Please keep an extra vigilant eye on any modifications you make to any candles. These candles are beautiful for decorative purposes, if lit anything that may fall onto the flame should be safely removed first.

Tuesday, 21 December 2010

Solstice Blessings


                   Wishing you all winter Solstice Blessings and a very magical Yule!

Thursday, 18 November 2010

Happy Birthday


Today is my husbands birthday, so I would just like to pause for a second to say Happy Birthday to him, I hope your day is as magical as your presence has made my life. I love you for all time, a true soul mate xx 

a love that even time will lie down and be still for
-quote from the film practical magic


This is the birthday cake I made today, with the childrens help, of course, the leaves are to symbolise his love of nature and gardening. It is filled with the wild plum jam we made from foraged fruit and to top of the evening we had a glass of our own homemade blackberry wine. perfect.

Saturday, 30 October 2010

Bats and Lanterns.


   More Halloween crafts, this time we have decided to make lanterns in the style of the sleepy hollow ones, only much more child friendly. The lamp on the left is a faerie lantern that my children bought for me (we didn't make this one) the one on the right is the one we made. we chose some stiff black board and made sure it would fix around a jar. Using a jar ensures that your cardboard doesn't burn and your tea light candle is held safely. We cut out our Halloween picture from the card and fixed a piece of tissue paper to the rear of the cut out shapes. Orange in this case to match the pumpkins waiting to be carved.


  Once this is completed you can roll your cardboard into a cylinder and fix it, we just used tape. then put your cylinder over the jar with the tea light inside. wait until after dark and light the candle. This will definitely wow the children and provide a spooky atmosphere.  A really eye catching lantern for our display. We will be keeping ours out of reach of our youngest children for candle safety reasons.


    I really love bats and no Halloween display is complete without bats, the above bats were very, very simple to make. We love to recycle as much as we can so we cut the bat shapes out from the crinkly black paper covering that comes in chocolate boxes. this gives them a slight 3D look and they make a crinkly noise when you touch them. Once cut out, the children stuck little sequins on for eyes so that they catch the light... added spookiness. Then they were hung onto a hanger using fishing line and left in a doorway to brush against the face of an unsuspecting passer by.


   We had some bats left over and didn't want them to go to waste so these were positioned on the wall as if they were just flying past. So as you can see we have been really busy, these are just a sample of the things the children have been making.