Just a short post to wish you all a Happy new year and to say goodbye to 2014. We have put quite a few things off recently due to a death in the family, blogging has been one of those things but we have still been muddling through in a quiet way and we are now very much looking forward to 2015 and all the new challenges it may bring.
We still made some Christmas decorations for our home, but this year things seem to have taken a simple, more natural approach. Both my husband and I have made some Christmas baubles, complete with pyrography, from a section of an old branch.
I made this pine cone garland, another very simple, natural craft that looked so beautiful on the fireplace. I am definitely thinking of making some more of these next year.
Another one of my favourite additions this year was the snowflake mobile. My husband hung a twisted willow branch, that had been sprayed slightly with silver glitter to give it a frosty feel, in the window. We then hung snowflake decorations and crystals from it to give a feel of snow. It was very difficult to get good photos of this but it looked amazingly magical.
My husband helped the children to make these wooden snowmen using offcuts of wood, which they chose to paint. So most of the decorations we made this year had a wooden feel to them.
Well that's some of the things we have been doing at this very busy time, all that's left to do is wish you all a very Happy new year!
A thrifty and natural life...full of magical crafts, money saving tips and home educating along the way.
Showing posts with label snowflake. Show all posts
Thursday, 1 January 2015
Friday, 20 December 2013
Wool Wrapped Wire Snowflakes
Every year we try to make some new decorations for our tree, this year we have been so busy I'm only just getting around to posting them here. One of my favourite things were the wool wrapped wire snowflakes... so simple but they look so lovely on the tree.
First I made the basic shape of a snowflake with wire, any wire will do as it will be covered, I've just used cheap garden wire. My husband soldered three lengths of wire in the middle to hold them together but it is possible just to wind the wire to get the basic shape. The smaller pieces of wire on each arm are just wrapped around the larger wire, once the wool is added they will fix better in place.
Then it's time to wrap the entire wire snowflake in wool, I used white for snow. I did this in one continuous piece starting from the centre and going down each arm in turn then back to the centre so that it is covered with two layers of wool, before going down the next arm. This made it easier to fix the end of the wool when the snowflake is completely covered with just one spot of glue.
When the wool wrapping is finished your snowflake will look like the photograph above. I decided to add a tiny pearl bead to the end of each wire like a little stopper, adding a spot of glue to hold it on. This not only looks pretty it also covers the wire ends in case it is a little scratchy and helps to hold all the wool in place.
Here is the finished snowflake after a quick spray with glitter spray, ready to have a loop added to hang on the tree. These look gorgeous hanging on the tree, are very simple and quick to make and we think they look quite stylish too.
We would like to take the chance to wish you all a Merry Yule / Christmas from all of us here.
First I made the basic shape of a snowflake with wire, any wire will do as it will be covered, I've just used cheap garden wire. My husband soldered three lengths of wire in the middle to hold them together but it is possible just to wind the wire to get the basic shape. The smaller pieces of wire on each arm are just wrapped around the larger wire, once the wool is added they will fix better in place.
Then it's time to wrap the entire wire snowflake in wool, I used white for snow. I did this in one continuous piece starting from the centre and going down each arm in turn then back to the centre so that it is covered with two layers of wool, before going down the next arm. This made it easier to fix the end of the wool when the snowflake is completely covered with just one spot of glue.
When the wool wrapping is finished your snowflake will look like the photograph above. I decided to add a tiny pearl bead to the end of each wire like a little stopper, adding a spot of glue to hold it on. This not only looks pretty it also covers the wire ends in case it is a little scratchy and helps to hold all the wool in place.
Here is the finished snowflake after a quick spray with glitter spray, ready to have a loop added to hang on the tree. These look gorgeous hanging on the tree, are very simple and quick to make and we think they look quite stylish too.
We would like to take the chance to wish you all a Merry Yule / Christmas from all of us here.
Thursday, 13 December 2012
Recycled Tin Christmas Decorations
The children love to try their hand at many different crafts and this year we thought we would have a go at a recycling craft and some metal punching. The metal circles were cut from the bottom of the cardboard tubes containing snacks often eaten at this time of year, in fact I saved these ones from last year.
The photograph above shows the equipment we gathered together to make our decorations and the metal disc. You could use a hammer and large nail for this but as we had small children keen to try, my husband put together a child friendly tool for small hands. This comprises of an old knitting needle fixed into a handle. If you look closely at the metal disc you will see I have marked the central point for my design. We have drawn on all of the designs or punched free hand but if you want to you could stick on a pattern to copy.
You just line up your pointed tool or nail onto your line and hit it with a hammer... very simple. I have moved along the lines tapping and making a pattern, in this case a snowflake. Remember to have a spare piece of wood under your metal disc to stop you going right through and leaving holes in your table.
The children loved this craft especially being let loose with a hammer and it got rather noisy at the table. My daughter also added some letters to her disc with a letter punch set.
These are the finished decorations, we have added some string to hang them with. They are quite shiny and catch the light beautifully hanging on the Christmas tree. I might hang some of them in the garden in the spring to use them to scare the birds away from our peas as they reflect so well.
The patterns could be as simple or intricate as you choose, I think the children have managed to make some lovely decorations from recycling something that usually just gets thrown away.
The photograph above shows the equipment we gathered together to make our decorations and the metal disc. You could use a hammer and large nail for this but as we had small children keen to try, my husband put together a child friendly tool for small hands. This comprises of an old knitting needle fixed into a handle. If you look closely at the metal disc you will see I have marked the central point for my design. We have drawn on all of the designs or punched free hand but if you want to you could stick on a pattern to copy.
You just line up your pointed tool or nail onto your line and hit it with a hammer... very simple. I have moved along the lines tapping and making a pattern, in this case a snowflake. Remember to have a spare piece of wood under your metal disc to stop you going right through and leaving holes in your table.
The children loved this craft especially being let loose with a hammer and it got rather noisy at the table. My daughter also added some letters to her disc with a letter punch set.
These are the finished decorations, we have added some string to hang them with. They are quite shiny and catch the light beautifully hanging on the Christmas tree. I might hang some of them in the garden in the spring to use them to scare the birds away from our peas as they reflect so well.
The patterns could be as simple or intricate as you choose, I think the children have managed to make some lovely decorations from recycling something that usually just gets thrown away.
Monday, 19 December 2011
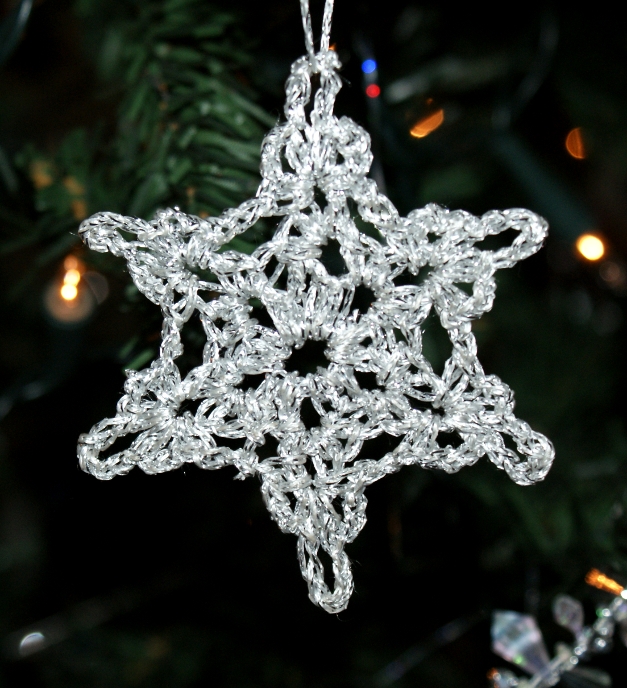
Crochet Snowflake
Just a quick post to show you the crochet snowflake I made earlier, as you know my husband and I usually try to make some new decorations for the tree each year. This year I have already made quite a few things but I set myself the challenge of making a crochet snowflake... so here it is.
Not too bad for a first attempt... I hope anyway. It is made with metallic silver thread and I was thinking of making a garland of them for the window but I have dropped the thread in my coffee and had to wash it. Really hope it will be OK but it seems to be taking ages to dry so one hanging decoration will have to do. I got the pattern for this snowflake from pinterest, if you would like to make one I'll post the link to attic24 here.
Sunday, 12 December 2010
Paper Quilled Snowflakes
As home educators, we hope to provide our children with the opportunity to try as many different and exciting arts and crafts as we can fit in over the years, with the aim of finding the ones the children love most and wish to continue with. Some of this enthusiasm has also rubbed off on us and this season I have tried out the art of paper quilling.
I found a free guide on a craft site, which looked very self explanatory (link at the bottom of this page) and my husband made me a quilling tool from a cut down needle stuck into a piece of wood, isn't he lovely! We then used the paper shredder to get the strips of card or paper to the correct size. I used the card we use to make greetings cards from as I wanted my snowflake to be sturdy enough to go on the tree.
The snowflake was sprayed with silver paint and glitter spray, which made it a little stronger, and matched the colour scheme of my tree.
This is a photograph of my finished snowflake, with ribbon added so that it will hang on the tree. I really enjoyed making this and I think it looks beautiful hanging on the tree. You could also fix the snowflake to the front of a home made Yule or Christmas card and wow the recipient. My eldest daughter has also tried it out, although she has taken it a little further and created her own designs.
My daughters remind me a little of fractals, these are also waiting to be put onto the tree. The art of paper quilling has a long history which you can read about on this site. If you would like to try this very relaxing craft out for your self and create these beautiful snowflakes for your tree you can find the guide here. My husband has done a guide for making your own quilling tool which you can see here.
I found a free guide on a craft site, which looked very self explanatory (link at the bottom of this page) and my husband made me a quilling tool from a cut down needle stuck into a piece of wood, isn't he lovely! We then used the paper shredder to get the strips of card or paper to the correct size. I used the card we use to make greetings cards from as I wanted my snowflake to be sturdy enough to go on the tree.
The snowflake was sprayed with silver paint and glitter spray, which made it a little stronger, and matched the colour scheme of my tree.
This is a photograph of my finished snowflake, with ribbon added so that it will hang on the tree. I really enjoyed making this and I think it looks beautiful hanging on the tree. You could also fix the snowflake to the front of a home made Yule or Christmas card and wow the recipient. My eldest daughter has also tried it out, although she has taken it a little further and created her own designs.
My daughters remind me a little of fractals, these are also waiting to be put onto the tree. The art of paper quilling has a long history which you can read about on this site. If you would like to try this very relaxing craft out for your self and create these beautiful snowflakes for your tree you can find the guide here. My husband has done a guide for making your own quilling tool which you can see here.
Subscribe to:
Posts (Atom)