I recently posted some photographs of our pine cone garlands on social media and was inundated with questions on how to make these and many people commented on how beautiful the finished garlands looked. So I have decided to post a little guide on our very thrifty and natural Autumn, Yule or Christmas garland decorations.
My husband and I decided over 12 years ago that we would embrace thrifty living... no more shop bought decorations for us!!... Everything we wanted we would make as thriftily as possible. Not only has this saved us so much money, unpacking our lovingly, handmade Christmas decorations every year holds so many memories.
I absolutely love the simplicity and natural beauty of these pine cone garlands, the one above was made for Autumn but I also have one that was made for Christmas a few years ago which has a few more sparkles.
First you will need to collect some pine cones, we usually grab a few throughout the year as we find them. The amount of pine cones you need will depend on the length of garland required, I'm using seven for my mantle piece. I usually leave them outside for a little while to ensure that any critters safely leave the pine cones.
To make the fixings we are using screw eyelets, they are really cheap only a few pence for a bag. I have managed to screw these directly into the end of the pine cone by hand but it is a little fiddly, so if you need help starting your hole, a very thin drill bit may give you a start.
Next just thread your pine cones onto your chosen string or ribbon, we are using natural jute string here but ribbons work just as well and there is less movement of the pine cones. You may notice if using string that all the pine cones slip to the middle when you try to create a swag in your garland, you could tie them on to keep them still... but I have another remedy for this...
A little trick which allows you to easily fix them in place but still allows them to be movable if you need to change the position of a pine cone. Thread the string through your eyelet and then thread it through again, as seen in the above photo... so you create a loop.
This simple act gives your pine cone a little more resistance so that you can move it but it doesn't slip down the string.
These garlands can be kept natural or decorated for Christmas with a little glitter, paint or fake snow... the best part is it has literally taken a few minutes and cost a few pennies to make, and this beautiful garland can be reused every year.
A thrifty and natural life...full of magical crafts, money saving tips and home educating along the way.
Showing posts with label pine cone. Show all posts
Wednesday, 29 November 2017
Tuesday, 30 June 2015
30 Days Wild - day 30
Today is the last day of the 30 days wild project and it coincides with my birthday so we have had a lovely day. I thought I would share some of the things we have been making for the wildlife this month to add to the ones we already have all over the garden.
This is one of the bee hotels we have made, we have a garden full of different types of bee house now, if you would like to make one my husband has written instructions for some different types here on his blog. If you build it they will come...
We have also made these garden charms, they look lovely hanging from the trees especially in the winter when the trees are bare.
We also make these pine cone bird feeders and if you would like to make the charms or pine cone feeders you will find them here.
Now the 30 days wild project has come to a close we would love to thank the 30 days wild team and the wild life trusts for bringing this challenge to us. Also a very big thank-you to everyone who has retweeted, favourited and liked our pages.
This is one of the bee hotels we have made, we have a garden full of different types of bee house now, if you would like to make one my husband has written instructions for some different types here on his blog. If you build it they will come...
We have also made these garden charms, they look lovely hanging from the trees especially in the winter when the trees are bare.
We also make these pine cone bird feeders and if you would like to make the charms or pine cone feeders you will find them here.
Now the 30 days wild project has come to a close we would love to thank the 30 days wild team and the wild life trusts for bringing this challenge to us. Also a very big thank-you to everyone who has retweeted, favourited and liked our pages.
Thursday, 1 January 2015
Goodbye 2014... Hello 2015
Just a short post to wish you all a Happy new year and to say goodbye to 2014. We have put quite a few things off recently due to a death in the family, blogging has been one of those things but we have still been muddling through in a quiet way and we are now very much looking forward to 2015 and all the new challenges it may bring.
We still made some Christmas decorations for our home, but this year things seem to have taken a simple, more natural approach. Both my husband and I have made some Christmas baubles, complete with pyrography, from a section of an old branch.
I made this pine cone garland, another very simple, natural craft that looked so beautiful on the fireplace. I am definitely thinking of making some more of these next year.
Another one of my favourite additions this year was the snowflake mobile. My husband hung a twisted willow branch, that had been sprayed slightly with silver glitter to give it a frosty feel, in the window. We then hung snowflake decorations and crystals from it to give a feel of snow. It was very difficult to get good photos of this but it looked amazingly magical.
My husband helped the children to make these wooden snowmen using offcuts of wood, which they chose to paint. So most of the decorations we made this year had a wooden feel to them.
Well that's some of the things we have been doing at this very busy time, all that's left to do is wish you all a very Happy new year!
We still made some Christmas decorations for our home, but this year things seem to have taken a simple, more natural approach. Both my husband and I have made some Christmas baubles, complete with pyrography, from a section of an old branch.
I made this pine cone garland, another very simple, natural craft that looked so beautiful on the fireplace. I am definitely thinking of making some more of these next year.
Another one of my favourite additions this year was the snowflake mobile. My husband hung a twisted willow branch, that had been sprayed slightly with silver glitter to give it a frosty feel, in the window. We then hung snowflake decorations and crystals from it to give a feel of snow. It was very difficult to get good photos of this but it looked amazingly magical.
My husband helped the children to make these wooden snowmen using offcuts of wood, which they chose to paint. So most of the decorations we made this year had a wooden feel to them.
Well that's some of the things we have been doing at this very busy time, all that's left to do is wish you all a very Happy new year!
Monday, 13 October 2014
Autumn Critter Craft
Autumn can be a magical time of year for children to explore nature with the last of the harvests, the leaves going through a beautiful colour change and then falling along with their nuts and seeds. Our children love to go for long walks and collect many things including pine cones, conkers, teasels and beautiful leaves to use in Autumn crafting of one sort or another. This year they have decided to make some autumn critters with the things they have collected.
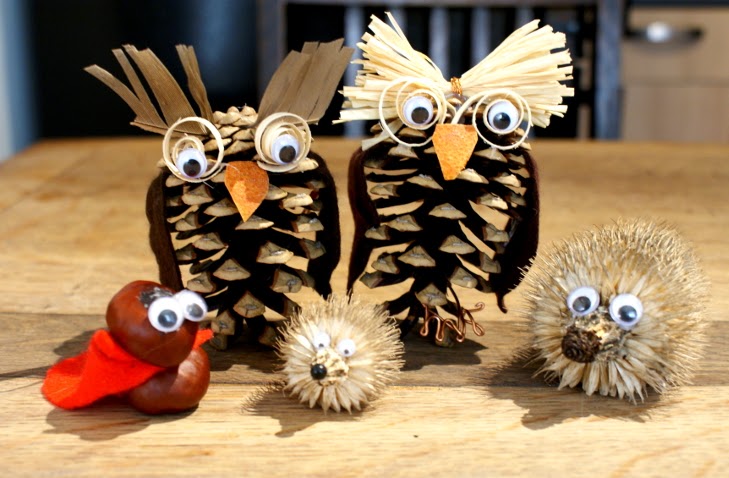
Many things that can be imagined by little ones can be easily made, start with the items you have managed to collect and see where your imagination takes you. As you can see we have made owls, hedgehogs and even conker man!
These are some of the things we started with, the little hedgehog seems like an obvious choice using the prickly teasel.
We have used the stalk as a nose and trimmed back some of the spikes at the stalk end until we had the desired length... this is quite prickly so little ones may need help or gloves. I found the teasel less prickly if you trim a tiny piece off the end of each spike, a bit like giving it a hair cut. Then all we did was add a nose and some googly eyes.
We love owls and the pine cone seemed to lend itself perfectly to the shape of an owl, so all we have done is add a few extra features to make it look a little more owl like. Conker man was made by my youngest daughter using a match stick and glue to hold his head on, she also gave him a lovely red super hero cape and has also been making him a family... so we now have a whole bunch of conker people.
A few years ago we made nature faeries with our autumn collections if you would like to see I have added the link.
If you decide to collect some Autumn things on your nature walks let us know what you made. Have fun!
Many things that can be imagined by little ones can be easily made, start with the items you have managed to collect and see where your imagination takes you. As you can see we have made owls, hedgehogs and even conker man!
These are some of the things we started with, the little hedgehog seems like an obvious choice using the prickly teasel.
We have used the stalk as a nose and trimmed back some of the spikes at the stalk end until we had the desired length... this is quite prickly so little ones may need help or gloves. I found the teasel less prickly if you trim a tiny piece off the end of each spike, a bit like giving it a hair cut. Then all we did was add a nose and some googly eyes.
We love owls and the pine cone seemed to lend itself perfectly to the shape of an owl, so all we have done is add a few extra features to make it look a little more owl like. Conker man was made by my youngest daughter using a match stick and glue to hold his head on, she also gave him a lovely red super hero cape and has also been making him a family... so we now have a whole bunch of conker people.
A few years ago we made nature faeries with our autumn collections if you would like to see I have added the link.
If you decide to collect some Autumn things on your nature walks let us know what you made. Have fun!
Tuesday, 10 December 2013
Garden Charms and Bird Treats
At this time of year, as the weather gets colder, our thoughts go to feeding the birds. This is our way of giving something back to nature to replace the berries we foraged in autumn. As well as making sure the bird table and feeders are full we have also been making some garden charms, which look very pretty hanging in the trees and provide an extra feast for our feathered friends.
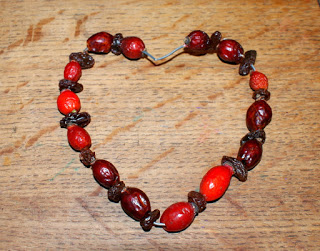
For the charms we have used some garden wire bent into the shape of a heart or star and various dried berries and nuts. The heart shape has been threaded with rosehips and raisins.
When fully threaded the shape was secured safely with either tape, string or wire and a loop was added to hang it on the tree.
We also made a star shape which was threaded with chestnuts and Rowan berries. It is harder to see the shape of this one as the chestnuts are much larger. Anything that birds find tasty can be threaded onto your wire shape and they look gorgeous hanging in the garden.
The pine cone feeders have been a firm favourite with the children for quite a few years now. First attach string or wire for attaching the feeder to the tree as seen in the above photo. Then coat your pine cone with either peanut butter or lard and roll it in bird seed.
These little pine cone feeders usually attract the small birds that are a bit nervous about visiting the bird table when larger birds are around. They are very simple and a lot of fun to make even for very small children.
I will leave you with a couple of photographs of the garden charms and pine cone bird feeders hanging in the trees. They add some much needed colour to the garden this time of year.
The children love feeding the birds and this also provides them with extra opportunities for bird watching.
For the charms we have used some garden wire bent into the shape of a heart or star and various dried berries and nuts. The heart shape has been threaded with rosehips and raisins.
When fully threaded the shape was secured safely with either tape, string or wire and a loop was added to hang it on the tree.
We also made a star shape which was threaded with chestnuts and Rowan berries. It is harder to see the shape of this one as the chestnuts are much larger. Anything that birds find tasty can be threaded onto your wire shape and they look gorgeous hanging in the garden.
The pine cone feeders have been a firm favourite with the children for quite a few years now. First attach string or wire for attaching the feeder to the tree as seen in the above photo. Then coat your pine cone with either peanut butter or lard and roll it in bird seed.
These little pine cone feeders usually attract the small birds that are a bit nervous about visiting the bird table when larger birds are around. They are very simple and a lot of fun to make even for very small children.
I will leave you with a couple of photographs of the garden charms and pine cone bird feeders hanging in the trees. They add some much needed colour to the garden this time of year.
The children love feeding the birds and this also provides them with extra opportunities for bird watching.
Friday, 8 February 2013
Snakes for Chinese New Year
Chinese New Year is on the 10th of February this year and it is the year of the snake, the children were very keen to make some snakes to celebrate. We have decided to make them with a few recycled and natural things we had around the house.
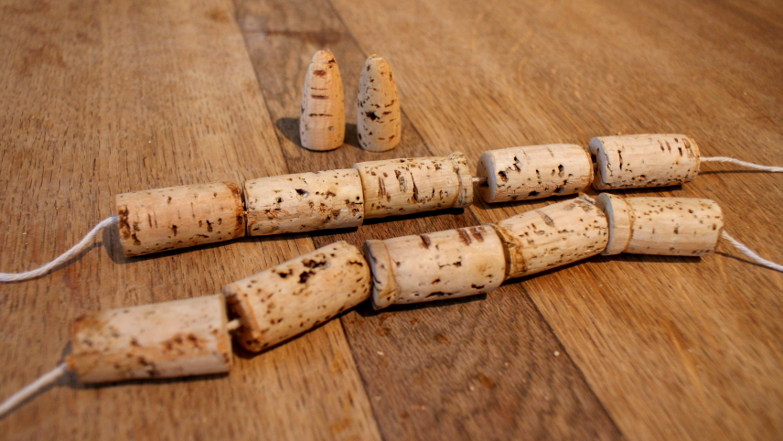
Old wine corks and left over pine cones are perfect for threading opportunities for young children and for the bodies of our snakes. We threaded five corks onto a length of string and knotted each end leaving a small gap between each cork so the snake could slither.
The tail segment was shaped by my husband and was attached to the row of corks by pushing the knot into the hole and sealing it there with a hot glue gun.
Red and gold are lucky colours in China, so the New Year snakes were painted using these colours mostly. The pine cones are going to be used as the head of the snake and have been sprayed with gold paint.
As you can see my husband has also drilled a small hole in the bottom of the pine cone (handy to put the stick in for ease of spraying) it is just a few millimeters deep so the knot can be glued and pushed inside to disguise it.
Eyes and a forked tongue have been added to each snake ready to be attached to the cork body when the paint is dry.
Here are the finished snakes, I think they are really quite cute and they have a very snake like slither movement...The children are very pleased with their work and didn't stop there, deciding to add some gold sequins.
If you don't have the corks available it is possible to make a snake with small branch pieces my husband made this one a couple of years ago, and it is very sturdy and still being played with.
All ready to bring in the year of the snake....Happy New Year China.
Old wine corks and left over pine cones are perfect for threading opportunities for young children and for the bodies of our snakes. We threaded five corks onto a length of string and knotted each end leaving a small gap between each cork so the snake could slither.
The tail segment was shaped by my husband and was attached to the row of corks by pushing the knot into the hole and sealing it there with a hot glue gun.
Red and gold are lucky colours in China, so the New Year snakes were painted using these colours mostly. The pine cones are going to be used as the head of the snake and have been sprayed with gold paint.
As you can see my husband has also drilled a small hole in the bottom of the pine cone (handy to put the stick in for ease of spraying) it is just a few millimeters deep so the knot can be glued and pushed inside to disguise it.
Eyes and a forked tongue have been added to each snake ready to be attached to the cork body when the paint is dry.
Here are the finished snakes, I think they are really quite cute and they have a very snake like slither movement...The children are very pleased with their work and didn't stop there, deciding to add some gold sequins.
If you don't have the corks available it is possible to make a snake with small branch pieces my husband made this one a couple of years ago, and it is very sturdy and still being played with.
All ready to bring in the year of the snake....Happy New Year China.
Thursday, 15 December 2011
Old Christmas Angel
We all have memories of Christmas past, for me opening the Christmas tree decorations every year holds so many memories of times past that I really need to pause to take it all in. There are the decorations for each of my children's first christmas, the one to symbolise our wedding, the beautiful vintage French ones my husband bought me, all the ones we have hand made over the last few years.... I could go on but first I would like to introduce you to a dear old friend of mine, this is her 22nd Christmas, she looks a little worse for wear but she has been greatly loved by lots of little children.
She is the sole survivor from a pack of three, still smiling and bringing cheer from behind her tired, faded blue eyes and tattered wings. This year I decided to try to make her some new friends, the idea came to me when I made the nature faeries for the Autumn solstice and I was quite excited when I found exactly the right type of small pine cone the other day.
To start with I cut the pine cone off the twig leaving a little stump, to insert into the bead for the head, this makes it a little stronger and a better fix for the bead using a hot glue gun.
Then traced round the old angel's wings onto the new wing material, I have used thin foam self adhesive sheeting, the other side is covered in silver glitter. I cut two wing shapes out for each angel and stuck them back to back to make both sides glittery but card would work just as well here.
Then we spray painted the new angels in silver, I really love the little acorn cup hats so decided to add these to our angels. These were also spray painted silver and had glitter sprinkled on top, my husband drilled the little holes so that we could add the string to the top to hang them from the Christmas tree.
Then you just need to assemble all the parts, we threaded silver thread through the hat and also added a little hair before we glued the hat to the head and the wings in place.
Three finished angels, I'm not sure whether to add faces or not so I have left them blank at the moment while I think about it.
Here they are together hanging on the tree, they look quite similar and I would love to think mine could last 22 years. I may keep a look out for something more angelic to use for the wings but in the meantime my youngest daughter loves them and has already given them a few kisses to welcome to the family.
This is one of the nature faeries that I made for the Autumn solstice, I sprayed him silver too so that he would kind of match the others.
She is the sole survivor from a pack of three, still smiling and bringing cheer from behind her tired, faded blue eyes and tattered wings. This year I decided to try to make her some new friends, the idea came to me when I made the nature faeries for the Autumn solstice and I was quite excited when I found exactly the right type of small pine cone the other day.
To start with I cut the pine cone off the twig leaving a little stump, to insert into the bead for the head, this makes it a little stronger and a better fix for the bead using a hot glue gun.
Then traced round the old angel's wings onto the new wing material, I have used thin foam self adhesive sheeting, the other side is covered in silver glitter. I cut two wing shapes out for each angel and stuck them back to back to make both sides glittery but card would work just as well here.
Then we spray painted the new angels in silver, I really love the little acorn cup hats so decided to add these to our angels. These were also spray painted silver and had glitter sprinkled on top, my husband drilled the little holes so that we could add the string to the top to hang them from the Christmas tree.
Then you just need to assemble all the parts, we threaded silver thread through the hat and also added a little hair before we glued the hat to the head and the wings in place.
Three finished angels, I'm not sure whether to add faces or not so I have left them blank at the moment while I think about it.
Here they are together hanging on the tree, they look quite similar and I would love to think mine could last 22 years. I may keep a look out for something more angelic to use for the wings but in the meantime my youngest daughter loves them and has already given them a few kisses to welcome to the family.
This is one of the nature faeries that I made for the Autumn solstice, I sprayed him silver too so that he would kind of match the others.
Wednesday, 21 September 2011
Nature Faeries
The Autumn Equinox falls on the 23rd of September this year and is the second of the three pagan harvest festivals otherwise called Mabon. We have been on several nature walks but have only collected a few Autumn things for our display so far, therefore the nature faerie craft will be using these natural things like pine cones and acorns.
First select a pine cone for the body and an acorn for the head for each faerie you want to make, we pulled the pointed end off the pine cones to allow a good place for the head to sit.
When it comes to gluing this sort of stuff I have found using a hot glue gun to be the most efficient way, it dries fast and holds well, this means helping the little ones so no one get hot glue on their fingers, but much better than waiting hours for the glue to dry.
This is what they look like with their heads attached, acorns were used with the cups removed for now. Then we added hair, my daughter was very insistent that they should have pink or multi coloured hair and helped to choose the wool. We stuck the hair on the top of the head with a spot of glue and then added the acorn cup as a hat with another spot of glue.
Starting to look a little more faerie like now, next step is to add facial features, we have used googly eyes and sparkly lips, of course.
Nearly done now, sycamore seed pods were used to create wings as that is what we had close to hand but you could use beautiful autumn red maple leaves or the round moon like honesty seed pods.
There you go, Autumn nature faeries, perfect to play with or they can be hung up on display or secretly hidden in the garden for the little ones to find and be surprised by. My husband also helped me with another idea to add little feet so that the faeries could stand, he cut off a couple of one of the larger pine cones scales and glued them to the bottom. I think it makes him look like he is wearing clogs.
If you prefer a more natural look to the faeries, they look just as good without the rainbow hair and googly eyes as you can see below.
This one was made in the same way as the others but without all the added cuteness from the children. I have added cotton to the back and hung it on a plant...hmm...gives me an idea about Christmas or Yule decorations, think I will make some more and spray them in silver or some other festive colour to hang on the tree...Enjoy the Equinox.
First select a pine cone for the body and an acorn for the head for each faerie you want to make, we pulled the pointed end off the pine cones to allow a good place for the head to sit.
When it comes to gluing this sort of stuff I have found using a hot glue gun to be the most efficient way, it dries fast and holds well, this means helping the little ones so no one get hot glue on their fingers, but much better than waiting hours for the glue to dry.
This is what they look like with their heads attached, acorns were used with the cups removed for now. Then we added hair, my daughter was very insistent that they should have pink or multi coloured hair and helped to choose the wool. We stuck the hair on the top of the head with a spot of glue and then added the acorn cup as a hat with another spot of glue.
Starting to look a little more faerie like now, next step is to add facial features, we have used googly eyes and sparkly lips, of course.
Nearly done now, sycamore seed pods were used to create wings as that is what we had close to hand but you could use beautiful autumn red maple leaves or the round moon like honesty seed pods.
There you go, Autumn nature faeries, perfect to play with or they can be hung up on display or secretly hidden in the garden for the little ones to find and be surprised by. My husband also helped me with another idea to add little feet so that the faeries could stand, he cut off a couple of one of the larger pine cones scales and glued them to the bottom. I think it makes him look like he is wearing clogs.
If you prefer a more natural look to the faeries, they look just as good without the rainbow hair and googly eyes as you can see below.
This one was made in the same way as the others but without all the added cuteness from the children. I have added cotton to the back and hung it on a plant...hmm...gives me an idea about Christmas or Yule decorations, think I will make some more and spray them in silver or some other festive colour to hang on the tree...Enjoy the Equinox.
Sunday, 5 December 2010
Pine Cone Trees
This is the first of our Yule / Christmas crafts this year, little pine cone trees. It is very easy, so even the smallest of the little folk can try this one. We always find ourselves with loads of pine cones this time of year, collected from many nature walks and displayed on our seasonal nature table. So finding something to use them for is always on my mind.
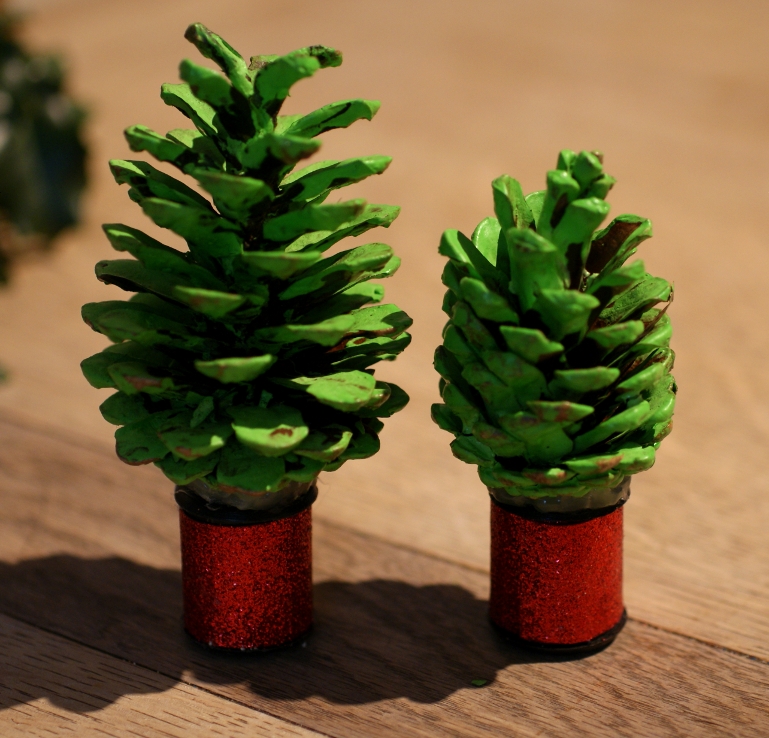
First, the children selected a good shaped pine cone and painted it green, these were then left to dry while we prepared the pots. Anything pot like can be used here, (bottle lids for example) but we have used old cotton reels and wrapped a piece of sparkly paper around them. My husband then glued the two together as you can see in the above photograph.
The next stage is also very easy, though a little messy, adorn with your chosen decorations. As you can see above my children have used as many sparkly things as they could find, totally raided the craft cupboards. We dabbed with glue then added sequins, jewels and glitter, of course! My daughter even found a different way of getting sequins and glitter on the little trees, smear with glue and roll the pine cone in them, seems to have worked well.
I think the final effect is very magical, they look so cute on the window ledge. The children had a really good time decorating the little trees and are quite impressed with their craft work. This craft can very easily be adapted to suit any age child and we hope you have as much fun as we did making them.
First, the children selected a good shaped pine cone and painted it green, these were then left to dry while we prepared the pots. Anything pot like can be used here, (bottle lids for example) but we have used old cotton reels and wrapped a piece of sparkly paper around them. My husband then glued the two together as you can see in the above photograph.
The next stage is also very easy, though a little messy, adorn with your chosen decorations. As you can see above my children have used as many sparkly things as they could find, totally raided the craft cupboards. We dabbed with glue then added sequins, jewels and glitter, of course! My daughter even found a different way of getting sequins and glitter on the little trees, smear with glue and roll the pine cone in them, seems to have worked well.
I think the final effect is very magical, they look so cute on the window ledge. The children had a really good time decorating the little trees and are quite impressed with their craft work. This craft can very easily be adapted to suit any age child and we hope you have as much fun as we did making them.
Subscribe to:
Posts (Atom)