Showing posts with label wreath. Show all posts

Wednesday, 20 December 2017

Natural wreaths

Following on from my last post showing how we made the wreath bases, I promised to add a few photos when we had finished decorating them. We prefer the natural look and usually prune a little overgrown greenery from our gardens to decorate with, which has the added bonus of being completely free.


This is our front door wreath, as you can see it has a completely green and natural look. I have used clippings from holly, ivy, pine and added a few pinecones. Some twigs have just been woven straight into the twig ring bases and some things, mainly the pinecones, have been wired on to hold them still.


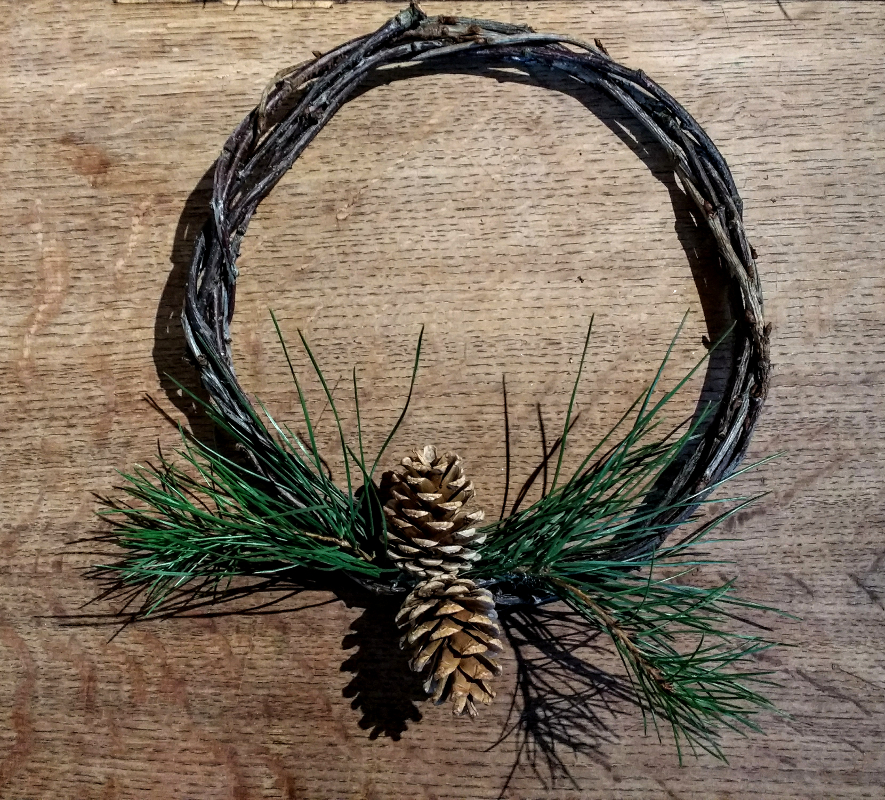
I have also made a few very simple ones to add to the back of some of our internal doors, as you can see I have woven in a small piece of pine and stuck a couple of pinecones on with a hot glue gun. I'm not sure yet whether to add a little snow spray.

These ring bases can be decorated as elaborate or as simply as you choose and the bases can be kept and used year after year with a new decor each time. Very simple, very quick and very thrifty.


Sunday, 17 December 2017

Twig wreath and star bases


Following on from our theme of thrifty or free homemade Christmas / yule decorations we have been making the bases for our wreaths and stars. As keen gardeners we tend to save any useful looking clippings and my husband had recently pruned our cherry tree which has beautiful reddish tinted bark, so we set to work creating the bases to woven wreaths seen above.


This is the pile of twigs I started with... when freshly cut, the twigs are still very pliable and can quite easily be bent and twisted into shape. To form the rings I first took one stick and bent it into a ring shape, then held it in place with one hand whilst intertwining the next stick around the ring. This is quite fiddly and it is possible to tie the first stick into a ring shape if you'd prefer but I always find that once you've woven in a couple of sticks it holds it's shape by itself.


Once it holds it's own shape you can then decide on how many sticks to weave in, you could go for a simple ring with just a few sticks or something much thicker and more substantial.


 We have gone for something in between as you can see in our first photograph... all ready to decorate for the season now. These bases have cost us nothing to make just using a few clippings from the garden and a little time, I usually decorate our wreaths with the natural look of fresh holly, ivy and pinecones from our gardens.

The stars are also easily made from twigs, cut five to the same size, lay them out in a star shape and tie off the corners. These can also be decorated to fit your decor.

I'll be back to post a couple of photos to show you the finished results when the wreaths have been decorated. After Christmas / Yule these wreath bases can be saved until they are needed again, I usually strip them back of all the fresh foliage and pack them away ready to be redecorated on their next outing.

Thursday, 18 October 2012

Corn Husk Sunflower Wreath

After harvesting our corn from the allotment the children have been trying to find craft uses for the left over husks, last week we made the corn husk dolls and this week we are making a sunflower wreath. We love sunflowers and due to bad weather and slugs we didn't manage to grow any this year, so the children have made one starting by painting the corn husks.


After they painted the husks yellow they were left to dry and we twisted some garden wire into a circle to form the basic outline for our sunflower shape.


The 'petals' were then bent around this wire and glued in place, we used hot glue as it is very quick and dries fast.


When bending aim to have the yellow side facing forward and glue on the back, this should keep the front looking nice, continue around the hoop as seen below.


We started with the larger petals first to get a complete circle all about the same size.


Once you have finished the first circle if you want to you can layer the flower to add more fullness, just continue going around building more layers until you are happy with the result or run out of petals.


Here's ours after the layering, as you can see it has a beautiful 3D effect. I have pinned it on the notice board so you can see how it hangs, I really love the wreath like this but the children decided it needed something else to make it more sunflower like. They have cut out a circle of brown felt and glued it to the back.


The children are really pleased with their sunflower wreath and I think it looks lovely. This could also be achieved with leaves if you don't have access to corn husks, as there are some beautiful coloured leaves about at the moment. We may try a red one when we collect enough leaves.



Saturday, 10 December 2011

Altered Wreath

Just a quick post to show you our door wreath, I brought the one below locally for just one pound 7 or 8 years ago, and for a couple of years we just hung it as it is with no alterations. 


But for the last few years we have been altering it quite a bit using the original wreath as a starter point. We have quite a large amount of overgrown ivy at the bottom of the garden, which comes in handy at this time of year for the decorations, the holly is also from a little bush by our front door and the pine cones collected from some of our many nature walks.


The ivy is very easy to intertwine through the twigs of the original wreath, I used some copper wire to fix a couple of pieces in place and for the pine cones. We have also added some hawthorn berries for extra colour, I really love these natural looking wreaths at the moment and because we have decorated it ourselves it can be made exactly the way we like it. My daughter helped me to collect the plants from our garden today, (well mostly she ran off with the trug) so it will hopefully add to the lovely family memories we have of the season.

Tuesday, 7 December 2010

Yule log and door wreath started


Time is moving so fast, I'm really behind in the seasonal preparations, I've managed to get the Yule log inside and partially decorated as you can see in the above photograph. The wood has been carefully selected to reflect our current situation and my husband has made a hole for the candle. I have decorated it with small clippings of holly and ivy from our garden, I need to add a few more things but for now that is as far as I have got. I was hoping that other family members might add a little of something they like, my daughter did add a couple of white pebbles and a drawing of a four leaf clover but she has since moved them on somewhere else. I will post another photograph when it is finished so you can see the end result.


  This is our door wreath, I got the basic ring with the circle of twigs for a pound locally about six years ago. It has lasted very well and I still really like the simplicity of the twig style ring but this year I thought I would enhance it slightly with nature. I have carefully wound in a couple of trimmings from our garden of holly and ivy, I could have gone overboard and made a huge holly wreath but I really love my little holly bush by the front door and would much rather it stayed alive. I intend to wire on a few more pine cones as we have loads of these and maybe some fir tree clippings too, but so far I'm quite impressed with my handy work, definitely OK for hardly any cost. I will post another photograph of the end result so you can judge for yourself.