Tomorrow is Lughnasadh or Lammas, the first of three pagan Autumn harvest festivals, in many different cultures people celebrate at harvest time. So today we are making corn dragonflies, my children are a little young to weave corn dollies so we have gone for something a little easier.
These are some things we collected from the garden, the corn stalk (or barley) had grown up under one of the bird feeders from dropped seeds and the leaves have come from our willow tree.
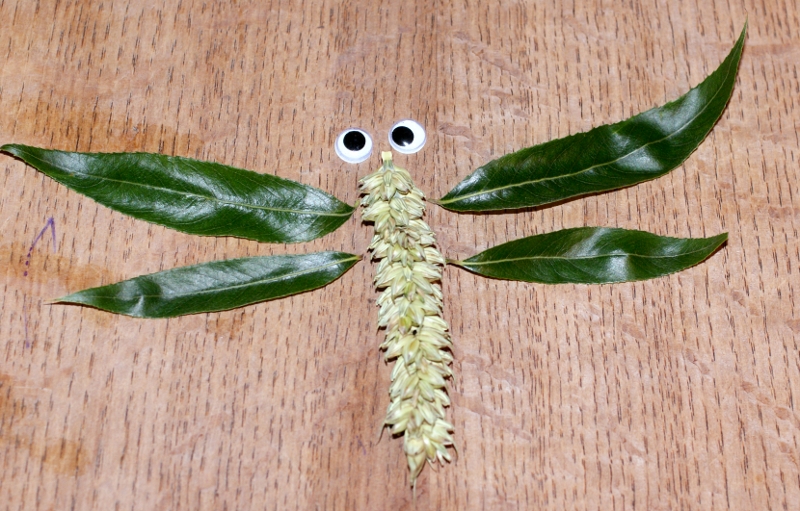
This is the layout for our dragonfly before the sticking commences, large googly eyes will be added at the front end to get the dragonfly look. We have also tried to pair up the leaves to match in size, with two larger ones at the front and two smaller ones at the back.
As you may notice in the above photograph, it is possible to slightly lift the individual seeds in rows and glue the leaves underneath. This will give your final dragonfly a much neater look and it also helps to hold the leaves in the correct position until the glue dries.
And there you go... two little corn dragonflies, once the eyes are fixed in place. We added cotton thread so they could be hung in the window. I originally thought that we would hang them from the trees in the garden so that birds could collect the seeds but the children wanted them hung inside for the time being anyway. We also made lavender butterflies in the same way as a pretty and natural way to infuse the house with the smell of lavender.
Here they are hanging with some of the butterflies, we have grouped them all together and tied them to a piece of stick so that it looks like a small mobile, but they look equally nice hanging on their own. I am thinking of hanging some lavender butterflies in the bathroom window to add a relaxing aroma to the room.
We made the lavender butterflies in the same way except this time we have used lavender flower heads for the body and eucalyptus leaves for the wings. These are a beautiful purple and silver colour and smell fantastic.
This is the layout we used for the butterflies and stuck them together in the same way as before. The children really enjoy
nature crafting in this way and this has the added bonus of smelling wonderful too.
A thrifty and natural life...full of magical crafts, money saving tips and home educating along the way.
Sunday, 31 July 2011
Thursday, 28 July 2011
Quick July Update.
It has been so busy here lately, we have had three birthdays and an anniversary, I have had two assignments to do and my eldest daughter has spread her wings and moved away from home. On top of all this it has been two months now since my cat went missing and my blog had it's first anniversary, which I missed. So posts here have not been very frequent, just the odd celebration post but we have been doing things... honestly.

At the start of the summer we made the most wonderfully tasting elderflower cordial, it kept us going for a while and the children loved it so much. The taste of this will forever remind me of the start of summer, my daughter affectionately named it 'flower juice'. Details of how this was made is on my husband's blog. He has also started off some more wine, last year we made some amazing wines, I'm hoping he can recreate these again this year. He has written about the wine in the post after the one above in case you fancy a read.

The allotment and the vegetables that we grow in the garden have really taken off, in fact last year I thought I had a glut of courgettes but that was nothing compared to this year! Everything I have cooked has included courgette and I do mean everything... courgettes are coming out of our ears. Of course I have made more courgette relish as seen in the above photograph, only this time I made a double batch of the one from last year. This year the relish tastes even better which is good as I may be forced to make another batch.
Must introduce you to one of our newest family members, this is one of our giant African land snails, we have had them for a few weeks now and they have amazed us with their antics and have doubled in size. My daughter loves snails and is constantly watching them as they bury themselves and munch their food... very loudly. We also have some stick insect eggs, my son is avidly waiting for them to hatch so that he can study them, as well as the pupating caterpillars. We will keep you informed of progress in the mini zoo.
You may have noticed the two blog awards in the side bar, I was given these at the end of June and I still haven't got around to thanking those responsible and passing them on. Watch this space though I will get to them shortly and everything else I may have missed out.
Monday, 18 July 2011
Bargain Finds
It has been a long time since my last Magpie Monday post so I thought I'd pop in to say Hi and show you some more things. First a granite pestle and mortar, my husband came home the other day with this... not an easy task believe me as he was on his push bike. I had wanted a large one this exact colour for a long time, my old one was white. He found this on his travels for £2.75 in a charity shop and thought he would surprise me.
Next is a bowl that I found in a box of junk at a car boot sale a while ago, it was totally black and gunky but it kind of spoke to me so I paid the 50p asking price and went home to see what was underneath. This is what I found... it is a silver colour (epns) and says 'Celtic pattern' on the base, I think it may be a sugar bowl and it has a blue glass liner. This has been used for all sorts of things over the years and is currently holding crystals.
Kind of a mystery item now, I found this at a jumble sale for 2p not really sure what it is but It may be home made?... it is a gold aged little pot, wooden I think but for the tiny price tag it was definitely worth it.
Looks very vintage... but although it is very battered and doesn't do much but sit on the shelf and gather dust, it has a very important job... 'keeper of the tiny treasures' it holds the tiny things I don't want to lose and the kids love to look at.
Lastly something with a more practical use a display cabinet for 80p, my husband had to modify it slightly. My son collects fossils, mostly teeth but he has a few others, this fish is far to delicate to be played with but it seems a shame to hide it away so the display cabinet is the perfect solution.
This post will be linked over at missielizzie's blog me and my shadow for the Magpie Monday post.
Sunday, 17 July 2011
Happy 3rd Birthday
Just a quick post to wish my beautiful daughter a happy 3rd birthday, it seems that all I've been doing the last few weeks is celebrate something or other, we have had three birthdays and an anniversary, but this is the last one for a while...phew. We have had a lovely day, it really doesn't seem three years ago that we came home from hospital with this little bundle...she looked just like a little angel.
This is one of my favourite photographs of her... so peaceful. Although I expect she will be spending more time the other side of the lens as she asked for her first camera for her birthday. Amongst her current favourite things are hello kitty and the colour pink so we had a go at making a hello kitty cake.
Some of the cards we made are below... happy birthday little one.
This is one of my favourite photographs of her... so peaceful. Although I expect she will be spending more time the other side of the lens as she asked for her first camera for her birthday. Amongst her current favourite things are hello kitty and the colour pink so we had a go at making a hello kitty cake.
Some of the cards we made are below... happy birthday little one.
Friday, 8 July 2011
7th Birthday
Today is my son's 7th birthday, so this is just a quick post to wish him a very happy birthday and to show you the cake we made. It really doesn't seem like 7 years ago that we came home from the hospital with him.
He is very rarely this quiet now, a very special little boy with a very different way of looking at things and he has inspired us to view the world differently too.
So here is the cake! As my son is extremely dinosaur obsessed, we thought a dinosaur cake would be quite exciting for him. It is my first go at making a themed cake like this, usually my cakes are round. I think he was quite impressed although I do remember him bringing up some anatomical inconsistencies. Happy 7th Birthday.
Nearly forgot to add the birthday cards we made for him, my youngest daughter had so much fun with her card... glitter really is her thing.
He is very rarely this quiet now, a very special little boy with a very different way of looking at things and he has inspired us to view the world differently too.
So here is the cake! As my son is extremely dinosaur obsessed, we thought a dinosaur cake would be quite exciting for him. It is my first go at making a themed cake like this, usually my cakes are round. I think he was quite impressed although I do remember him bringing up some anatomical inconsistencies. Happy 7th Birthday.
Nearly forgot to add the birthday cards we made for him, my youngest daughter had so much fun with her card... glitter really is her thing.
Friday, 24 June 2011
2nd anniversary
Today is our 2nd wedding anniversary, although we have been together a lot longer than this. So this is just a short post to wish my wonderful husband and true love of my life, a 'happy anniversary'.
We thought it would be fun to hand make presents for each other every year based on the traditional gift guide, this year is cotton and my husband made this beautiful piece of thread art for me.
We had recently been talking about thread or string art, which used to be popular in the 1970's, as I used to do this as a little girl with my grandfather. It is a beautiful gift to be surprised with and has a heart in the middle.
This is what I made for him, it is a photo frame covered in cotton fabric, which I then sealed. The little flower is made from a circle out of a very old, falling apart dictionary. The definition of love. I have also put in a photo from our wedding.
I had to include a photograph of this, an origami crane and say 'yay I did it' Last year on our first wedding anniversary (which was paper), my husband wrote me the most beautifully romantic poem (on paper) and one of the things I tried to make for him was this origami crane. Unfortunately those of you who have known me that long will remember I could not get the crane right and was quite disappointed... so this year I was determined to get it right and finally managed it... better late than never isn't it?
Monday, 20 June 2011
Paper Quilled Sun
I thought I would have another go at paper quilling, this time a sun for the summer solstice. We have already made tea light lanterns for the garden, so this will hang in the window and hopefully catch the sun.
First, I shredded a sheet of yellow card as you can see above, the quilling tool was made by my husband and If you would like to make one yourself I will put a link at the end of this post.
I made lots of different sized circles very simply by rolling the strips of card around the quilling tool, loosening slightly and sticking the end down at the required size. Some circles are made with the full length A4 strip and some with half a strip. They were then fixed with a spot of glue into a circle of card to give the body of the sun.
Then I made these shapes to go around the outside, I made the circle in the same way, loosened to the desired size and pinched one side of the circle. This gives you this tear drop or flame shape. Do enough of these to totally go around your sun.
Stick them at random orientations around the outside like the photograph above to finish the sun shape. After this I sprayed just a touch of gold paint on to the sun, not enough to cover the yellow but just enough to give a gold glow in the sun.
The link to the post for making your own quilling tool is here.
First, I shredded a sheet of yellow card as you can see above, the quilling tool was made by my husband and If you would like to make one yourself I will put a link at the end of this post.
I made lots of different sized circles very simply by rolling the strips of card around the quilling tool, loosening slightly and sticking the end down at the required size. Some circles are made with the full length A4 strip and some with half a strip. They were then fixed with a spot of glue into a circle of card to give the body of the sun.
Then I made these shapes to go around the outside, I made the circle in the same way, loosened to the desired size and pinched one side of the circle. This gives you this tear drop or flame shape. Do enough of these to totally go around your sun.
Stick them at random orientations around the outside like the photograph above to finish the sun shape. After this I sprayed just a touch of gold paint on to the sun, not enough to cover the yellow but just enough to give a gold glow in the sun.
A piece of gold thread was added to the top so that it could be hung in the window and I wanted to add a bell or some glass beads to the bottom but I couldn't find any so sequins have been added to catch the sun.
Here it is in the window, not a very sunny day but hopefully this will look lovely with the sun shining on it.
Subscribe to:
Posts (Atom)


