Wednesday, 31 August 2016

Glass Ball and Wire Cane Tops

Our garden backs onto the countryside with a small river running past, every summer beautiful dragonflies and damselflies fill every available space and when the seasons change we start to miss them. So we came up with the idea of making a small piece of sculpture to brighten the garden during the cold winter months using some of the parts from a broken mobile.


This is the broken mobile... I kept the parts as we have a passion for recycling and reusing things but the cane tops can just as easily be made with garden wire and glass balls or marbles if you fancy making some yourself.


The first thing we did was make the body of the dragonfly, my husband used a bar with a hole in to hold the wire still, but a cane works just as well. Put the end of the wire into the hole and keep winding the wire round until it starts to resemble a large spring and could fit the required amount of marbles in. We have used six marbles in total.


With the marbles pushed into the spring it automatically starts to look like the body of a dragonfly, you can then use pliers to spiral the wire at the end to finish it off nicely, leaving a little excess wire at the head end to attach to the cane. We have used a larger marble for the head.


We have made the wings with a slightly thinner garden wire because it is so much easier to shape and can be bought very cheaply. Once you have your wing shape twist the wire together to hold it in place remembering to leave enough spare wire on the underside of the wings to fix onto the body of your dragonfly.


A little detail was added using very thin wire and beads, this was wound around the edges of the wings to fix them in place and create a representation of the veining on the dragonflies wings.


Then all that's left to do is fix the wings to the body by wrapping the long piece of wire around the body. A glass bead can be fixed to the insects thorax to cover the knotted wire using hot glue or resin. In the photograph above you can see some of the other things we have made using the glass balls and wire from the broken mobile.


These garden cane tops have been made in a similar way to the dragonfly using a simple spiral to hold the glass balls and adding a few beads as a finishing touch. I have left the bottom end of the wire straight to slide into the end of a bamboo cane but they can also be spiralled to slip over the top of the cane.


Here is the finished dragonfly in the garden, the wire at the front of it's head was straightened and slid into the top of a bamboo cane, which is hidden by the bush. As the body has been made using a spring shape and it is only fixed to the cane at the front it has given the sculpture a subtle movement which has enchanted the children.


These are some of the cane tops which remind us of little moons orbiting planets and definitely liven up a dull looking cane. A small magical touch to add a little cheer to the gardens in the winter.

As there have been a few reports of fires caused by people having glass on sunny window ledges we will be using these to brighten pots in shady corners.


Tuesday, 16 August 2016

Rock pooling

We recently went on an educational adventure to one of our local beaches to explore the rock pools. The beach we chose has an interesting chalky foreshore and lots of flints leading to a range of good rock pools and even some fossils.


The children started searching the pools as soon as the tide started to recede, with the hope of finding something new. They were very soon rewarded with something we hadn't seen in a rock pool before... a moon jellyfish... in fact we found several different kinds of jelly fish by the time the day was over.


The jellyfish was quite large, it was approximately the size of an adult hand and you can see the exposed chalk foreshore behind it. Another new sighting for us occurred not long after when we spotted a shedding or moulting shore crab, it was a chance which was too good to miss so we have taken a short video for you to see.


We waited for the crab to move away and hide in the weed and decided to look at the now empty crab shell, it had stayed together and from a distance still looked like an actual crab.


This was a lovely experience for the children and after this we found many crabs that had also moulted and quite a few cast off shells.


There were hundreds of tiny baby crabs all over the pools most of them much smaller than my daughters little finger nail. We also found a few hermit crabs and managed to take a really short video of one for you to see.


As the day went on we had found many of the usual rock pooling finds like anemones, winkles, prawns and even some tiny fish. Although we never seem to find starfish at this beach.


There are a few of our finds in this bucket, although we did have to empty it often to stop it getting too full. Below is a close up of one of the small crabs caught in our net.


As I mentioned before this place is very good for finding fossils, even in the chalk foreshore belemnites are a common find and often get washed out of the chalk after the high tide.


These are some of our fossil finds today, previously we have found sea urchins and sea sponges. This beach is a place of scientific interest because of the exposed fossil beds in the cliffs and we intend to revisit in the Autumn to examine the geology in more detail and see if any fossils have been exposed at high tide. A steppe Mammoth was found in the freshwater fossil beds at the base of these cliffs a few years ago and the children are quite excited to see where it was found.

You can read more about West Runton here, this site also directs you to good sites to explore for fossils in your area.

The photographs and videos on this post were taken by my wonderful husband.

Wednesday, 10 August 2016

Berry Cordial

Following on from my last post, we are still inundated with various berries, our currants have had especially large crops this year. As I hate things to go to waste we have decided to make a berry cordial for the children to enjoy in the late summer sunshine.


We have used 500g of mixed berries, make sure these are clean but there is no need to remove the stalks or pips as we will be putting the mixture through a straining bag to remove them later.


Place the berries in a pan, add a litre of water and bring to the boil. I have used a potato masher whilst the mixture is cooking to help release the juice from the berries.


Turn of the heat after about 10 minutes as the berries should have broken down and leave the mixture to infuse and cool slightly. As you can see in the photographs the juice is a beautiful, rich jewel colour.


After it has cooled slightly pour the mixture through a straining bag or some muslin to get rid of all stalks and pips and leave you with a lovely clear liquid.


Measure your liquid once strained as you need to add approximately half the amount of sugar to liquid when you return it to the heat. I had 700g of liquid once the straining had finished so I intended to add 350g of sugar but as the berries I used were very sharp tasting we found we needed to add a little more to suit the children's taste buds. Once your liquid is returned to the heat and the sugar has dissolved your cordial should look quite syrupy and can now be bottled up into a sterilised bottle.


This is a cordial so it needs to be diluted in water like a squash when it comes to drink it. This smells amazing and very strongly of the berries added and the children loved their drink. We also used some of this diluted cordial to make our ice lollies for warm summer days.

Friday, 29 July 2016

Red Currant Jelly

We have a large redcurrant bush in our garden and this year it has given us a bumper crop of berries, over two kilos and still going. So we have been thinking of extra things to make to preserve the berries into the winter.


Looking into the history of redcurrant jelly, I found that it was traditionally used in England as an accompaniment for Sunday roasts and Christmas dinner before the cranberry version was introduced from America and became the norm.


I decided to just make a small batch of redcurrant jelly, mostly to keep for the festive season and my husband has used the remaining berries for a batch of homemade wine, which I have to say smells amazing. The recipe I have used is a very simple one just using an equal amount of berries to sugar, the same as I use for all the jams and jellies I make.


First clean your berries, there is no need to de-stalk them as we will be straining the mixture through a jelly bag later. A sieve and a piece of muslin will do if you do not own a jelly bag. I have used 500 grams of berries and just covered them in the pan with water as you can see above.


Boil the berries for a few minutes until they soften using a masher or back of a spoon to help release the juices. Then allow to cool for a while before straining the mixture through the jelly bag to remove any stalks and pips. Try not to squeeze the jelly bag while it is straining as this may give you a cloudy jelly, some people prefer to leave this over night.


Once you have your strained mixture it should be a beautiful clear jewel colour, you can then measure how much fluid you have to see how much sugar you need to add.

** Remember**  if you have 500 ml of fluid you will need to add 500 grams of sugar ... keep this measurement like for like and you can't really go wrong. ( keep to either both metric or both imperial)

Return your fruit and sugar mixture to the pan and bring to a boil, stirring all the time, to get your setting point, this will probably only take about 5 to 10 minutes. You can check if your jelly has reached a setting point by placing a small drop onto a cold plate, after a couple of minutes this drop will wrinkle when you push your finger into it.


Then simply pour into your sterilised jars and allow to cool.... I will need to add a sticker to mine saying do not open until Christmas dinner or there may not be any left.

Friday, 22 July 2016

Home Education journal July 2016

Just through the other side of the busiest few weeks for birthdays and it feels great to finally be able to sit and breathe for more than a minute. So leaving out the four birthdays and our wedding anniversary, here are some of the other things we have been doing over the last few weeks.


A zoo visit gave us some chilling out time, especially as they had a new attraction in the play park... bouncy pillows. We had to return to this part of the park several times to bounce as it was a huge lure to my young bouncers. Another high point was the pooping bird video! ... A striated Caracara bird of prey was chatting to my son and I thought it looked so cute that I should try to film it to preserve the memory. However as soon as I had started to film, the bird stopped talking and pooped much to the amusement of the children.


Around this time the elderflower had come into bloom, we love elderflower cordial very much and make some every year. Spurred on by a twitter chat we decided to make extra this year and freeze some for the up coming birthday parties as a special treat.


It is very easy to make and very delicious, if you would like to make some you can find our recipe here.


We have been for some wonderful country walks and hikes through our local nature reserve, the children love to document changes in the wildlife and plant life at various locations throughout the year.


It's especially nice to find fields full of daisies and other wildflowers whilst looking for a place to eat your picnic... the butterfly, bee and insect action going on in this field was amazing to see.


The children's interest in science has continued to grow and they have been studying various aspects of geology. Some of their experiments have included making two different types of lava to compare and using sugar cubes to study erosion.


They spent some time plotting volcanoes around the ring of fire in the pacific ocean to give us this giant map amongst other activities.

We were lucky enough to get the chance to buy a couple of boxes of fruit,  plums and peaches, for just 7 pence a punnet, so we jumped at the offer. This meant quickly processing it before it went off ... so we got down to making batches of both peach and plum wine, both types of jam and a few cakes for tea.


It was a very busy few days but not a single fruit was wasted... the above photograph is my upside down plum cake which was the very tasty end of the last punnet of plums. I may share this recipe in the Autumn when the plums are in season. So that covers a few things from our daily lives.... until the next post.

Friday, 17 June 2016

Handmade Mouse Mat

Father's day is fast approaching and the children like nothing better than to make gifts as little extras for their wonderful father. This year we decided to make a sturdy mouse mat as the ones we have keep getting mysteriously peeled and we have to constantly replace them.


Firstly, finish peeling the top layer from the mouse mat if you need to, as we have chosen to reuse the rubber bottom layer for this very simple craft. Next choose your top layer and test out the fabric to see if your mouse works well on the surface. I have decided to use a faux leather as this mouse mat is for father's day but any scraps of leather or thick fabric would work well. You could even use a fabric that had a photograph printed on it if you wanted a personal touch.


Cut out a rough shape slightly large than your mouse mat as it's easier to cut it to the exact size after glueing. If using a porous fabric you may want to test a small patch to see how the glue dries before starting your mat.


We have used a latex based glue for this project to give a better flexibility. Paste a small amount of glue to each side you want to stick and wait a few seconds to allow to go tacky.


Stick both sides together, ensure there are no creases and press down firmly, then allow to dry completely.


We left ours to dry for a few hours underneath some very heavy books, this ensures your mouse mat dries totally flat and has no lumps, bumps or creases in.


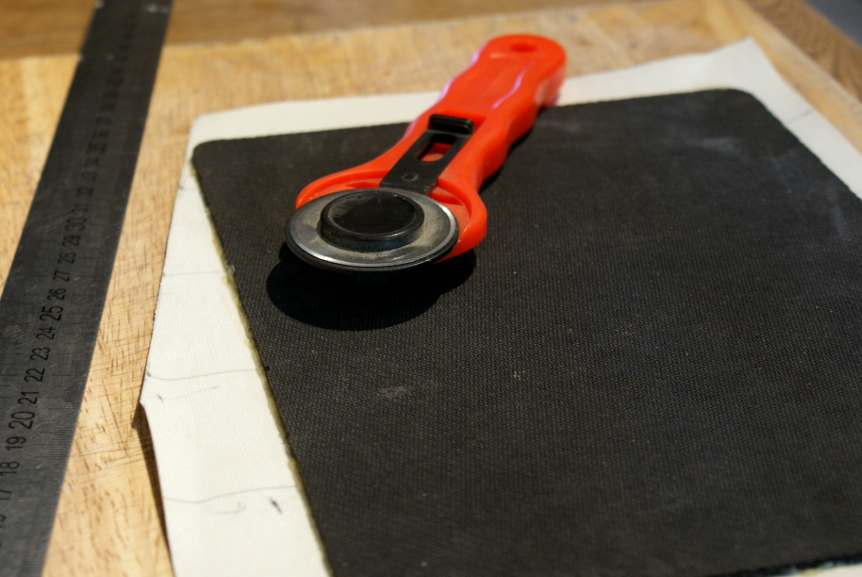
After the mouse mat is dry you can cut around the edges as neatly as possible also ensuring the corners are rounded. Scissors or a craft knife will work well but we have used a rotary cutter as this cuts fabric very neatly with one quick motion.


As you can see the completed mouse mat is now taking shape, the faux leather has given the mat a very professional look. It will look perfect on any father's desk either at home in the study or in his work office.


There we go all finished, the mouse works perfectly and because it is much stronger than the ones we usually buy it shouldn't suffer from peeling any more.


If you would like to personalise your mouse mat further you could emboss it or try out some metallic permanent markers and a quick spray of lacquer to ensure it doesn't come off. It may be best to add details to a top corner so that it doesn't interfere with the mouse functions in any way.


Monday, 30 May 2016

Home education journal - A busy time

It's been a while since I have posted an education journal entry as we have just been so busy, but I have picked out a few things from the last few weeks to record here. We have started to go swimming again for an hour or two each week which the children have enjoyed immensely and it's a very important life skill. We had a short break over winter to allow my daughter's new ear piercings to heal but at least nobody forgot how to swim.


We have continued to spend a lot of time at our local nature reserve, so that we can observe the seasonal changes in wildlife there. Also taking the time to explore the ruins of Trowse Newton Hall found in the reserve.


With the commencement of spring, plant experiments start all over the house and garden. The one pictured above is to see if various plants can find their way through a maze to find the light... the children tested beans and potatoes.


They have also continued looking into plant anatomy in much more detail including flower dissection and labelling.


Another science project had them looking into energy and motion, they made straight roller coasters and bumpy ones to test how much energy was needed to get the marbles over all the bumps amongst other things, which proved very entertaining.


We have spent some time exploring the directions on a compass and made little signposts to have in their rooms to enable them to know which way our house faces and also the windows. They found which way to position the signpost using a compass. Another part of the Mystery science course was to plot the sun's passage over our house using a little plastic dome.


We also took part in the RHS school's gardening project to grow rocket seeds that had been in space. 


We had to plant two packets of seeds, one from space and the other a control, to see how each packet grew. Each seed had to be planted independently in it's own compartment in the seed tray, so it took quite a lot of time and patience. 


The children took one packet each and all our results are being recorded on a very large chart.


That covers just a tiny fraction of the things we have been doing and some of the science projects the children have been experimenting with. It's been very busy here sorting out the allotment, plants and various other activities. Hope to be back really soon.