Wednesday, 30 November 2011

Autumn Leaf Bowls

Just time to fit in one last craft the children have been doing for Autumn before the season changes, this time we have made leaf shaped clay pots or candle holders. My eldest children made some like these when they were very small and I can remember some children making them when I was at school. So we thought we would have a go using a pack of air drying clay after seeing some recently which reminded me of how pretty the bowls looked.


First thing we did was print and cut out some leaf templates and chose one each, then we rolled out the clay to the required thickness. We rolled ours out quite thin but I think if we make some more I will leave the clay slightly thicker as I was terrified that the children would break them.


My husband put the leaf template onto the clay and cut round them all and we added a few leaf details onto the clay. For more realistic looking veins you could press real leaves into the clay and cut around them.


The cut out leaf was then placed onto a bowl, so that it curled around it and left to completely dry, we used several different sized bowls so that each leaf had a unique shape. There is a lot of waiting to dry in this craft so a little patience is required.


After the clay has dried it was possible to paint the bottom of the leaf while it was still on the bowl, we used acrylic paint for this. After the painted base has dried you can remove your leaf bowl and paint the inside, we started to paint them in Autumnal colours but the children decided to add extra colours to the inside of the bowls.


This is what we ended up with, after adding a little extra sparkle as it is coming up to Christmas. My daughter's one is mostly red, my son has added a little blue glitter and I painted mine red and lightly sprayed it with gold paint. They are not quite finished yet as we will be adding a couple of layers of varnish to make them a little stronger and easier to clean.


It looks very Autumnal with a candle in it, although we are now seeing the start of Winter. My son also made some casts of dinosaur footprints with the left over clay, just like the fossil ones.


Saturday, 19 November 2011

A Tale of Two Beaches

We have been making the most of the last sunny weather of Autumn with some more beach trips, two different sorts of beaches, to give the children different experiences and hopefully an entrance to study other coast based educational subjects. First we went to the east coast of Norfolk where the beach was sandy with a few dunes and lots of pebbles, but no rock pools and no cliffs.


Usually the children spend their time looking to see what the tide has washed up and then they insist on having some rides and visiting the local reptile centre or the sea life centre. This year we visited both of these places, there were hardly any people in the sea life centre at all so we were able to spend a long time watching the sea creatures and getting extra insights into the creatures behaviour from the staff. The children enjoyed playing finger tag with a penguin and had a very close encounter with a ray when it popped up over the top of the tank and nearly kissed them!


The other beach we visited was on the north Norfolk coast and this was a very different experience, we went to West Runton the place where the fossil of the elephant was found. This beach had cliffs and rock pools, when the tide went out a chalky foreshore was exposed which was full of fossils, of course this was very interesting to my son who loves fossil hunting.


The photograph above was taken just after the tide started to go out and rock pooling commenced with much enthusiasm, we found fish, winkles and other sea snails, anemones, limpets and many different types of crab. Our favourite were the little hermit crabs we nearly passed over thinking they were snails, my son also had lots of prawns tickling his feet like they were cleaning them which caused much amusement.


Seeing the differences first hand like this allows the children better insights when we discuss coastal geology and erosion but most of all we'll remember the wonderful times we had at the beach especially the rock pooling day.

Wednesday, 9 November 2011

Autumn Tea light holders

Just a quick post to show you some of the themed tea light holders we made this Autumn, which would look lovely at any bonfire or fireworks party. If you are a regular reader you may remember we made our tea light holders from old recycled jars earlier in the year, if you need to recap on how to put the wire on the top you can find them here.


We have two small schumacher trees in the garden and we waited for the leaves to change colour to make the bonfire picture I wrote about yesterday. With the leaves left over from the children's crafts we glued some on a couple of jars, any leaves can be used last year we used maple leaves and earlier in the year we used leaf skeletons. The schumacher  leaves have the appearance of flames and the beautiful glow they give off when lit make a lovely Autumn addition to any garden.


Here they are after dark, I think they look quite magical like little tiny bonfires. We made these as temporary lanterns for Autumn, and are hoping to make more seasonal ones in the future. If you would like to preserve the leaves and make this autumnal lantern last a little longer you could totally cover the leaves in craft glue or modge podge to seal them in.


Inspire Me Beautiful

Tuesday, 8 November 2011

3D bonfire and fireworks art

The children have been making some lovely 3D bonfire and fireworks art pictures incorporating  some natural things from the garden and some junk modelling recently and I thought I would share them here.


We have collected little twigs from the garden to make the base of the bonfire, this year we glued them on with a hot glue gun as last year we have to wait a long time for the PVA glue to dry. The children have used the red leaves from a Schumacher tree to simulate the flames on the fire, we waited ages for the leaves to change colour this year.


They marked out the shape of the fireworks with glue and covered them with glitter. Then to make the fireworks look 3D, we have collected the seed heads from some of our herbs, like fennel and dill and sprayed them with spray glue and glitter.


They can either be glued on like the photograph above or the stalk can be poked through the paper and taped down on the back. This then creates your 3D firework and you can use as many as you can find.


We only had a few left in the garden but enough to create this pretty display. Some of the seed heads look like little stars bursting out of the page.


Here is a close up of my sons picture so that you can see the stack of twigs making the 3D bonfire, the leaf flames and the seed head fireworks close up.


Here are both completed works of art waiting to dry. Not only a bright and colourful way to cheer up the wall in these very dark grey days but also 3 dimensional. Leading up to fireworks day they have also done some related junk modelling and made these lovely rockets from some old bottles.

Friday, 28 October 2011

Halloween Paper Quilling

As Halloween is approaching fast we thought we would have a go at some seasonally inspired paper quilling choosing a bat and pumpkin to try and quill. First you need a quilling tool and paper, I use a quilling tool made for me by my husband, I will put a link at the bottom of the page if you would like to make your own tool and we have used a paper shredder to shred the card for quilling.


Start by making a spiral and this is done by rolling the paper around the quilling tool as seen in the above photograph, continue until all of the strip of paper is tightly rolled.


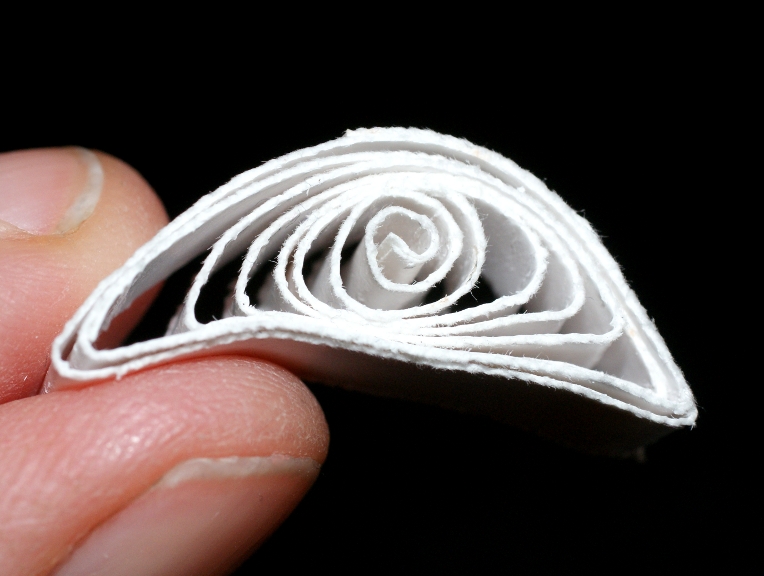
Remove your coil from the tool and allow it to loosen to the desired size, you should be left with a spiral like the one above. Once it has loosened enough put a spot of glue on the loose end to fix it and you are ready to mould it to the shape you require.


For the bat's body I allowed the spiral to open up quite a way to give a larger shape then squeeze the bottom until it has a point like the one shown above.


Then squeeze the top down while holding the shape firming on each side, this will give you the heart shape shown above. Once you have achieved this shape pinch the two top points or ears as they will become, this will make them more bat like.


Next you need to make four semi circles, all shapes start as a circle on the quilling tool, then the above shape is made by pinching both sides downwards. The more you pull it down, the more pronounced the bat wing shape is.


Once you have your body shape and four semi circles you can glue them together like the above photograph shows to give you the basic bat shape.


For the pumpkin you need to make another two semi circle shapes and one eye shaped one, which is made by just squeezing both sides of the initial circle. These three shapes then need to be stuck together, with the eye shape in the middle.


We have pinched the top of the middle shape to make the stalk of the pumpkin and added a small curl of paper to represent a vine. what do you think?


If we had used coloured card for the quilling we would be finished now but unfortunately I only had white card so we had to paint our quilled shapes. The bat was spray painted black and googly eyes were glued on and the pumpkin was brushed lightly with acrylic paints to give a hint of colour. We are going to add thread to these to hang them up for Halloween on our haunted tree.

This craft can also be done by children, my son who is 7 years old is always very interested in having a go at quilling, today he made the pumpkin seen above on the left and is very happy with the results. My daughter who is only 3 years old also enjoyed having a go, she made some lovely spirals around a pencil. If you would like to make your own tool my husband's guide is here.

Wednesday, 26 October 2011

Halloween Paper Banner

Halloween / Samhain is almost upon us, it is one of my favourite holidays and it always ends up the one I have the least preparation time for, with it being exam season. Every year I say I will make fabric banners so that we can re use them but time just runs out, so this year I have made an easy paper banner.


This is one of many dictionaries we have in the house, it is old, battered and broken with many missing pages. It was only fit for the recycling bin really but I am always reluctant to bin things that may have other uses, so I have been using it for crafts. Making gift boxes, paper flowers, for drawing and painting on in an altered page style, journalling and mixed media art and herb labels to name a few things, and now this banner...


First you will need to ready your printer and find a font for your spooky writing, then just print the letters out onto your old pages. The above pages were just used as test sheets to get the printed letters in the right place and to work out the size of the flag, once you are happy, mark and cut out the shape of the flag. I decided to age the paper to give it a spooky vintage feel by dabbing a used tea bag around the edges of the flags.


As you can see above the tea bag leaves an old brown mark, good for making treasure maps too. Then fold the top over a piece of wool or string and glue down, I have used a glue stick here as it is just paper.


That's it... one completed banner, just hang it up. You can really go to town here if you want to, as long as the printer will print on your old paper you could print in colours or spooky pictures.


My husband also made a banner making the lettering look a little spookier than mine as you can see above. He has printed out the letters with added cobwebs, bat wings, ghosts and some kind of splatter effect.


This is a close up of one of his pages, we decided to make these flags a slightly different shape to the first ones but they are fastened to the wool in the same manner.


 This is what both banners look like on the wall, it should enlarge if you click on it. This is an easy paper craft all letters and pictures could be painted or drawn on if you have no printer. It is also very easy for small children to paint their own banner for a Halloween party centre piece and hang spooky things on it.

Monday, 17 October 2011

A Little Vintage and The Cat Returns!

I haven't done a Magpie Monday post for a while and this is one with a slight difference, I have not had much time for shopping and have just been trying to buy things I really need or like. Firstly I found this tablecloth with lovely Autumnal colours for just 75p, the colours actually remind me of the ones used in some of the Clarice Cliff designs. The only tablecloths we have are the modern plastic ones which are very useful for messy crafts and some given to me by my Grandmother, which are too special for me to introduce to the children just yet, so this will come in useful. I am not sure whether to keep it as a tablecloth or use the fabric for something else but so far my daughter has been using it for picnics with her dolls.


Next is a couple of wooden cotton reels I found, I had to pay 50p for these but I do love the wooden ones and the colours are very pretty.  They are now taking pride of place on the top draw of my sewing basket.


I found this bowl or saucer for 25p, to be honest I really don't know what it is, but I liked the simple lines of it, maybe it was an under saucer for a plant pot?... I bought it for my cat, not for normal cat food but for the special treats he gets like a little tuna or chicken.


This bowl is now back in use after 4 months as my cat sadly went missing at the beginning of June, but I am pleased to announce he is now home, he just strolled right in like nothing was wrong the other day. We are all very surprised and happy to have him safe at home again.


Lastly for today I have a glass lemon squeezer my husband found for me for just 50p, we had an awful modern plastic one which did not work well and I really have no idea where it came from anyway. I love these glass ones, so easy to use and they catch the pips... I now have plenty of little volunteers for lemon squeezing.


This post is for the magpie Monday series hosted by missielizzie.


Me and My Shadow