Showing posts with label father's day. Show all posts

Friday, 17 June 2016

Handmade Mouse Mat

Father's day is fast approaching and the children like nothing better than to make gifts as little extras for their wonderful father. This year we decided to make a sturdy mouse mat as the ones we have keep getting mysteriously peeled and we have to constantly replace them.


Firstly, finish peeling the top layer from the mouse mat if you need to, as we have chosen to reuse the rubber bottom layer for this very simple craft. Next choose your top layer and test out the fabric to see if your mouse works well on the surface. I have decided to use a faux leather as this mouse mat is for father's day but any scraps of leather or thick fabric would work well. You could even use a fabric that had a photograph printed on it if you wanted a personal touch.


Cut out a rough shape slightly large than your mouse mat as it's easier to cut it to the exact size after glueing. If using a porous fabric you may want to test a small patch to see how the glue dries before starting your mat.


We have used a latex based glue for this project to give a better flexibility. Paste a small amount of glue to each side you want to stick and wait a few seconds to allow to go tacky.


Stick both sides together, ensure there are no creases and press down firmly, then allow to dry completely.


We left ours to dry for a few hours underneath some very heavy books, this ensures your mouse mat dries totally flat and has no lumps, bumps or creases in.
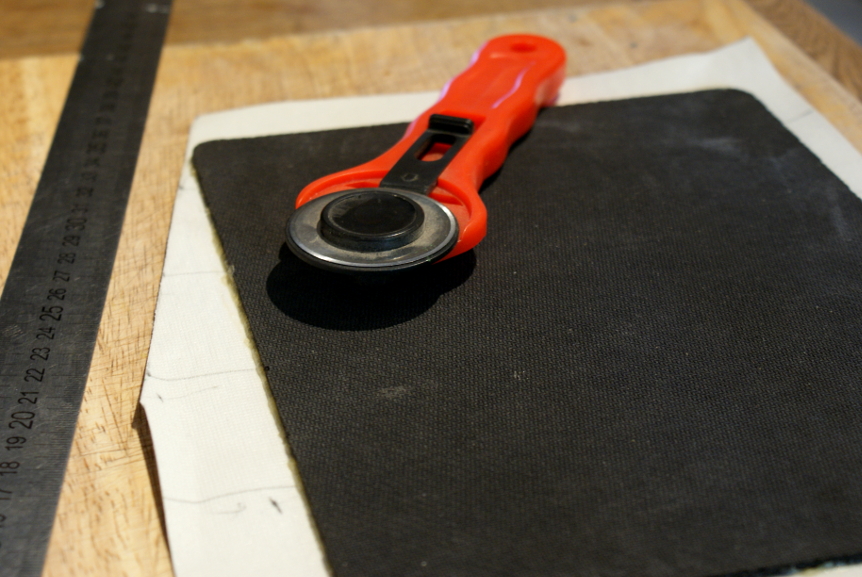

After the mouse mat is dry you can cut around the edges as neatly as possible also ensuring the corners are rounded. Scissors or a craft knife will work well but we have used a rotary cutter as this cuts fabric very neatly with one quick motion.


As you can see the completed mouse mat is now taking shape, the faux leather has given the mat a very professional look. It will look perfect on any father's desk either at home in the study or in his work office.


There we go all finished, the mouse works perfectly and because it is much stronger than the ones we usually buy it shouldn't suffer from peeling any more.


If you would like to personalise your mouse mat further you could emboss it or try out some metallic permanent markers and a quick spray of lacquer to ensure it doesn't come off. It may be best to add details to a top corner so that it doesn't interfere with the mouse functions in any way.


Sunday, 19 June 2011

Father's day frames

Just a quick post to wish my husband, the wonderful father of my children, a happy father's day. We usually give some homemade presents as well as bought ones on special occasions as the children love to make things. This year everything seems to keep creeping up on me so fast that I'm having trouble keeping up.


So this years craft is a very simple one, we saved a few jar lids from the tea light lanterns to use as frames and added magnets to the back of them. These automatically stick but if you want something more permanent, you could add a spot of hot glue. This leaves the inside of the jar lid for your photographs, we took some fun ones, printed them out and cut them to shape. Then just push into the lid, once added to the frames they can be stuck anywhere that a magnet will stick.


This photograph shows them on the refrigerator but they are ideal for my husband to stick up in his workshop. Last year we made large hand print posters with the messy little hand print poem on and my son painted a rock with the words 'dad rocks' on it you can find a picture here.

Saturday, 16 October 2010

Rock Painting


I have been thinking of ways of making the garden look a little more interesting or magical lately, to the children over the stark winter months, and also introduce some more fun crafts. This time we have killed two birds with one stone (excuse the pun). It was a really rainy day, the children were a little upset that we had to cancel our trip out so we had to come up with something to do last minute that was fun. We didn't have any acrylic paint so we have had to use normal poster paint but they loved making these little rock monsters so much that we will probably make some more when we have the proper paint. My husband sprayed them with lacquer to make them a little more waterproof.


 When they were dry and the sun was shining, we hid them all over the garden. As you can see above, some have had some finishing touches of googly eyes and the toadstool has a little hand carved stalk. But these were mostly painted and made by my youngest children aged just 6 and 2 with much love. 


Now when winter comes and the garden is bare, there will be little folk or things of interest hiding everywhere. So far my daughter has been finding them hilariously funny every time she spots one lurking. Some of them like the one above are very colourful and will brighten up a dull corner.


I spotted this lonely one playing in the dirt. We did something similar to this for my husband on father's day, my son painted a rock and we wrote "dad rocks" on it. you can see it here. can't wait to paint some more using acrylic paint. we have quite a few crafts lined up to cheer up the garden for winter and to try to make it a little more magical for the little ones.