A thrifty and natural life...full of magical crafts, money saving tips and home educating along the way.
Showing posts with label crafts. Show all posts
Monday, 12 February 2018
Easy Bookmarks
These bookmarks are very simple to make with just a few items from your craft box and a few spare minutes, my children often like to make them. So I thought I would make a special one for my husband with faux leather and little wooden hearts especially with Valentines day in mind.
First collect together the items to be used, in this case faux leather, heart shaped wooden buttons and an elastic hair tie. Any fabric or ribbons can be used here, your designs can reflect your interests or those of the person you intend to use the bookmark.
Mark out your required size of bookmark, I have made mine the width of the ruler and around 30 centimetres long... however you could make it smaller or longer depending on the size of books most commonly read. Try out a few lengths on your books to see which size you prefer and remember to take the seams into account.
Next fold the end of the fabric over the hair tie and stitch a hem as seen above, this will hold your hair tie in place. As this is faux leather it will not fray but if you are using ribbon or fabric it's best to hem each end of your bookmark.
Then stitch on your buttons, you could use just one button on the opposite side to the hair tie allowing you to hook the tie over the button to keep your page. With valentines day in mind I have sewn on two heart buttons, one on each end to symbolise our two hearts being drawn together.
As you can see it securely saves your page with no risk of it falling out like a conventional bookmark. Just to show you an alternative design....
This is my daughter's bookmark, as you can see she has used a pretty ribbon and colourful star shaped buttons for it.
She also has an added feature on her bookmark...an extra button, this allows the same bookmark to be used for many different sizes of books. Children's books vary so much in size from one to another that this gives her the choice of bookmark size.
As you can see in the photograph above the extra button allows her to securely bookmark her pages in a range of different size books. A very simple craft for your little readers to try.
Sunday, 17 December 2017
Twig wreath and star bases
Following on from our theme of thrifty or free homemade Christmas / yule decorations we have been making the bases for our wreaths and stars. As keen gardeners we tend to save any useful looking clippings and my husband had recently pruned our cherry tree which has beautiful reddish tinted bark, so we set to work creating the bases to woven wreaths seen above.
This is the pile of twigs I started with... when freshly cut, the twigs are still very pliable and can quite easily be bent and twisted into shape. To form the rings I first took one stick and bent it into a ring shape, then held it in place with one hand whilst intertwining the next stick around the ring. This is quite fiddly and it is possible to tie the first stick into a ring shape if you'd prefer but I always find that once you've woven in a couple of sticks it holds it's shape by itself.
Once it holds it's own shape you can then decide on how many sticks to weave in, you could go for a simple ring with just a few sticks or something much thicker and more substantial.
We have gone for something in between as you can see in our first photograph... all ready to decorate for the season now. These bases have cost us nothing to make just using a few clippings from the garden and a little time, I usually decorate our wreaths with the natural look of fresh holly, ivy and pinecones from our gardens.
The stars are also easily made from twigs, cut five to the same size, lay them out in a star shape and tie off the corners. These can also be decorated to fit your decor.
I'll be back to post a couple of photos to show you the finished results when the wreaths have been decorated. After Christmas / Yule these wreath bases can be saved until they are needed again, I usually strip them back of all the fresh foliage and pack them away ready to be redecorated on their next outing.
Labels:
Christmas,
crafts,
decorations,
free,
natural,
star,
sticks,
thrifty living,
twigs,
wreath,
Yule
Wednesday, 31 August 2016
Glass Ball and Wire Cane Tops
Our garden backs onto the countryside with a small river running past, every summer beautiful dragonflies and damselflies fill every available space and when the seasons change we start to miss them. So we came up with the idea of making a small piece of sculpture to brighten the garden during the cold winter months using some of the parts from a broken mobile.
This is the broken mobile... I kept the parts as we have a passion for recycling and reusing things but the cane tops can just as easily be made with garden wire and glass balls or marbles if you fancy making some yourself.
The first thing we did was make the body of the dragonfly, my husband used a bar with a hole in to hold the wire still, but a cane works just as well. Put the end of the wire into the hole and keep winding the wire round until it starts to resemble a large spring and could fit the required amount of marbles in. We have used six marbles in total.
With the marbles pushed into the spring it automatically starts to look like the body of a dragonfly, you can then use pliers to spiral the wire at the end to finish it off nicely, leaving a little excess wire at the head end to attach to the cane. We have used a larger marble for the head.
We have made the wings with a slightly thinner garden wire because it is so much easier to shape and can be bought very cheaply. Once you have your wing shape twist the wire together to hold it in place remembering to leave enough spare wire on the underside of the wings to fix onto the body of your dragonfly.
A little detail was added using very thin wire and beads, this was wound around the edges of the wings to fix them in place and create a representation of the veining on the dragonflies wings.
Then all that's left to do is fix the wings to the body by wrapping the long piece of wire around the body. A glass bead can be fixed to the insects thorax to cover the knotted wire using hot glue or resin. In the photograph above you can see some of the other things we have made using the glass balls and wire from the broken mobile.
These garden cane tops have been made in a similar way to the dragonfly using a simple spiral to hold the glass balls and adding a few beads as a finishing touch. I have left the bottom end of the wire straight to slide into the end of a bamboo cane but they can also be spiralled to slip over the top of the cane.
Here is the finished dragonfly in the garden, the wire at the front of it's head was straightened and slid into the top of a bamboo cane, which is hidden by the bush. As the body has been made using a spring shape and it is only fixed to the cane at the front it has given the sculpture a subtle movement which has enchanted the children.
These are some of the cane tops which remind us of little moons orbiting planets and definitely liven up a dull looking cane. A small magical touch to add a little cheer to the gardens in the winter.
As there have been a few reports of fires caused by people having glass on sunny window ledges we will be using these to brighten pots in shady corners.
This is the broken mobile... I kept the parts as we have a passion for recycling and reusing things but the cane tops can just as easily be made with garden wire and glass balls or marbles if you fancy making some yourself.
The first thing we did was make the body of the dragonfly, my husband used a bar with a hole in to hold the wire still, but a cane works just as well. Put the end of the wire into the hole and keep winding the wire round until it starts to resemble a large spring and could fit the required amount of marbles in. We have used six marbles in total.
With the marbles pushed into the spring it automatically starts to look like the body of a dragonfly, you can then use pliers to spiral the wire at the end to finish it off nicely, leaving a little excess wire at the head end to attach to the cane. We have used a larger marble for the head.
We have made the wings with a slightly thinner garden wire because it is so much easier to shape and can be bought very cheaply. Once you have your wing shape twist the wire together to hold it in place remembering to leave enough spare wire on the underside of the wings to fix onto the body of your dragonfly.
A little detail was added using very thin wire and beads, this was wound around the edges of the wings to fix them in place and create a representation of the veining on the dragonflies wings.
Then all that's left to do is fix the wings to the body by wrapping the long piece of wire around the body. A glass bead can be fixed to the insects thorax to cover the knotted wire using hot glue or resin. In the photograph above you can see some of the other things we have made using the glass balls and wire from the broken mobile.
These garden cane tops have been made in a similar way to the dragonfly using a simple spiral to hold the glass balls and adding a few beads as a finishing touch. I have left the bottom end of the wire straight to slide into the end of a bamboo cane but they can also be spiralled to slip over the top of the cane.
Here is the finished dragonfly in the garden, the wire at the front of it's head was straightened and slid into the top of a bamboo cane, which is hidden by the bush. As the body has been made using a spring shape and it is only fixed to the cane at the front it has given the sculpture a subtle movement which has enchanted the children.
These are some of the cane tops which remind us of little moons orbiting planets and definitely liven up a dull looking cane. A small magical touch to add a little cheer to the gardens in the winter.
As there have been a few reports of fires caused by people having glass on sunny window ledges we will be using these to brighten pots in shady corners.
Labels:
beads,
cane tops,
crafts,
dragonfly,
garden,
garden cane,
garden love,
glass,
magical,
marbles,
recycle,
reuse,
sculpture,
wire
Friday, 17 June 2016
Handmade Mouse Mat
Father's day is fast approaching and the children like nothing better than to make gifts as little extras for their wonderful father. This year we decided to make a sturdy mouse mat as the ones we have keep getting mysteriously peeled and we have to constantly replace them.
Firstly, finish peeling the top layer from the mouse mat if you need to, as we have chosen to reuse the rubber bottom layer for this very simple craft. Next choose your top layer and test out the fabric to see if your mouse works well on the surface. I have decided to use a faux leather as this mouse mat is for father's day but any scraps of leather or thick fabric would work well. You could even use a fabric that had a photograph printed on it if you wanted a personal touch.
Cut out a rough shape slightly large than your mouse mat as it's easier to cut it to the exact size after glueing. If using a porous fabric you may want to test a small patch to see how the glue dries before starting your mat.
We have used a latex based glue for this project to give a better flexibility. Paste a small amount of glue to each side you want to stick and wait a few seconds to allow to go tacky.
Stick both sides together, ensure there are no creases and press down firmly, then allow to dry completely.
We left ours to dry for a few hours underneath some very heavy books, this ensures your mouse mat dries totally flat and has no lumps, bumps or creases in.
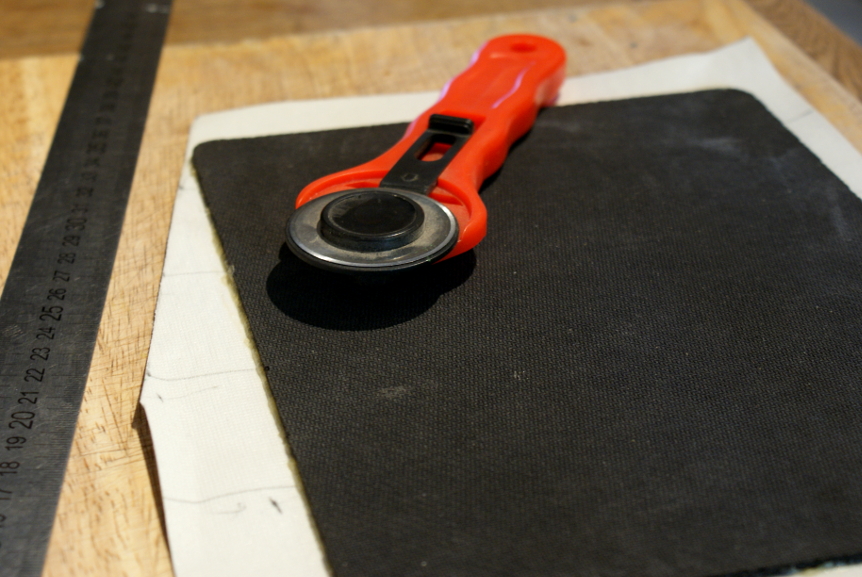
After the mouse mat is dry you can cut around the edges as neatly as possible also ensuring the corners are rounded. Scissors or a craft knife will work well but we have used a rotary cutter as this cuts fabric very neatly with one quick motion.
As you can see the completed mouse mat is now taking shape, the faux leather has given the mat a very professional look. It will look perfect on any father's desk either at home in the study or in his work office.
There we go all finished, the mouse works perfectly and because it is much stronger than the ones we usually buy it shouldn't suffer from peeling any more.
If you would like to personalise your mouse mat further you could emboss it or try out some metallic permanent markers and a quick spray of lacquer to ensure it doesn't come off. It may be best to add details to a top corner so that it doesn't interfere with the mouse functions in any way.
Monday, 13 October 2014
Autumn Critter Craft
Autumn can be a magical time of year for children to explore nature with the last of the harvests, the leaves going through a beautiful colour change and then falling along with their nuts and seeds. Our children love to go for long walks and collect many things including pine cones, conkers, teasels and beautiful leaves to use in Autumn crafting of one sort or another. This year they have decided to make some autumn critters with the things they have collected.
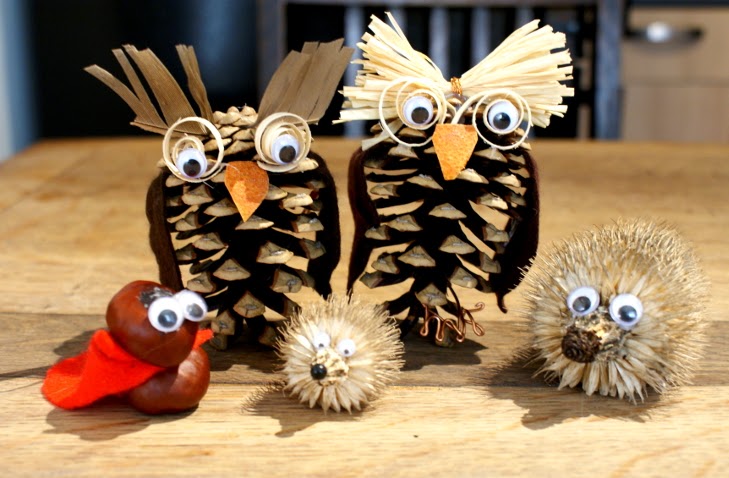
Many things that can be imagined by little ones can be easily made, start with the items you have managed to collect and see where your imagination takes you. As you can see we have made owls, hedgehogs and even conker man!
These are some of the things we started with, the little hedgehog seems like an obvious choice using the prickly teasel.
We have used the stalk as a nose and trimmed back some of the spikes at the stalk end until we had the desired length... this is quite prickly so little ones may need help or gloves. I found the teasel less prickly if you trim a tiny piece off the end of each spike, a bit like giving it a hair cut. Then all we did was add a nose and some googly eyes.
We love owls and the pine cone seemed to lend itself perfectly to the shape of an owl, so all we have done is add a few extra features to make it look a little more owl like. Conker man was made by my youngest daughter using a match stick and glue to hold his head on, she also gave him a lovely red super hero cape and has also been making him a family... so we now have a whole bunch of conker people.
A few years ago we made nature faeries with our autumn collections if you would like to see I have added the link.
If you decide to collect some Autumn things on your nature walks let us know what you made. Have fun!
Many things that can be imagined by little ones can be easily made, start with the items you have managed to collect and see where your imagination takes you. As you can see we have made owls, hedgehogs and even conker man!
These are some of the things we started with, the little hedgehog seems like an obvious choice using the prickly teasel.
We have used the stalk as a nose and trimmed back some of the spikes at the stalk end until we had the desired length... this is quite prickly so little ones may need help or gloves. I found the teasel less prickly if you trim a tiny piece off the end of each spike, a bit like giving it a hair cut. Then all we did was add a nose and some googly eyes.
We love owls and the pine cone seemed to lend itself perfectly to the shape of an owl, so all we have done is add a few extra features to make it look a little more owl like. Conker man was made by my youngest daughter using a match stick and glue to hold his head on, she also gave him a lovely red super hero cape and has also been making him a family... so we now have a whole bunch of conker people.
A few years ago we made nature faeries with our autumn collections if you would like to see I have added the link.
If you decide to collect some Autumn things on your nature walks let us know what you made. Have fun!
Saturday, 21 December 2013
Wool Wrapped Wire Reindeer
Yesterday I wrote about the wool wrapped wire snowflakes we made... Today I'm bringing you something much cuter, Rudolf the red nosed reindeer, made in the same way as the snowflakes.
We started in a similar way to the snowflakes, my husband began by drilling small holes into some left over dowel and inserting the wire to make a reindeer shape as seen in the photo below. My daughter also made one with an old cork and some wooden skewers as you will see in the last photo.
After getting the basic shape I then wrapped the entire reindeer in brown wool until every last piece was covered. I managed to use one continuous piece of wool again as this is easier to fasten off the end with a spot of glue.
To finish I toyed with the idea of a small, shiny red button or bead for his nose but in the end we opted for a little red pom pom and a quick spray of glitter.
He makes a very cute addition to our festive decorations this year, my daughter absolutely loves him and has made one of her own. She decided to paint her reindeer instead of wrapping him in wool.
And then there were two...
We started in a similar way to the snowflakes, my husband began by drilling small holes into some left over dowel and inserting the wire to make a reindeer shape as seen in the photo below. My daughter also made one with an old cork and some wooden skewers as you will see in the last photo.
After getting the basic shape I then wrapped the entire reindeer in brown wool until every last piece was covered. I managed to use one continuous piece of wool again as this is easier to fasten off the end with a spot of glue.
To finish I toyed with the idea of a small, shiny red button or bead for his nose but in the end we opted for a little red pom pom and a quick spray of glitter.
He makes a very cute addition to our festive decorations this year, my daughter absolutely loves him and has made one of her own. She decided to paint her reindeer instead of wrapping him in wool.
And then there were two...
Friday, 20 December 2013
Wool Wrapped Wire Snowflakes
Every year we try to make some new decorations for our tree, this year we have been so busy I'm only just getting around to posting them here. One of my favourite things were the wool wrapped wire snowflakes... so simple but they look so lovely on the tree.
First I made the basic shape of a snowflake with wire, any wire will do as it will be covered, I've just used cheap garden wire. My husband soldered three lengths of wire in the middle to hold them together but it is possible just to wind the wire to get the basic shape. The smaller pieces of wire on each arm are just wrapped around the larger wire, once the wool is added they will fix better in place.
Then it's time to wrap the entire wire snowflake in wool, I used white for snow. I did this in one continuous piece starting from the centre and going down each arm in turn then back to the centre so that it is covered with two layers of wool, before going down the next arm. This made it easier to fix the end of the wool when the snowflake is completely covered with just one spot of glue.
When the wool wrapping is finished your snowflake will look like the photograph above. I decided to add a tiny pearl bead to the end of each wire like a little stopper, adding a spot of glue to hold it on. This not only looks pretty it also covers the wire ends in case it is a little scratchy and helps to hold all the wool in place.
Here is the finished snowflake after a quick spray with glitter spray, ready to have a loop added to hang on the tree. These look gorgeous hanging on the tree, are very simple and quick to make and we think they look quite stylish too.
We would like to take the chance to wish you all a Merry Yule / Christmas from all of us here.
First I made the basic shape of a snowflake with wire, any wire will do as it will be covered, I've just used cheap garden wire. My husband soldered three lengths of wire in the middle to hold them together but it is possible just to wind the wire to get the basic shape. The smaller pieces of wire on each arm are just wrapped around the larger wire, once the wool is added they will fix better in place.
Then it's time to wrap the entire wire snowflake in wool, I used white for snow. I did this in one continuous piece starting from the centre and going down each arm in turn then back to the centre so that it is covered with two layers of wool, before going down the next arm. This made it easier to fix the end of the wool when the snowflake is completely covered with just one spot of glue.
When the wool wrapping is finished your snowflake will look like the photograph above. I decided to add a tiny pearl bead to the end of each wire like a little stopper, adding a spot of glue to hold it on. This not only looks pretty it also covers the wire ends in case it is a little scratchy and helps to hold all the wool in place.
Here is the finished snowflake after a quick spray with glitter spray, ready to have a loop added to hang on the tree. These look gorgeous hanging on the tree, are very simple and quick to make and we think they look quite stylish too.
We would like to take the chance to wish you all a Merry Yule / Christmas from all of us here.
Thursday, 24 October 2013
Pumpkin sun catchers
Just thought I would share this quick Halloween craft with you. If your children are as busy with crafts as mine, it is inevitable that you will have many left over pre cut out sheets of random shapes... I always save these just in case they come in useful and it makes perfect sense to re-use craft items to save money.
This is a left over sparkly, foam sheet with pre cut pumpkins on it. First cut out one of the pumpkin shapes... sounds odd cutting out an already cut out shape but you will need to leave a border around the shape, a bit like a photo frame...see below.
This is our sparkly pumpkin border, which was then stuck down to a piece of orange tissue paper. Our craft sheet was already self adhesive making it very simple. Then cut out the whole shape and it will look like a coloured in pumpkin.
All that's left to do is add your facial features and stick on the window, for some pumpkins we cut out eye, nose and mouth shapes and stuck them on, but in others we just used a marker pen.
These are some of the finished sun catcher pumpkins which can also be fixed around a light source like a jar with a tea light inside to be used after dark.
This is a very thrifty and easy craft for children to do using something that normally gets thrown away. This could be tried with any shapes you have, but if you don't have the craft sheets you can always cut out your own shapes in black card.
This is a left over sparkly, foam sheet with pre cut pumpkins on it. First cut out one of the pumpkin shapes... sounds odd cutting out an already cut out shape but you will need to leave a border around the shape, a bit like a photo frame...see below.
This is our sparkly pumpkin border, which was then stuck down to a piece of orange tissue paper. Our craft sheet was already self adhesive making it very simple. Then cut out the whole shape and it will look like a coloured in pumpkin.
All that's left to do is add your facial features and stick on the window, for some pumpkins we cut out eye, nose and mouth shapes and stuck them on, but in others we just used a marker pen.
These are some of the finished sun catcher pumpkins which can also be fixed around a light source like a jar with a tea light inside to be used after dark.
This is a very thrifty and easy craft for children to do using something that normally gets thrown away. This could be tried with any shapes you have, but if you don't have the craft sheets you can always cut out your own shapes in black card.
Subscribe to:
Posts (Atom)