Showing posts with label Samhain. Show all posts

Wednesday, 31 October 2012

Happy Halloween

Just a short post to wish you all a Happy Halloween / Blessed Samhain and show you a few of the things we have been doing. We have brought in our Halloween tree, this is usually made from some spooky looking sticks which the children decorate.


I had to squeeze it on the window ledge between our ginger and turmeric plants that we have been growing. It looked a little sparse so we thought we would make a few extra decorations, one of these was a twig star.


As you can see in the photograph these are very easy to make, I have used some small twigs saved from when my husband pruned a shrub recently and copper wire. Any wire or string would do, I have used copper wire as we seem to have loads of it about, my husband saves it from broken appliances to use in craft projects. If you are interested in salvaging your own copper wire you can read about it at the bottom of this post.


The twigs are just tied in the shape of a star and hung on a piece of thread onto the Halloween tree. We also made some ghostly cupcakes.... my daughter thought they looked really cute. We added blueberries to our cake mixture to represent 'eye of newt' and desiccated coconut for 'bat toe nail clippings'. The ghost shape is just formed from icing. Very tasty.


We have been really busy and my husband has been doing some crafts too for Mexico's day of the dead (Día de los Muertos),  If you would like to see his sugar skulls, cupcakes and pumpkins you can read here. They look really cool.


Friday, 26 October 2012

Very Large Cobweb

With Halloween / Samhain approaching fast the children have been decorating the house to give it a spooky feel and a few new crafty things were needed. A couple of years ago we made small woven cobwebs with conker spiders ( see here) but they didn't survive this year so we decided to make some more on a much bigger scale.


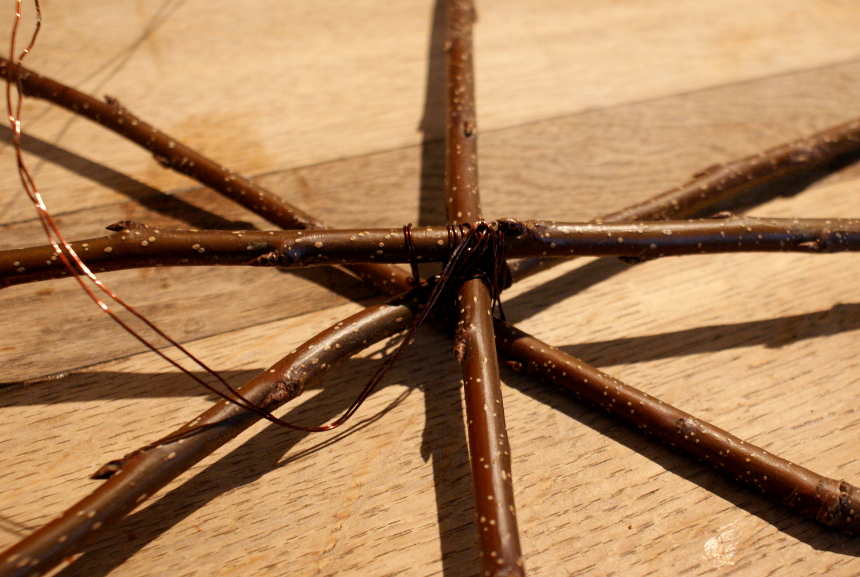
My husband had been pruning back a couple of trees recently, so we collected some straight sticks that he had put aside to use as bean canes next year. They were laid out to give the best shape for a web, we used four sticks and fixed them together in the middle.


We have used wire for this but any kind of string or wool would do as long as it was fixed quite firmly.


As you can see in the photograph above my daughter tested them for sturdiness. We then chose some old wispy wool from the craft cupboard to make the web.


We wound the wool around in a web style pattern trying to leave equal gaps all the way to the edge of the sticks. To help the wool stay in place it has been wrapped around the stick a couple of times and we have taken advantage of little buds and the natural pieces that stick out.


Here is the end result... a very large cobweb. The size is only limited by the length of the sticks you have available.


 Complete with spider ready to scare people.


Wednesday, 26 October 2011

Halloween Paper Banner

Halloween / Samhain is almost upon us, it is one of my favourite holidays and it always ends up the one I have the least preparation time for, with it being exam season. Every year I say I will make fabric banners so that we can re use them but time just runs out, so this year I have made an easy paper banner.


This is one of many dictionaries we have in the house, it is old, battered and broken with many missing pages. It was only fit for the recycling bin really but I am always reluctant to bin things that may have other uses, so I have been using it for crafts. Making gift boxes, paper flowers, for drawing and painting on in an altered page style, journalling and mixed media art and herb labels to name a few things, and now this banner...


First you will need to ready your printer and find a font for your spooky writing, then just print the letters out onto your old pages. The above pages were just used as test sheets to get the printed letters in the right place and to work out the size of the flag, once you are happy, mark and cut out the shape of the flag. I decided to age the paper to give it a spooky vintage feel by dabbing a used tea bag around the edges of the flags.


As you can see above the tea bag leaves an old brown mark, good for making treasure maps too. Then fold the top over a piece of wool or string and glue down, I have used a glue stick here as it is just paper.


That's it... one completed banner, just hang it up. You can really go to town here if you want to, as long as the printer will print on your old paper you could print in colours or spooky pictures.


My husband also made a banner making the lettering look a little spookier than mine as you can see above. He has printed out the letters with added cobwebs, bat wings, ghosts and some kind of splatter effect.


This is a close up of one of his pages, we decided to make these flags a slightly different shape to the first ones but they are fastened to the wool in the same manner.


 This is what both banners look like on the wall, it should enlarge if you click on it. This is an easy paper craft all letters and pictures could be painted or drawn on if you have no printer. It is also very easy for small children to paint their own banner for a Halloween party centre piece and hang spooky things on it.

Thursday, 28 October 2010

Spider webs for Halloween


 Halloween / Samhain is one of my favourite holidays, I love how spooky the house looks with broomsticks propped up by the front door and witches hats hanging on the hat pegs in the hallway. All cobwebs in the house get a reprieve for a few days and the smell of pumpkin lanterns wafts through every room.

    The children have been really busy crafting scary things for Halloween, we have had to find crafts suitable for a 2 year old to join in because she absolutely loves everything crafty the messier the better. Yesterday we made cobwebs with great, big hairy spiders in them. Do you think they look spooky or just rather cute?


    We have used conkers to hold the wooden skewers in place as we have many hanging around thanks to our Autumn collecting, but you could also use large crafting polystyrene balls, clay or indeed anything round you can find. Then the conker was covered in glue and rolled in wool that has been cut up very small so that it was all fuzzy. Pipe cleaner legs were added and googly eyes. The web part was very simple to make as you can see, it is easy to wind wool around the skewers. This does tend to slip a bit if played with too much, so some discrete dots of glue would hold this in place if you choose to.


 They are now ready to hang up on the wall to scare people for Halloween. My husband also helped our son to make a PVA glue cobweb. He drew out the web shape in glue on a laminate sheet and left it to dry overnight. Once dry it could be peeled off the laminate sheet, and stuck on a window. The thinner you can get the web the better here as it tends to spread out a little, but it looks very effective.